You sit through hours of meetings each week, and critical details slip through the cracks. Someone missed a key decision. A team member needs to review action items. A participant with hearing impairment struggles to follow along. Microsoft Teams live transcription solves these problems by converting spoken words into real-time text that everyone can read during the meeting and reference later.
The feature works directly within Teams meetings and requires minimal setup. Admins configure transcription policies once, and meeting organizers can activate the feature with a single click. Teams automatically generates a searchable transcript that captures participant names, timestamps, and spoken content.
This guide walks you through the complete process. You’ll learn how to enable transcription policies in the Teams Admin Center, start live transcription during meetings, and download transcripts for your records. We’ll also cover when you might need professional CART services for complex scenarios that require higher accuracy or specialized interpretation support.
Prerequisites for Microsoft Teams transcription
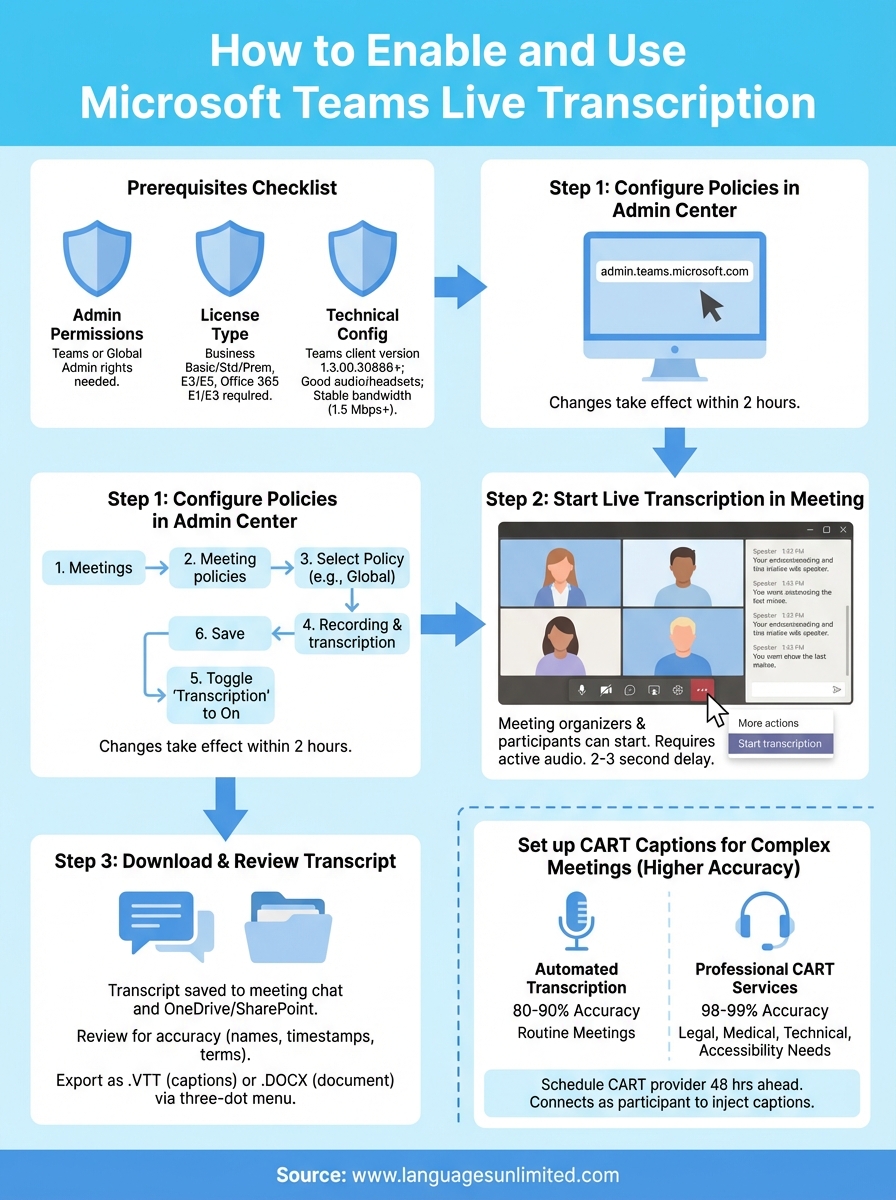
You need to verify several requirements before you can enable microsoft teams live transcription in your organization. Your administrative access level, license type, and meeting configuration all determine whether the feature will function correctly. Missing any of these prerequisites blocks transcription from working, even if you follow the configuration steps perfectly.
Admin permissions and roles
Your organization requires at least one person with Teams Administrator or Global Administrator rights to enable transcription policies. Standard users cannot access the Teams Admin Center where these policies live, regardless of their meeting organizer status.
If you don’t have admin access, contact your IT department or the person who manages your Microsoft 365 environment. You’ll need them to either grant you temporary admin privileges or configure the transcription settings on your behalf. Teams service administrators can also manage these policies, giving you flexibility in who handles the setup process.
License requirements
Microsoft includes transcription features in specific license tiers. Your organization must have one of the following subscriptions for each user who will access transcripts:
| License Type | Transcription Access |
|---|---|
| Microsoft 365 Business Basic | Yes |
| Microsoft 365 Business Standard | Yes |
| Microsoft 365 Business Premium | Yes |
| Microsoft 365 E3 | Yes |
| Microsoft 365 E5 | Yes |
| Office 365 E1 | Yes |
| Office 365 E3 | Yes |
The feature works for both meeting organizers and participants, but everyone needs a valid license. Users with free Teams accounts or licenses not listed above cannot access live transcription or download transcript files after meetings end.
Technical and meeting configuration
Your Teams client must run version 1.3.00.30866 or later for transcription to function properly. You can verify your version by clicking your profile picture in Teams, selecting "About," and checking the version number displayed.
Browser-based Teams users need Microsoft Edge or Google Chrome for the best transcription experience. Firefox and Safari support basic meeting functions but may not display transcripts correctly or allow downloads.
Transcription only works in scheduled meetings and Meet Now sessions. It does not function in channel meetings or one-on-one calls.
Audio quality directly impacts transcription accuracy. Participants should use headsets or quality microphones rather than built-in laptop speakers. Background noise, multiple people speaking simultaneously, and poor internet connections all reduce the system’s ability to capture words correctly. Your organization’s network bandwidth should support at least 1.5 Mbps upload and download speeds per participant for smooth transcription performance.
Step 1. Configure policies in the Admin Center
Your organization’s transcription settings live in the Teams Admin Center, where you control who can access microsoft teams live transcription and under what conditions. This configuration happens once at the organizational level, and the policies you set here apply to all meetings going forward. You’ll need your admin credentials before starting this process, as standard users cannot access these controls.
Access the Teams Admin Center
Open your web browser and navigate to admin.teams.microsoft.com. Sign in with your Global Administrator or Teams Administrator account. The dashboard loads with several menu options on the left sidebar.
If you see an error message stating you lack permission, verify that your account has the correct administrator role assigned. You can check this by going to the Microsoft 365 admin center first and reviewing your role assignments under "Active users."
Navigate to transcription policy settings
Click Meetings in the left navigation menu, then select Meeting policies. The system displays a list of all existing policies in your organization, with Global (Org-wide default) appearing at the top.
Select the policy you want to modify. Most organizations start with the Global policy, which applies to all users who don’t have a custom policy assigned. You can also create targeted policies for specific departments or user groups if your organization requires different transcription rules across teams.
Enable live transcription
Scroll down to the Recording & transcription section within your selected policy. Locate the Transcription toggle switch and set it to On. This action enables the live transcription option for all users covered by this policy.
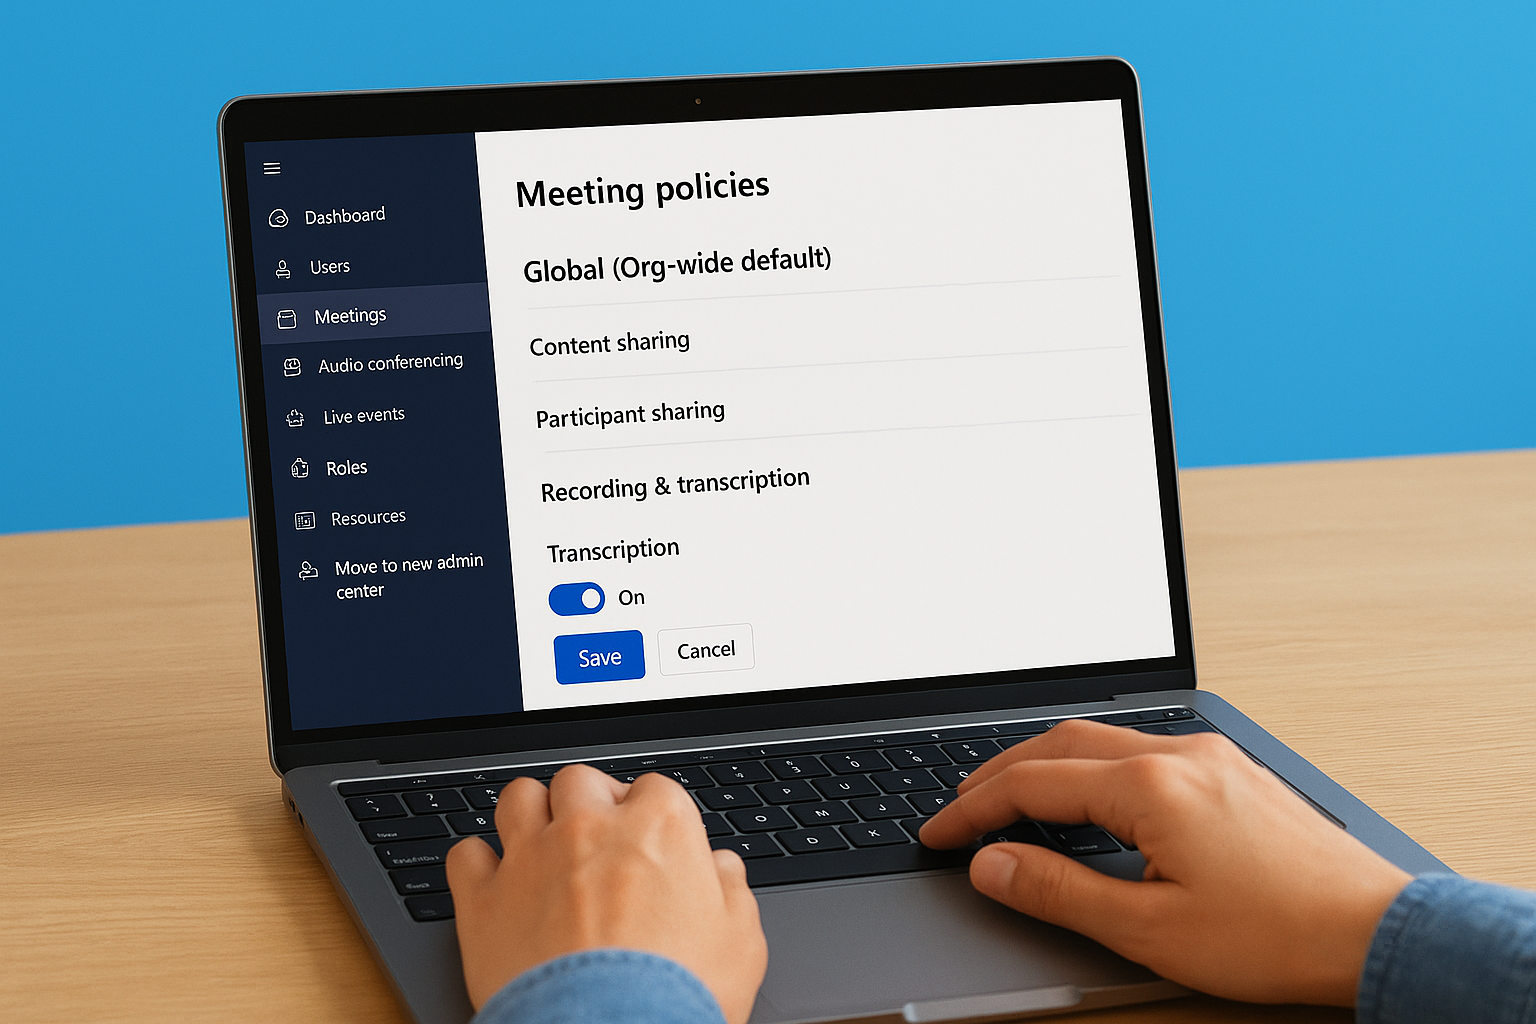
Microsoft automatically saves this setting when you toggle the switch, but you should click "Save" at the bottom of the page to ensure all changes apply correctly.
The changes take effect within two hours for most users, though some organizations report updates appearing within minutes. You can now assign this policy to specific users or groups by returning to the Meeting policies page, selecting your policy, and clicking Manage users to add individuals or groups who should have transcription access enabled.
Step 2. Start live transcription in a meeting
Your admin has enabled the policies, and now you can activate microsoft teams live transcription during any scheduled meeting or Meet Now session. The process takes three clicks and works for both meeting organizers and participants who have the appropriate permissions. You’ll see the transcript appear in real time as people speak, creating an accessible record that everyone in the meeting can follow along with.
Join or create your meeting
Start or join your Teams meeting through the calendar or by clicking a meeting link. Wait until at least one other participant joins before activating transcription, as the feature requires active audio input to function. Your meeting window displays the standard controls bar at the bottom with options for camera, microphone, and screen sharing.
The transcription option appears in the meeting controls regardless of whether you organized the meeting or received an invitation. However, your ability to start transcription depends on the policy settings your admin configured in Step 1.
Activate transcription controls
Click the three-dot menu (More actions) in the meeting controls bar. A dropdown menu appears with various meeting options. Scroll down until you locate Start transcription and click it. Teams immediately begins converting speech to text.
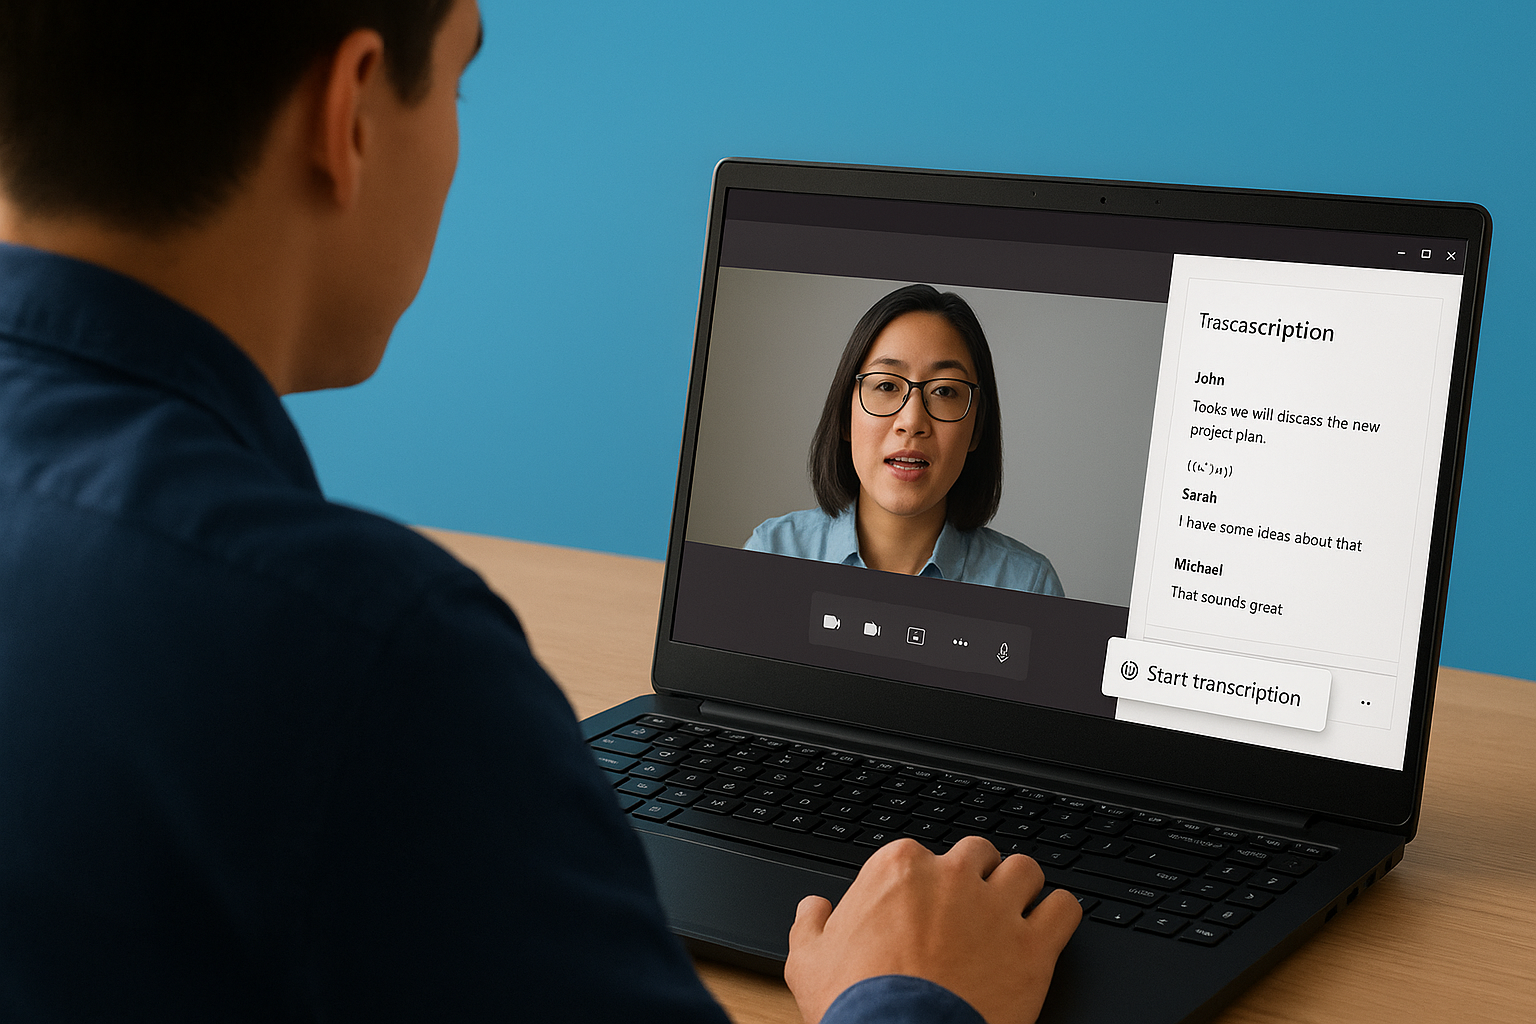
The system processes audio in real time, but you may notice a 2-3 second delay between when someone speaks and when their words appear on screen.
Your transcription panel opens on the right side of the meeting window, showing participant names next to their spoken words. Each entry includes a timestamp that marks when the person spoke, helping you track conversation flow. You can minimize this panel by clicking the arrow icon if you need more screen space for video feeds or shared content.
Monitor transcription accuracy
Check the transcript periodically to verify the system captures speaker names correctly. Teams sometimes assigns words to the wrong person if multiple participants speak simultaneously or if someone’s microphone picks up another person’s voice. Background noise, accents, and technical terminology can reduce accuracy.
If transcription stops working mid-meeting, click the three-dot menu again and select Stop transcription, then restart it. This reset often resolves temporary processing issues caused by network interruptions or audio quality problems.
Step 3. Download and review the transcript
Your meeting ends, and Teams automatically saves the transcript file to your organization’s designated storage location. The system processes the final version within minutes of the meeting conclusion, converting all speech-to-text data into a structured document that preserves speaker identification and timestamps. You can access this file immediately to verify accuracy, extract action items, or share the record with team members who missed the session.
Locate your saved transcript
Navigate to the meeting chat in Teams by opening your calendar and clicking the meeting you just finished. The transcript appears in the chat thread with a file attachment labeled "Transcript" followed by the meeting date and time. Click this file to open the web viewer, which displays the full transcript in your browser.
Alternatively, find the transcript in OneDrive or SharePoint if your organization uses these storage options. The file saves to the meeting organizer’s folder by default, under Recordings > [Meeting Name]. You need appropriate permissions to access transcripts from meetings you didn’t organize, so request access from the organizer if the file doesn’t appear in your storage locations.
Review and verify transcript accuracy
Open the transcript and scan through the speaker names and timestamps to confirm the system captured conversations correctly. Teams formats the transcript with each speaker’s name on a separate line, followed by their words and the exact time they spoke. This structure helps you locate specific discussions or decisions quickly.
microsoft teams live transcription achieves roughly 80-90% accuracy under optimal conditions, but technical terms, accents, and background noise reduce this rate significantly.
Look for obvious errors in technical vocabulary, proper nouns, or industry-specific terms. The system often misinterprets specialized language as common words that sound similar. You can manually edit these mistakes by downloading the transcript as a VTT or DOCX file, making your corrections in a text editor or word processor, and redistributing the updated version to participants.
Export transcript formats
Click the three-dot menu next to the transcript file and select Download. Teams offers two export options: VTT format for video players and accessibility tools, or DOCX format for standard document editing. The DOCX version works best for distributing meeting notes or creating permanent records, while VTT files integrate with video platforms that require synchronized captions.
Store the downloaded transcript in your project management system or shared drive where relevant stakeholders can reference it. Include the meeting date and attendee list in the filename to make future searches easier and maintain clear documentation of who participated in the discussion.
Set up CART captions for complex meetings
Microsoft teams live transcription handles routine meetings effectively, but certain scenarios demand higher accuracy than automated systems can deliver. Legal depositions, medical consultations, academic lectures with technical terminology, and meetings with multiple speakers talking rapidly all benefit from professional CART services (Communication Access Realtime Translation). A trained stenographer listens to your meeting in real time and produces captions with 98-99% accuracy, compared to the 80-90% accuracy of automated transcription. Your organization maintains compliance with accessibility requirements while ensuring every participant can follow along without missing critical information.
When CART outperforms automated transcription
You should consider CART services when your meeting involves specialized vocabulary that automated systems consistently misinterpret. Medical professionals discussing patient care, legal teams reviewing case details, or technical presentations with industry-specific terms all require precision that machine learning cannot yet match. The stenographer understands context and corrects errors in real time, something Teams transcription cannot do.
Meetings with accessibility requirements also benefit from CART. Federal contracts often mandate Section 508 compliance, which requires human-verified captions for official proceedings. Educational institutions providing accommodations for deaf or hard-of-hearing students need the reliability that professional captioners deliver. The cost increases compared to free automated transcription, but you avoid the risk of miscommunication or compliance violations.
Connect a CART provider to Teams
Schedule your CART service with a qualified provider at least 48 hours before your meeting. Your provider needs the meeting topic, anticipated technical terms, and participant names to prepare their dictionary. This preparation step dramatically improves caption accuracy from the meeting’s first minute.
The stenographer joins your Teams meeting as a standard participant but uses specialized software to inject captions into the meeting stream.
Send your meeting link to the CART provider along with any presentation slides or agendas they should review. During the meeting, the professional captioner appears in your participant list and activates closed captions through Teams’ built-in caption display. Participants see the captions at the bottom of their screen, just like they would with automated transcription, but with significantly higher accuracy and proper formatting of technical terms.
Final thoughts on Teams transcription
Microsoft teams live transcription streamlines your meeting documentation and improves accessibility without requiring specialized equipment or third-party software. The built-in feature handles most internal meetings, training sessions, and collaborative discussions where minor transcription errors don’t create significant problems. You can enable it in minutes through the Admin Center and start capturing conversations immediately.
However, accuracy matters when your meetings involve legal proceedings, medical consultations, federal contract discussions, or presentations with complex technical terminology. Professional CART services deliver the precision and compliance that automated systems cannot match, particularly when you need transcripts for official records or accessibility accommodations. Your organization benefits from knowing when free automated transcription suffices and when human expertise becomes necessary.
Languages Unlimited provides professional CART captioning and interpretation services when your Teams meetings require higher accuracy than automated transcription can deliver. Our stenographers handle specialized vocabulary, multiple speakers, and complex content while maintaining 98-99% accuracy throughout your session. Contact our team to discuss your specific meeting requirements and accessibility needs.