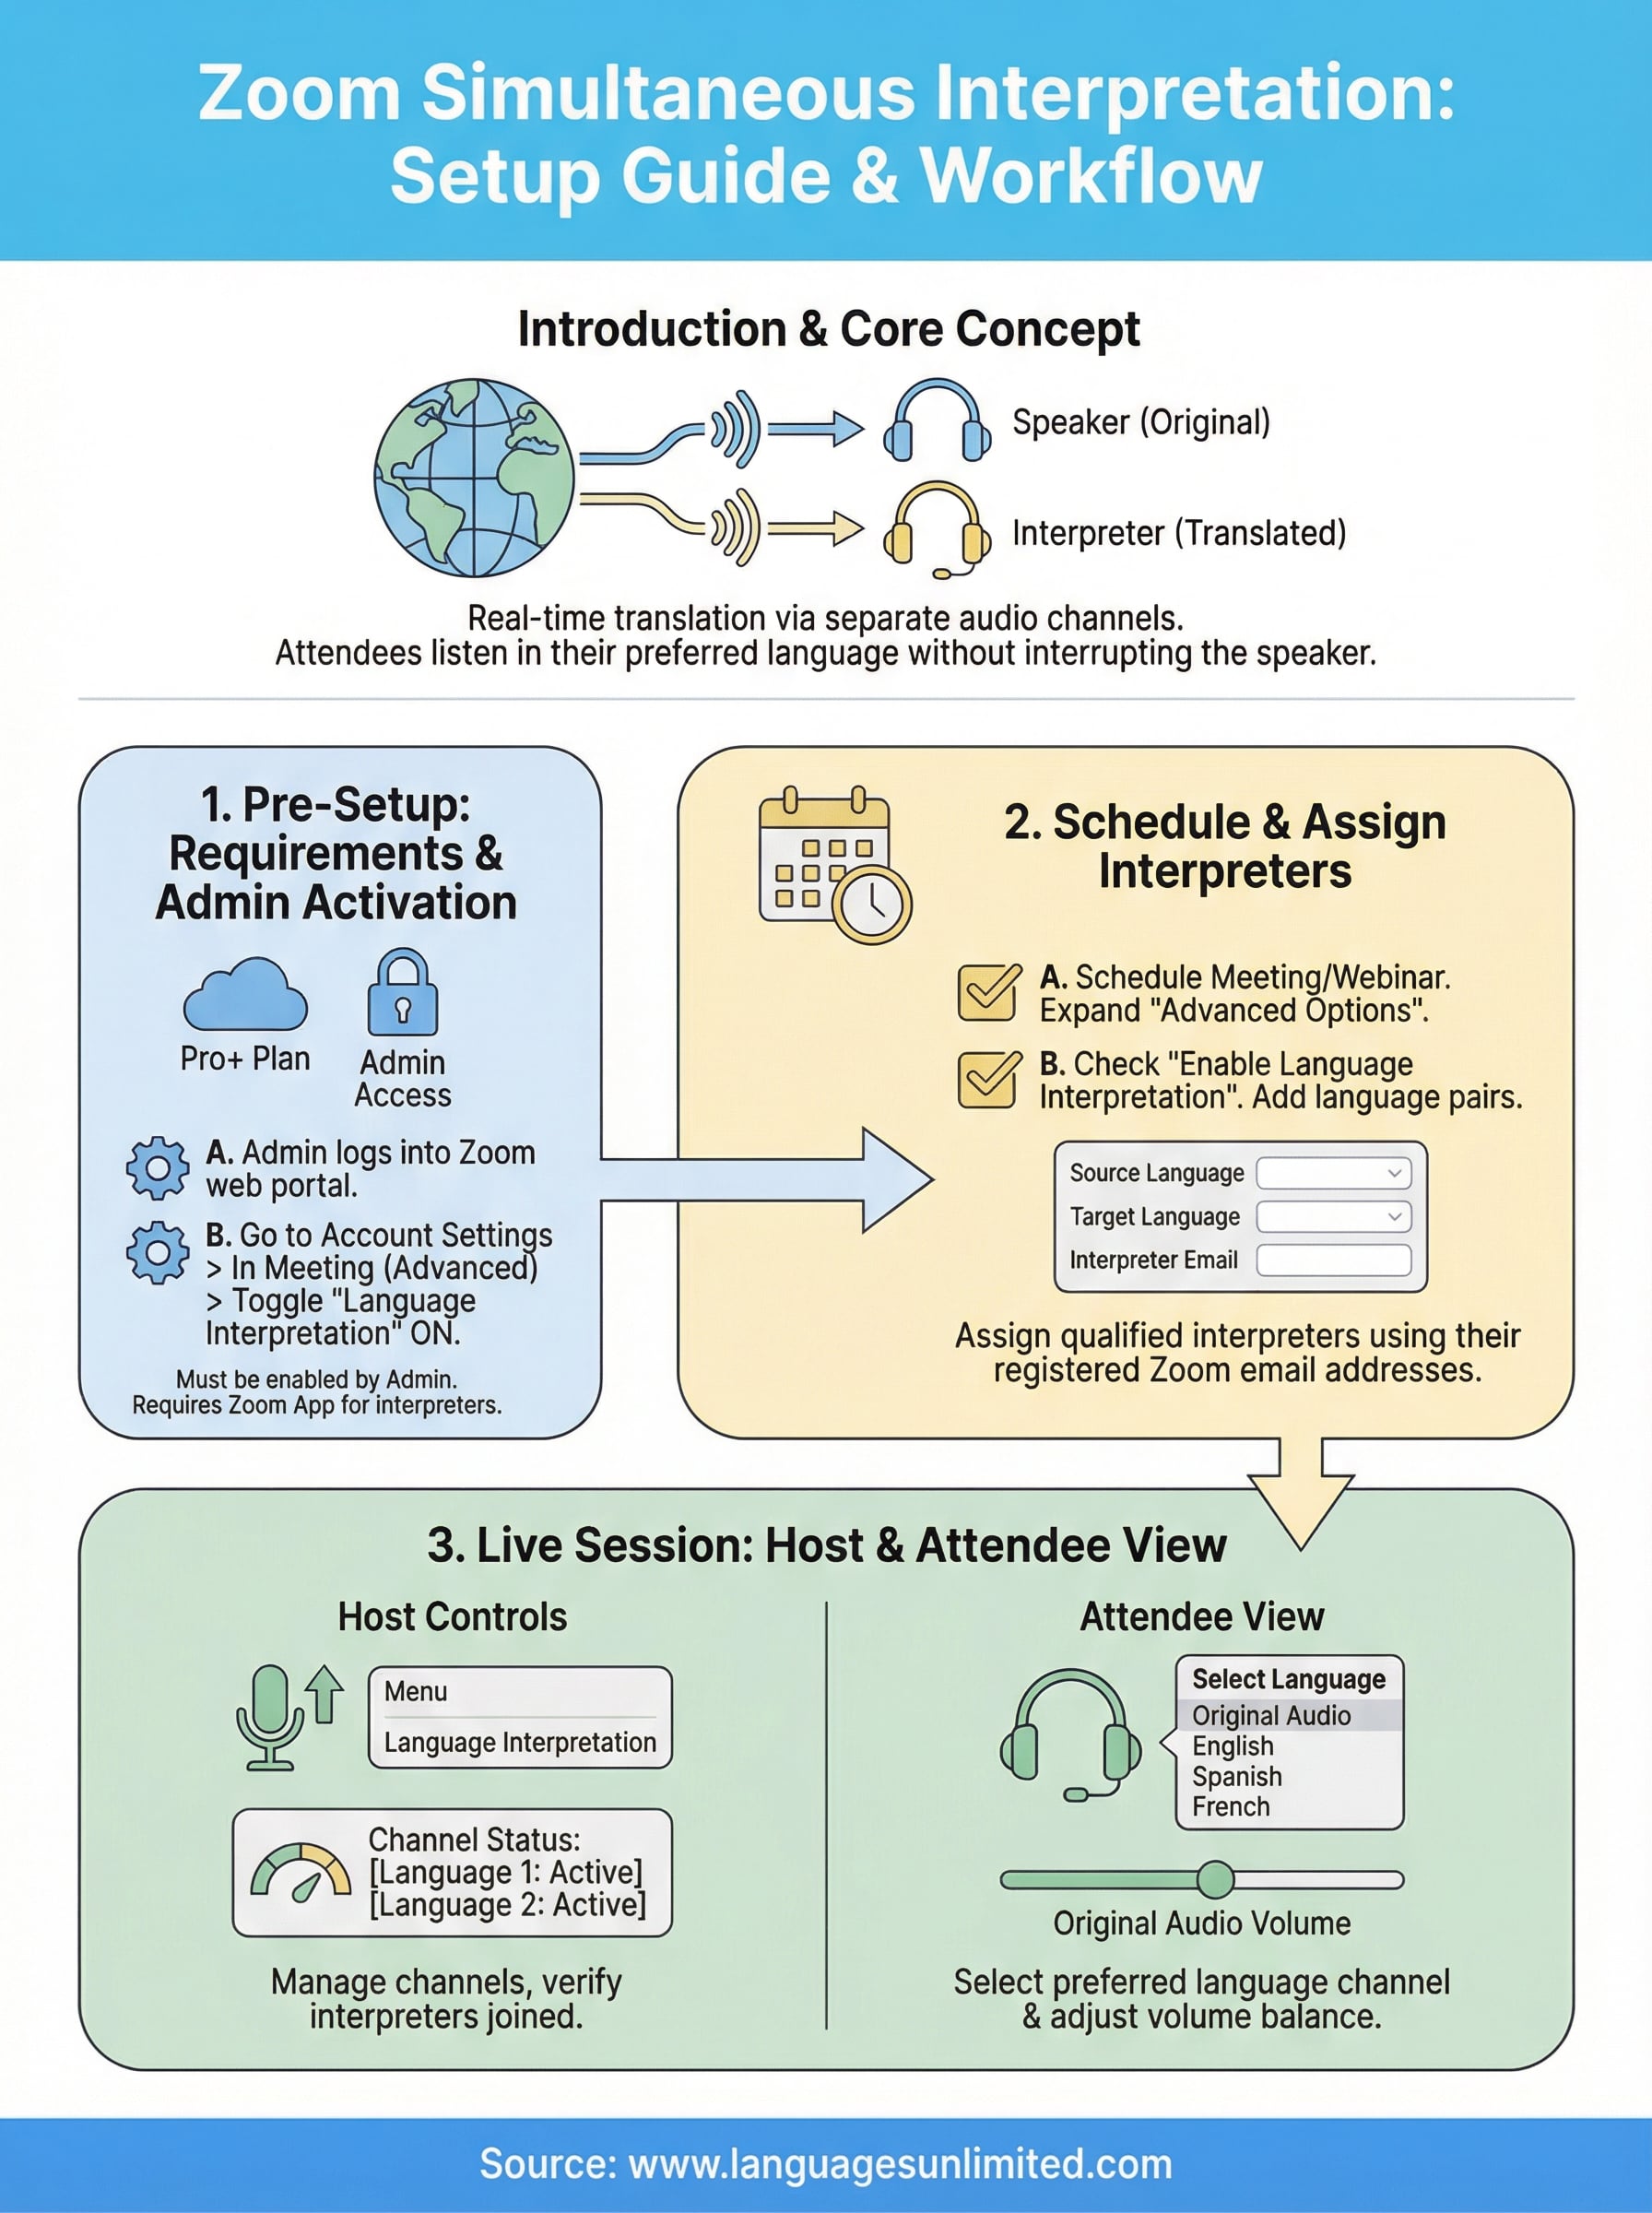
Zoom made multilingual meetings far more accessible when it rolled out the zoom simultaneous interpretation feature, allowing participants to listen to a live interpreter in their preferred language without interrupting the speaker. It’s a powerful tool for organizations that hold multilingual conferences, client meetings, or public events. But getting it up and running isn’t always intuitive, and a few wrong settings can derail the entire experience.
The feature itself handles the technical side: audio channels, language selection, and interpreter assignments. What it doesn’t provide is the interpreter. That’s where a professional language services provider like Languages Unlimited comes in. Since 1994, we’ve supplied qualified simultaneous interpreters for virtual and on-site events across 200+ languages, working with government agencies, healthcare systems, legal teams, and corporations nationwide.
This guide walks you through every step, from enabling the feature in your Zoom account settings to assigning interpreters and managing language channels during a live session. Whether you’re an event organizer, IT admin, or project manager, you’ll have a clear, practical roadmap by the end. Let’s get into the setup process.
What Zoom simultaneous interpretation is and when to use it
Zoom’s simultaneous interpretation feature creates separate audio channels inside a meeting or webinar. Each channel carries a live interpreter’s voice speaking in a specific target language. Participants pick their preferred language from a menu in the Zoom interface, and they hear the interpreter in that channel while the original speaker’s audio drops to a low volume in the background. The result: everyone follows the conversation in real time, in their own language, without the meeting pausing for translation.
How the feature works
When you activate simultaneous interpretation, Zoom lets you add multiple language channels to a single session, with limits that depend on your account type and license tier. You assign one or more interpreters to each channel using their registered email addresses, and Zoom sends them a dedicated join link. Once the session starts, interpreters join through a purpose-built interpreter interface, where they can switch between languages, hand off to a relay interpreter mid-session, and manage their own audio stream independently from the main room.
Attendees never interact with any of this backend setup. They simply tap a "Language" button in their Zoom audio panel, choose their preferred channel, and listen. The interpreter’s voice plays clearly in their ear while the original speaker continues at a reduced volume in the background.
This separation of audio streams is what makes simultaneous interpretation fundamentally different from having someone type translations in the chat or speak over the presenter.
When simultaneous interpretation makes sense
The zoom simultaneous interpretation feature works best when pausing the speaker for translation is impractical or would break the session’s flow entirely. Here are the most common scenarios where it delivers real value:
- International conferences and summits where attendees speak different languages and sessions follow a fixed schedule
- Government and public agency hearings that must serve multilingual communities under legal or regulatory requirements
- Corporate all-hands meetings with globally distributed teams across multiple countries
- Medical and healthcare webinars where clinical accuracy and timing both matter
- Legal proceedings conducted virtually with non-English-speaking participants
- Academic lectures and training programs delivered to multilingual student cohorts
- Live product launches or press events reaching international media or investor audiences
If your audience is monolingual or your meeting involves only a few participants who all share a common language, the feature adds unnecessary complexity. Once you have two or more distinct language groups in the same session, though, simultaneous interpretation is almost always the better choice over any consecutive method.
How it differs from consecutive interpretation
Consecutive interpretation means the speaker pauses at regular intervals while the interpreter translates what was just said. It works well in smaller settings like depositions, medical appointments, and one-on-one interviews. Simultaneous interpretation removes those pauses entirely. The interpreter listens and speaks at the same time, keeping the session running at full speed with no interruptions.
Zoom has no built-in feature support for consecutive interpretation. If you tried to run consecutive interpretation in Zoom without the dedicated channels, your interpreter would have to speak directly into the main room audio, which disrupts pacing and effectively doubles the meeting length. Simultaneous interpretation through Zoom’s dedicated language channels avoids that problem completely, making it the right choice for any session where time efficiency and participant experience both matter.
Before you start: requirements and key limitations
Before you touch a single Zoom setting, make sure your account type and your meeting configuration actually support the zoom simultaneous interpretation feature. Jumping into setup without checking these details first is one of the most common reasons organizers hit a wall on the day of the event.
Account and license requirements
Zoom restricts simultaneous interpretation to specific paid plans. You need at least a Pro account to access language interpretation for meetings, and you need a Zoom Webinars add-on if you plan to run the feature in a webinar format. The feature must also be enabled at the account or group level by an admin, not just a meeting host, which means coordinators without admin access need to loop in IT or their Zoom account administrator before anything else.
If you’re using Zoom through an organization’s managed account, confirm with your IT admin that interpretation is enabled before your event date, not the morning of.
Here’s a quick summary of the core requirements:
| Requirement | Detail |
|---|---|
| Plan type | Pro, Business, Education, or Enterprise |
| Webinar interpretation | Requires Zoom Webinars add-on |
| Who enables it | Account admin or group admin |
| Interpreter invitation | Via registered Zoom email address |
| Language channels | Up to 20 per session |
Key limitations to know before the session
The feature has hard caps on the number of language channels per session. Zoom currently allows up to 20 channels in a single meeting or webinar, which covers most multilingual events. Each interpreter must have a registered Zoom account and be added using the email address tied to that account. You cannot assign an interpreter using a name or phone number alone.
One more constraint worth flagging: interpreters cannot join through a browser or dial in by phone. They must use the Zoom desktop or mobile app to access the interpreter interface. If an interpreter plans to connect from a restricted network or a shared device, run a short tech check the day before. Last-minute login issues are almost always preventable with a quick test session in advance.
Step 1. Enable language interpretation in Zoom settings
Enabling the zoom simultaneous interpretation feature starts at the admin level, not the meeting host level. You won’t find this toggle inside the meeting scheduler itself. Instead, you need to log into the Zoom web portal and turn it on at the account or group settings level before any host on your account can use it.
If you host meetings under an organization’s managed Zoom account, confirm with your IT admin that they complete this step well before your event date, because hosts cannot activate this setting on their own.
How to turn on language interpretation as an admin
Log into your Zoom account at zoom.us using admin credentials. Navigate to Account Management, then select Account Settings. From there, open the Meeting tab and scroll down to the "In Meeting (Advanced)" section. Find the Language Interpretation toggle and switch it on. Zoom will prompt you to confirm the change. Once you confirm, the feature becomes available to all hosts under that account immediately.
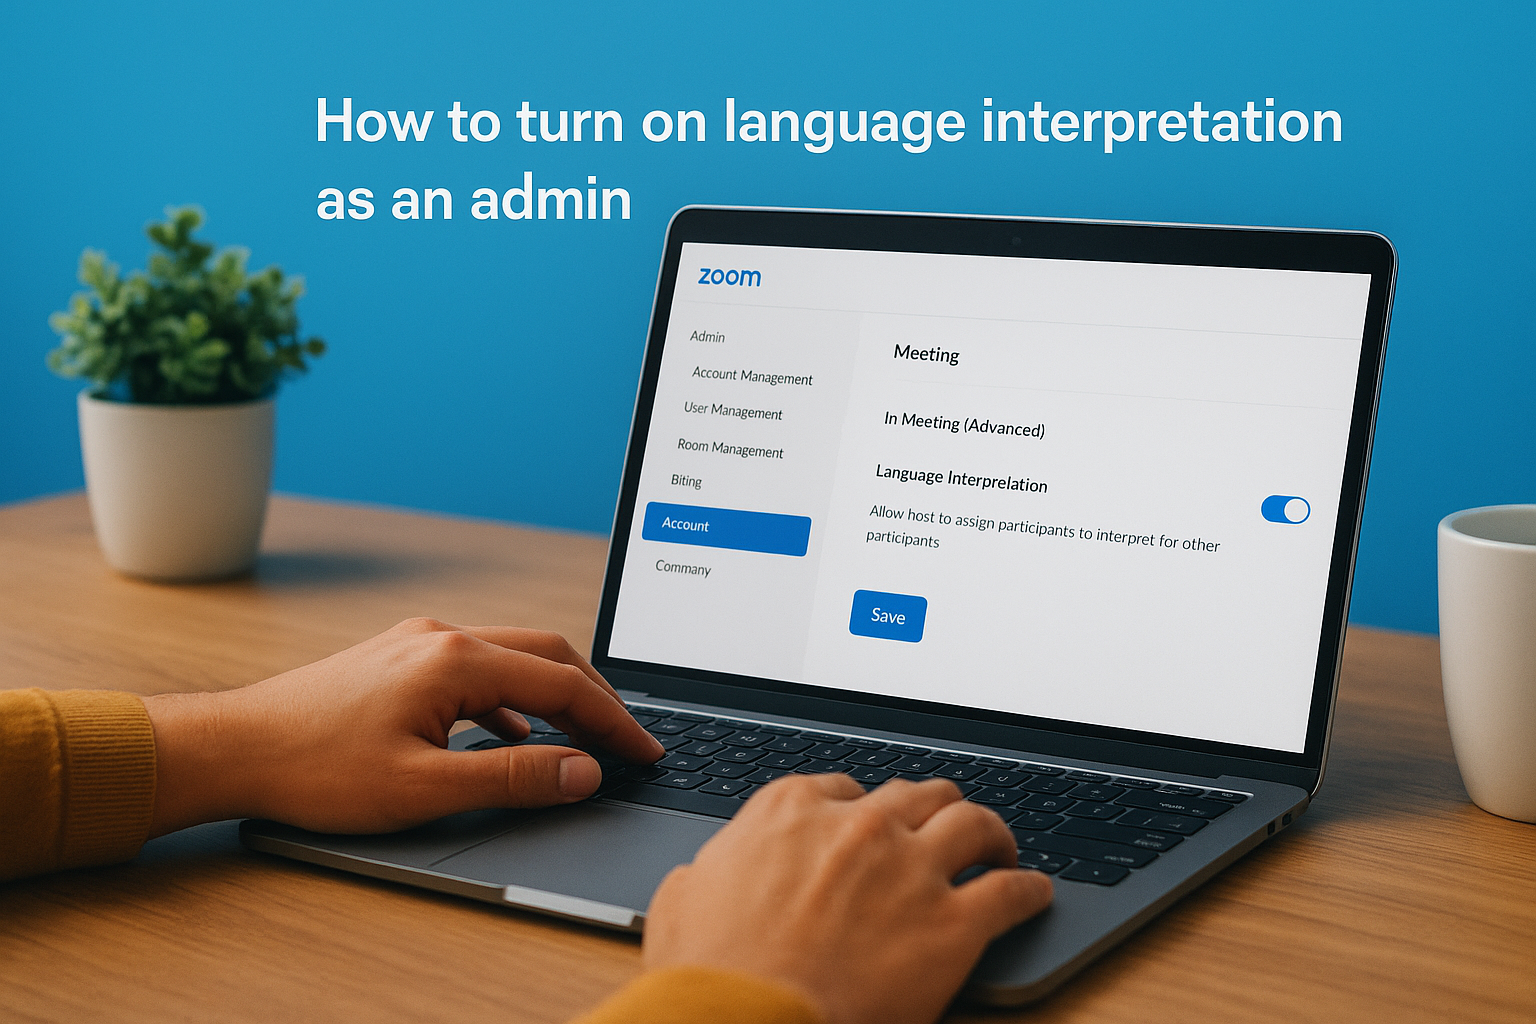
Here are the exact steps in order:
- Go to zoom.us and sign in with admin credentials
- Click Account Management in the left sidebar
- Select Account Settings
- Click the Meeting tab at the top
- Scroll down to In Meeting (Advanced)
- Locate Language Interpretation and toggle it on
- Click Save to confirm the change
If your Zoom account includes multiple user groups, you can also enable interpretation at the group level rather than account-wide. Go to User Management, select Groups, choose the relevant group, and follow the same path through the Meeting tab to apply the setting only to that group.
How to verify the setting is active
Once you save the change, refresh the page and return to the same section to confirm the toggle still shows as enabled. Refreshing is a simple step that catches occasional save errors before they cause problems on the day of your event. You can also ask a meeting host on your account to open the meeting scheduler and check whether the Language Interpretation option appears inside the Advanced Options panel. If it does, the setting is live and your hosts can move on to scheduling a session with interpreters.
Step 2. Schedule your meeting or webinar with interpreters
With the zoom simultaneous interpretation feature now active on your account, you can add interpreters directly inside the meeting or webinar scheduler. This is where you assign each interpreter to a specific language channel using their registered Zoom email address, so collect those addresses from your interpreters before you open the scheduler.
How to add language channels when scheduling
Open the Zoom web portal and click Schedule a Meeting (or Schedule a Webinar if you have the webinar add-on). Fill in your standard meeting details first, then scroll down to the Advanced Options panel and expand it. Check the box labeled "Enable Language Interpretation." Once you check that box, a new section appears where you can add language pairs and assign interpreters by email.
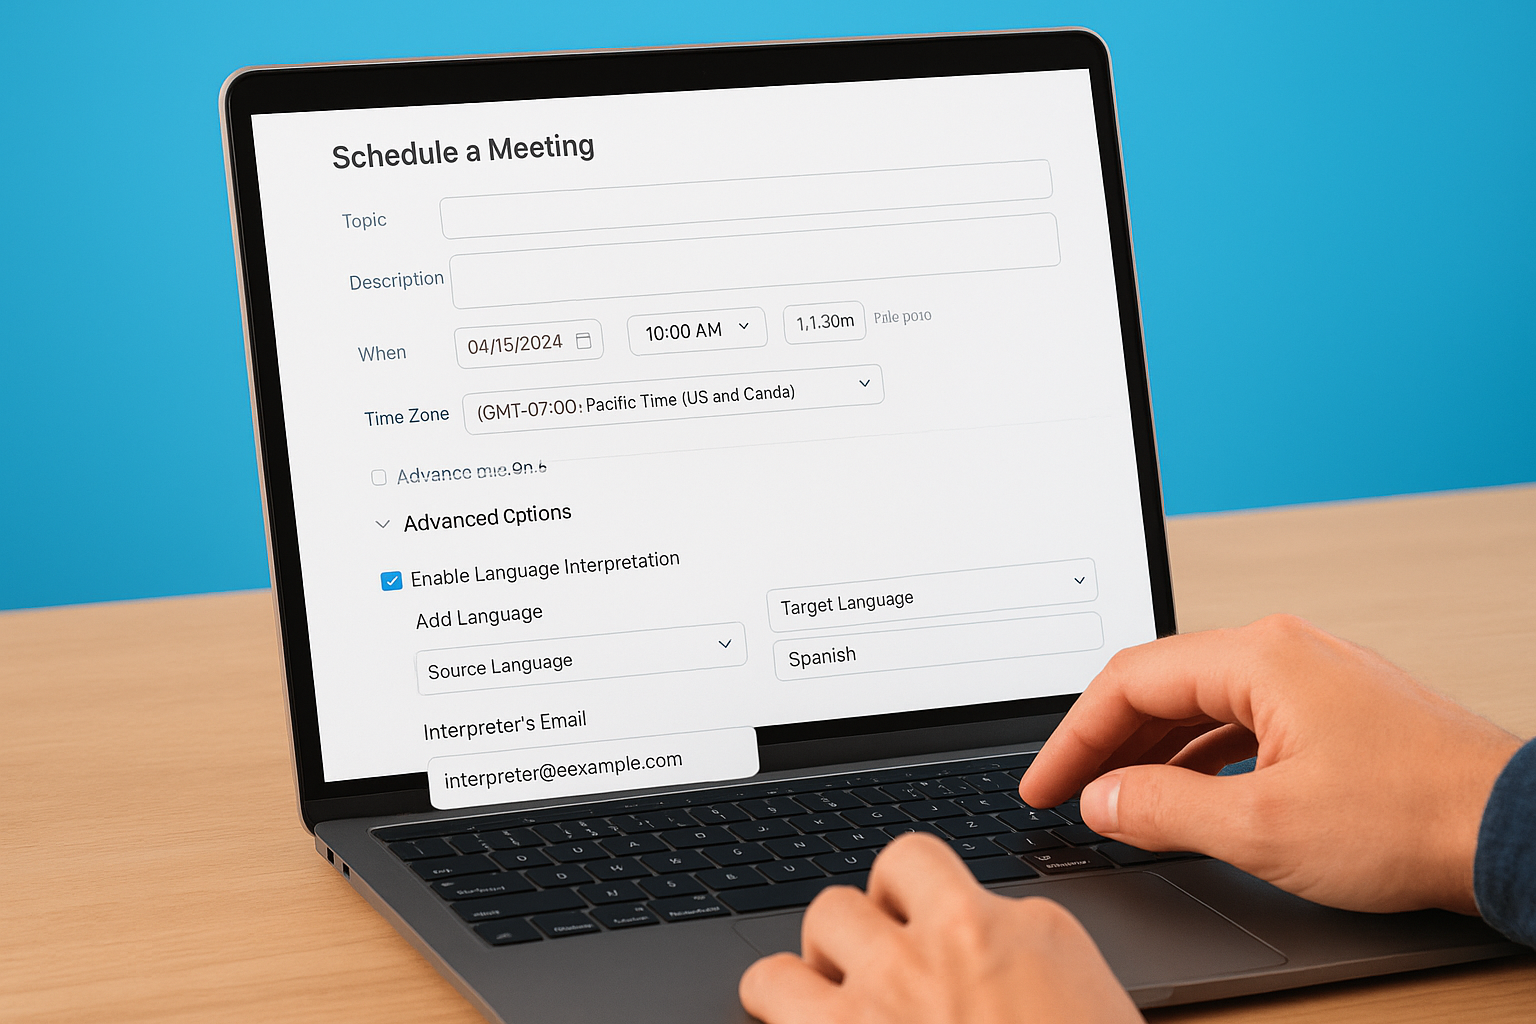
Collect every interpreter’s registered Zoom email address before you open the scheduler. Zoom uses that address to send the interpreter a dedicated join link, and an incorrect address means your interpreter never receives it.
For each language channel, click Add Language and complete these steps in order:
- Select the source language (the language the speaker will use)
- Select the target language (the language the interpreter will speak into)
- Enter the interpreter’s registered Zoom email address
- Click Save to confirm that channel
Repeat this process for every language channel your session requires, then save the meeting or webinar as you normally would.
What to send your interpreters before the session
Once you save the meeting, Zoom automatically emails each assigned interpreter a unique join link that connects them to the interpreter interface, not the standard attendee view. Forward a copy of your own confirmation to each interpreter and ask them to test their dedicated link in a practice session at least 24 hours before the event.
Send your interpreters the following details alongside their link confirmation:
- The meeting date, start time, and time zone in plain written form
- A glossary or agenda covering the session’s subject matter
- Your direct contact number for technical issues on the day
- Written confirmation of their assigned language pair
This preparation significantly reduces last-minute confusion and keeps your multilingual session on schedule.
Step 3. Run the session and help attendees choose a language
Once the session goes live, your job shifts from configuration to coordination. Open the Zoom meeting controls at the bottom of your screen and click the arrow next to the microphone icon. You’ll see a Language Interpretation option appear in the audio menu. From there, you can view the status of each language channel and confirm which interpreters have joined their assigned channels.
What the host sees once the session starts
As host, you have a real-time view of interpreter status inside the meeting controls. If an interpreter hasn’t joined their channel yet, you can see it immediately and contact them through the chat panel before the session gets underway. The zoom simultaneous interpretation feature keeps interpreters in a separate audio stream, so their connection issues won’t bleed into the main room audio. Confirm that every language channel shows an active interpreter before you open the floor to speakers.
If an interpreter drops mid-session, Zoom allows you to reassign the channel or have a backup interpreter join using the same dedicated link sent during scheduling.
How attendees select their language channel
Attendees select their preferred language directly inside the Zoom audio controls panel. The process is straightforward, but many first-time participants miss the button entirely because it only appears once interpretation is active. Walk your audience through these steps at the start of every multilingual session:
- Click the upward arrow next to the microphone icon in the Zoom toolbar
- Select Language Interpretation from the audio options menu
- Choose your preferred language channel from the list
- Adjust the original audio volume slider to your preference (lower means less of the speaker’s original language in the background)
Remind attendees that they can switch channels at any time during the session without disrupting other participants. Some events cover multiple topics with speakers in different languages, so letting people know they can move freely between channels reduces confusion. Paste a short written instruction into the chat at the start of the session so attendees have a reference point if they miss your verbal walkthrough.
You’re ready to host multilingual Zoom sessions
You now have everything you need to enable, configure, and run the zoom simultaneous interpretation feature from start to finish. You know which account types support it, how to activate it at the admin level, how to assign interpreters to language channels, and how to guide attendees through selecting their preferred audio stream on the day of the session.
The setup itself takes minutes once your admin settings are confirmed and your interpreters have their join links in hand. What determines whether your multilingual session actually succeeds is the quality of the interpreters behind each channel. A well-configured Zoom session with underqualified interpreters still fails your audience.
Languages Unlimited has qualified simultaneous interpreters available across 200+ languages for virtual and on-site events. Whether you need one language channel or ten, our team can staff your session with vetted professionals. Contact our team to get started.