Webex makes it possible for meeting hosts to assign interpreters to dedicated language channels so attendees can listen in their preferred language, all in real time. Setting up Webex simultaneous interpretation correctly, though, requires specific steps from both admins and hosts before a single word gets translated. Miss a configuration step, and your multilingual meeting falls apart before it starts.
This guide walks you through the full setup process, from enabling simultaneous interpretation at the admin level to configuring interpreter assignments as a host. You’ll learn how to manage language channels, work with interpreters during live sessions, and handle common issues that come up in Webex Meetings, Webinars, and Personal Rooms.
At Languages Unlimited, we provide professional simultaneous interpreters for virtual meetings, conferences, and events across 200+ languages. We work with organizations that rely on platforms like Webex every day, and proper platform configuration is half the battle. Use this guide to get your Webex environment ready, so your interpreters can focus on what they do best, delivering clear, accurate interpretation to every participant in the room.
How Webex simultaneous interpretation works
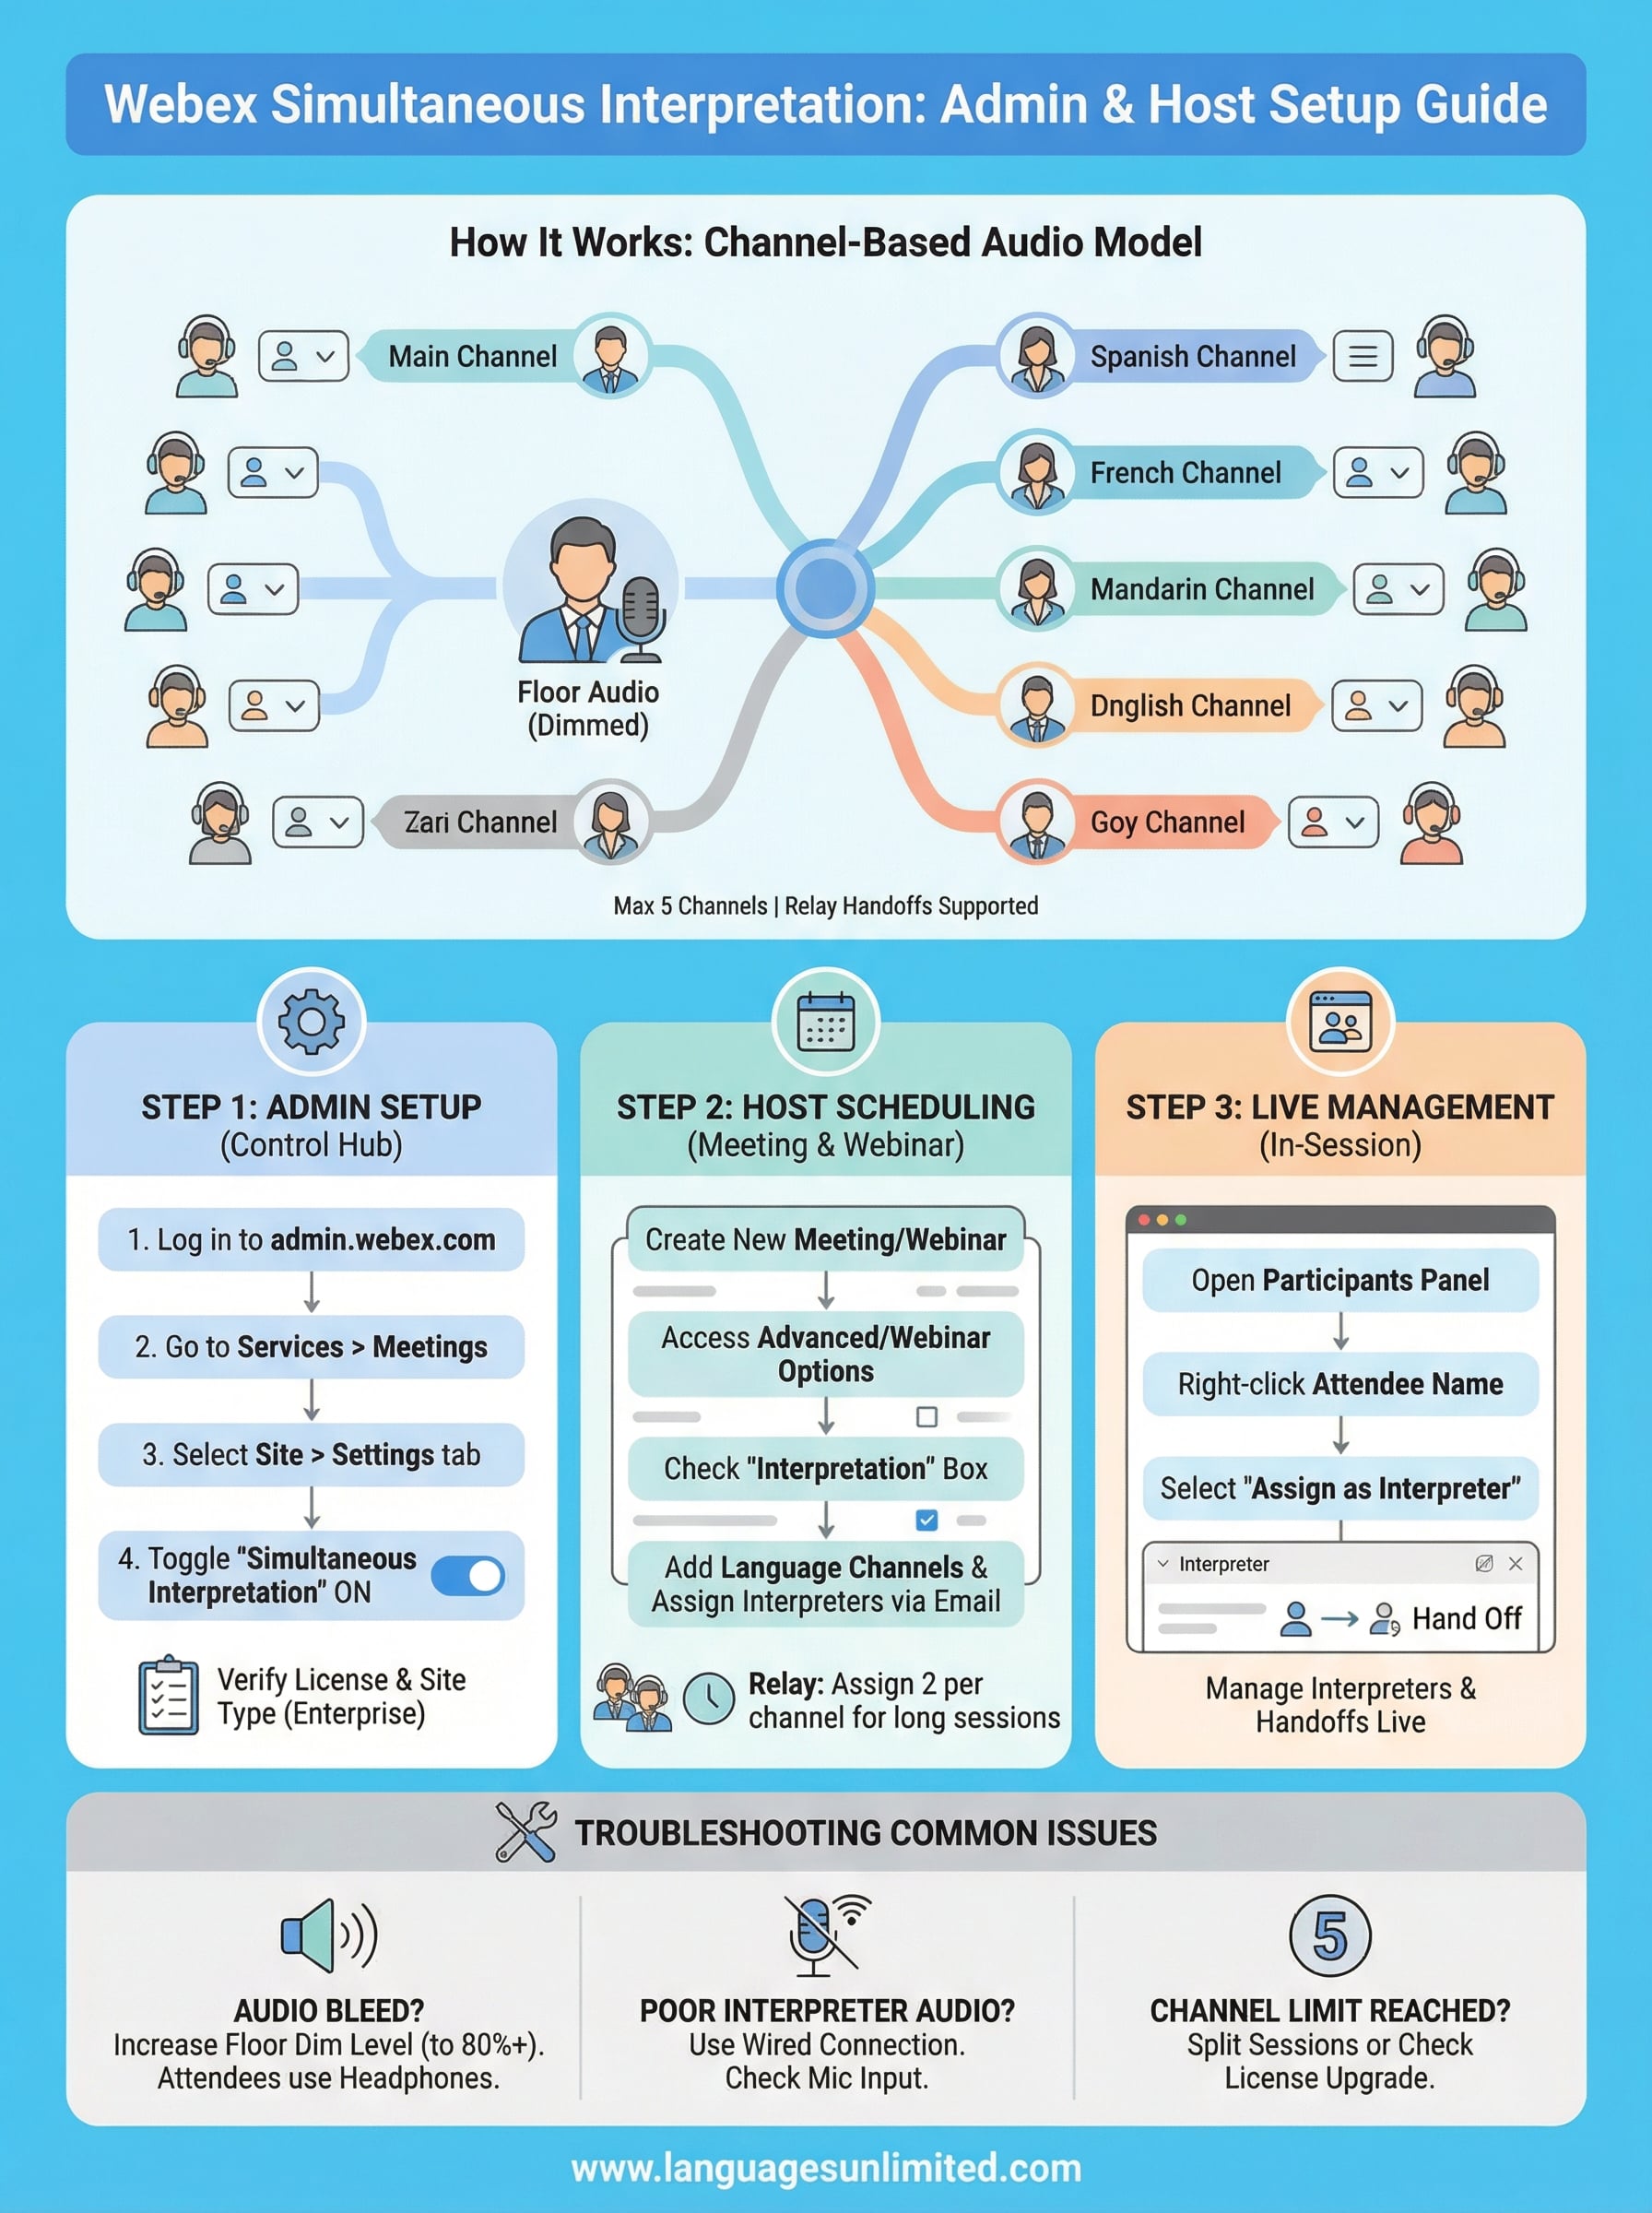
Webex simultaneous interpretation runs on a channel-based audio model that separates the original speaker’s floor audio from the interpreted output. When you activate this feature, Webex creates dedicated language channels inside the meeting. Attendees select their preferred language from a drop-down menu, and they hear the interpreter speaking into that channel instead of the main floor audio. The original floor audio is dimmed in the background by default, so listeners can still detect tone and pacing while the interpreter carries the primary volume.
The channel-based audio model
Each language channel functions as an isolated audio stream within the meeting. Interpreters are assigned to a specific language pair, for example English to Spanish, and they speak into that channel while the meeting proceeds in real time. Webex supports up to five simultaneous language channels in a single session, which covers the majority of multilingual conference setups. Attendees who do not need interpretation simply stay on the floor audio and hear the speaker directly.
The floor audio dimming is set to 80% by default for attendees on a language channel, but hosts can adjust this level before or during the session.
When an interpreter needs a break, a second interpreter can take over on the same channel without any gap for attendees. This relay handoff is built into the workflow, which means you can staff language pairs with two interpreters and rotate them every 20 to 30 minutes, which is the standard practice for maintaining accuracy in long sessions.
Who does what: hosts, admins, and interpreters
Three roles carry specific responsibilities in a Webex interpretation setup. Admins work at the organizational level in Control Hub to unlock the feature for hosts. Hosts configure interpretation when they schedule the meeting and manage interpreters once the session is live. Interpreters receive an invitation by email and join the meeting with a dedicated interpreter panel that gives them control over their active channel.
Here is a quick breakdown of responsibilities:
| Role | Responsibility |
|---|---|
| Admin | Enable interpretation in Control Hub settings |
| Host | Add language channels, assign interpreters at scheduling or during the meeting |
| Interpreter | Accept the interpreter role, activate their channel, and deliver audio output |
Your interpreters do not need a special Webex license. They join as standard participants and Webex promotes them to interpreter status once the host assigns them.
What attendees experience
From the attendee’s perspective, the experience is straightforward. Once the host starts interpretation, a language selector appears at the bottom of the Webex interface. Attendees click it, choose their language, and immediately receive the interpreted audio stream. They can switch channels at any point during the meeting without disrupting anyone else.
Mobile attendees using the Webex app on iOS or Android have access to the same language selector, so your remote participants get the same quality of access as those on desktop.
Step 1. Enable interpretation in Control Hub as an admin
Before any host can add language channels to a meeting, an admin must turn on simultaneous interpretation at the organization level inside Webex Control Hub. This setting is off by default, so hosts will not see the option in their scheduler until you complete the steps below.
Locate the interpretation setting in Control Hub
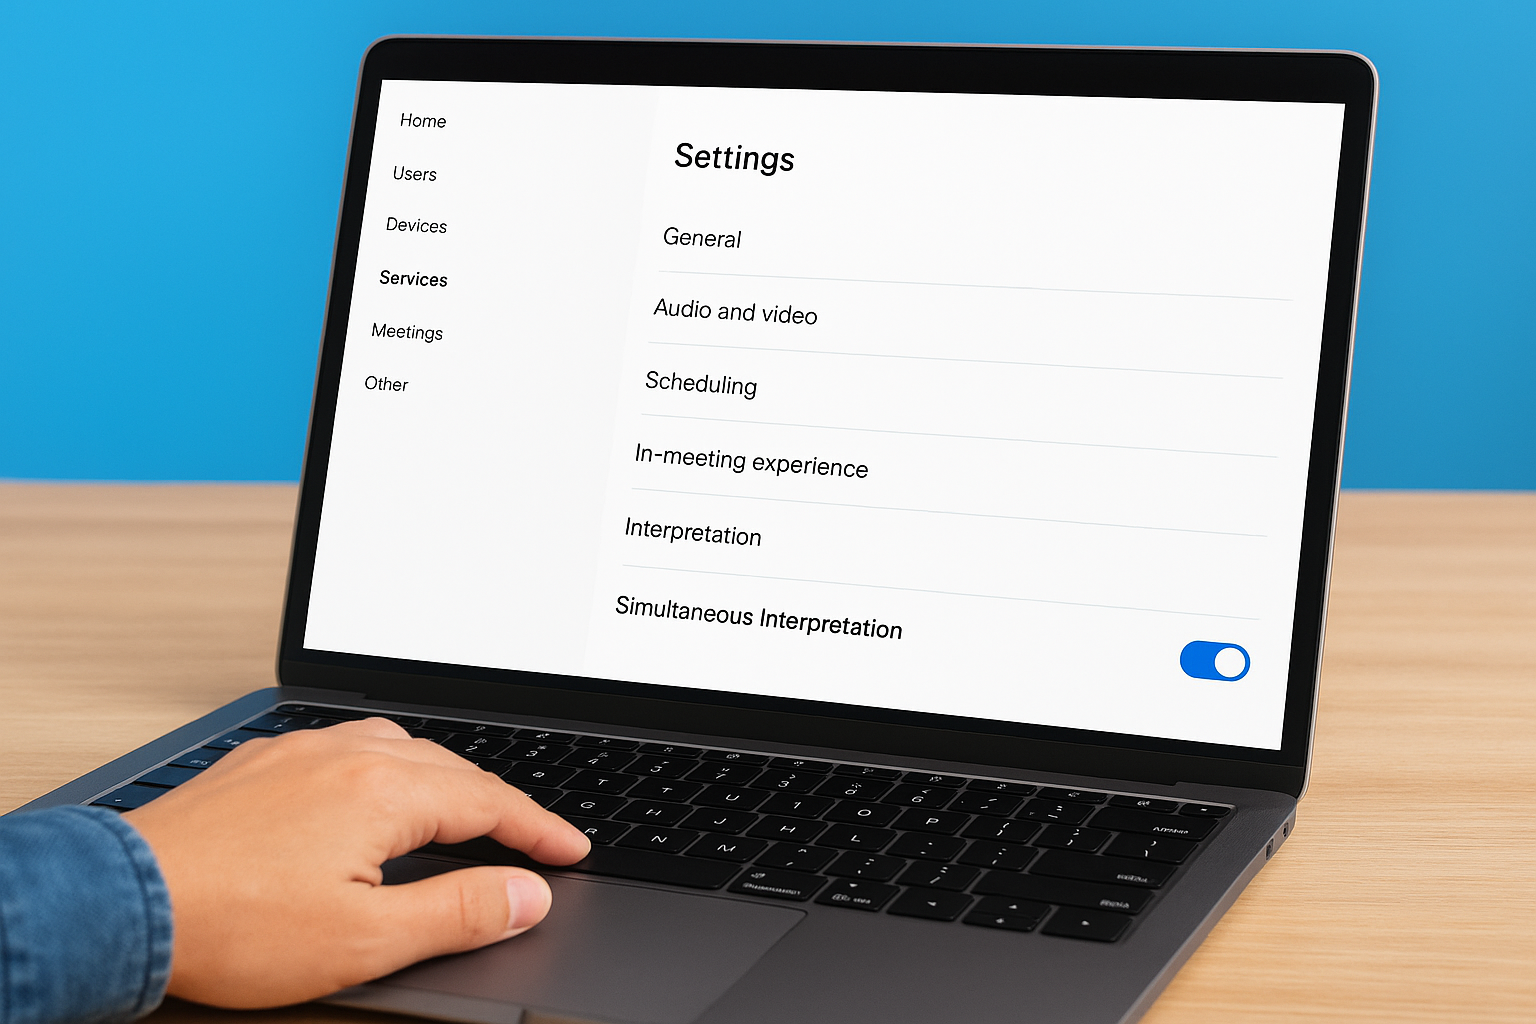
Log in to admin.webex.com with your administrator credentials. From the left navigation panel, go to Services, then select Meetings. Click on the site you want to configure, then open the Settings tab. Scroll down to the Interpretation section and toggle Simultaneous Interpretation to the on position. Save your changes.
This setting applies per Webex site, so if your organization runs multiple sites, you need to enable it on each one separately.
Once you save, the change takes effect within a few minutes. Hosts on that site will immediately see the interpretation configuration option when they schedule a new meeting or webinar.
Verify your license and site type
Not all Webex plans include simultaneous interpretation, so confirm your eligibility before you start. The feature is available on Webex Meetings and Webex Webinars under qualifying enterprise licenses. Personal Room interpretation requires separate confirmation with your Cisco account team.
Use this checklist to confirm your setup is ready:
- Your organization holds a Webex enterprise license that covers interpretation
- You are logged into Control Hub as a full administrator, not a read-only admin
- The Webex site you are configuring runs on a supported site version (Webex Suite or equivalent)
- You have at least one verified host account on the site that will use the feature
If the interpretation toggle is grayed out, your current license tier likely does not include Webex simultaneous interpretation. Contact your Cisco account representative to confirm what your plan covers and whether an upgrade or add-on applies to your organization.
Step 2. Schedule meetings, webinars, and Personal Room sessions
Once your admin has enabled the feature in Control Hub, you configure language channels and assign interpreters at the scheduling stage. The process differs slightly depending on whether you are running a standard meeting, a webinar, or a Personal Room session, so follow the steps that match your session type.
Schedule a standard meeting with interpretation
Open the Webex web scheduler at webex.com and create a new meeting. Scroll to the Advanced Options section and check the Interpretation box. From there, click Add Language and select the language pairs your session requires, for example English and Mandarin, or English and French. You can add up to five language channels per meeting.
Add your interpreters by email address at the scheduling stage so Webex sends them an automatic invitation that includes their interpreter role and channel assignment.
For each language channel, enter the email address of the interpreter responsible for that channel. You can assign one or two interpreters per channel, which lets you set up relay rotation for longer sessions without revisiting the scheduler.
Configure interpretation for webinars
Webex Webinars follow the same scheduling path, but you access the webex simultaneous interpretation settings under the Webinar Options tab instead of Advanced Options. Select Simultaneous Interpretation, add your language channels, and assign interpreters by email. One key difference in webinars is that your interpreters join as panelists automatically, so they have microphone access without a separate promotion step during the event.
Add interpretation to a Personal Room
Personal Room interpretation requires a slightly different approach because Personal Rooms do not have a traditional scheduler. You enable interpretation for a Personal Room session from the Webex user portal under My Personal Room, then select Edit and toggle on interpretation. From there, the language channel setup works the same way as a standard meeting. Keep in mind that this option only appears if your admin confirmed Personal Room interpretation is supported on your license tier, as covered in Step 1.
Step 3. Assign and manage interpreters during the session
Even if you assigned interpreters during scheduling, you can still add, remove, or reassign interpreters while the session is live. Webex gives hosts full control over language channels from the interpreter management panel, accessible during any active meeting or webinar where webex simultaneous interpretation is enabled. Open the participant panel, locate the interpreter’s name, right-click, and select Assign as Interpreter to promote them.
Promote interpreters during a live meeting
Once the meeting starts, open the Participants panel from the toolbar at the bottom of your screen. Find the name of the person you want to assign, right-click their entry, and choose Assign as Interpreter. Webex will prompt you to select the language channel and direction for that interpreter. Confirm the assignment, and the interpreter immediately receives an on-screen notification with their active channel information.

You can assign interpreters this way even if you did not add them during the scheduling step. This is useful when a last-minute interpreter substitution happens or when an unplanned language need comes up at the start of a session.
If an interpreter declines their assignment or does not respond within the session, you can reassign the channel to another participant without pausing the meeting.
Manage handoffs and channel control
For sessions longer than 30 minutes, set up two interpreters per language channel so they can rotate without any interruption to attendees. The outgoing interpreter clicks Hand Off in their interpreter panel, which signals the second interpreter to take over. The transition is seamless on the attendee side because the channel audio continues without a gap.
Hosts can monitor which channels are active and staffed from the interpretation management view during the session. If a channel goes unstaffed because an interpreter drops out, Webex reverts attendees on that channel to the floor audio automatically. Watch your participant list for this, and have a backup interpreter contact ready before long sessions begin so you can fill the gap within seconds.
Troubleshoot limits, audio issues, and common pitfalls
Even a well-configured webex simultaneous interpretation session can run into problems once it goes live. Most issues fall into three categories: audio quality problems, interpreter access failures, and hitting platform limits. Knowing the cause of each problem in advance saves you from scrambling mid-session.
Fix audio bleed and volume problems
Audio bleed happens when attendees on a language channel still hear the floor audio too loudly, which makes it hard to follow the interpreter. The most common cause is the floor audio dim level being set too low. Before the session starts, go to your meeting settings and raise the dim percentage to 80% or higher so the interpreter’s voice takes clear priority. If attendees report echo, ask them to use headphones instead of speakers because open-speaker setups on both ends often create feedback loops in the interpreted audio stream.
If an interpreter’s audio sounds choppy or delayed, ask them to switch from Wi-Fi to a wired ethernet connection and close any bandwidth-heavy applications running in the background.
Interpreter microphone issues are another frequent complaint. Confirm that each interpreter selects the correct audio input in their Webex device settings before the session begins. A quick sound check 10 minutes before go-live catches most hardware mismatches before they affect attendees.
Work around the five-channel limit
Webex caps simultaneous interpretation at five language channels per session. If your event requires more languages, you have two practical options. First, split the event into separate Webex sessions, each covering a different language group, and use a single moderator feed to keep content synchronized across rooms. Second, check whether your Cisco account allows a Webex Webinars license upgrade, since large-scale webinar plans sometimes offer expanded channel configurations for enterprise accounts.
If a language channel disappears mid-session, it usually means the assigned interpreter lost their connection or declined the role. Reassign the channel immediately from the Participants panel using the steps in Step 3, and always have a backup interpreter standing by for critical language pairs.
Next steps
You now have everything you need to configure webex simultaneous interpretation from end to end, whether you are an admin enabling the feature in Control Hub, a host building out language channels in the scheduler, or someone troubleshooting audio problems mid-session. The steps in this guide cover the full workflow so your multilingual meetings run without last-minute scrambling.
Platform setup gets your technical foundation right, but the quality of interpretation still depends on the professionals you put in those channels. Experienced simultaneous interpreters handle fast speakers, technical terminology, and relay handoffs in ways that automated solutions cannot match. If you need certified interpreters across 200+ languages for your next Webex meeting, webinar, or conference, Languages Unlimited can staff your session with qualified professionals who are familiar with virtual platform workflows.
Contact our team to discuss your interpretation needs and get your next multilingual event covered.