Whether you’re transcribing a deposition, a medical consultation, or a recorded training session, knowing how to upload video for transcription can save hours of manual work. But the process isn’t always as simple as dragging a file into a tool and hitting "go." File format, audio clarity, and speaker identification all play a role in how accurate your final transcript turns out.
At Languages Unlimited, transcription is one of our core services, we’ve been converting spoken content from video and audio into precise written text since 1994. Our team of over ten thousand language professionals handles transcription across hundreds of languages, serving legal firms, healthcare providers, government agencies, and businesses nationwide. We know firsthand what separates a usable transcript from one that’s riddled with errors and gaps.
This guide walks you through the best practices for uploading video files for transcription, from preparing your files before upload to choosing the right settings and output format. Whether you’re using an AI-powered platform or working with a professional transcription provider, these steps will help you get cleaner, more accurate results every time.
What you need before you upload a video
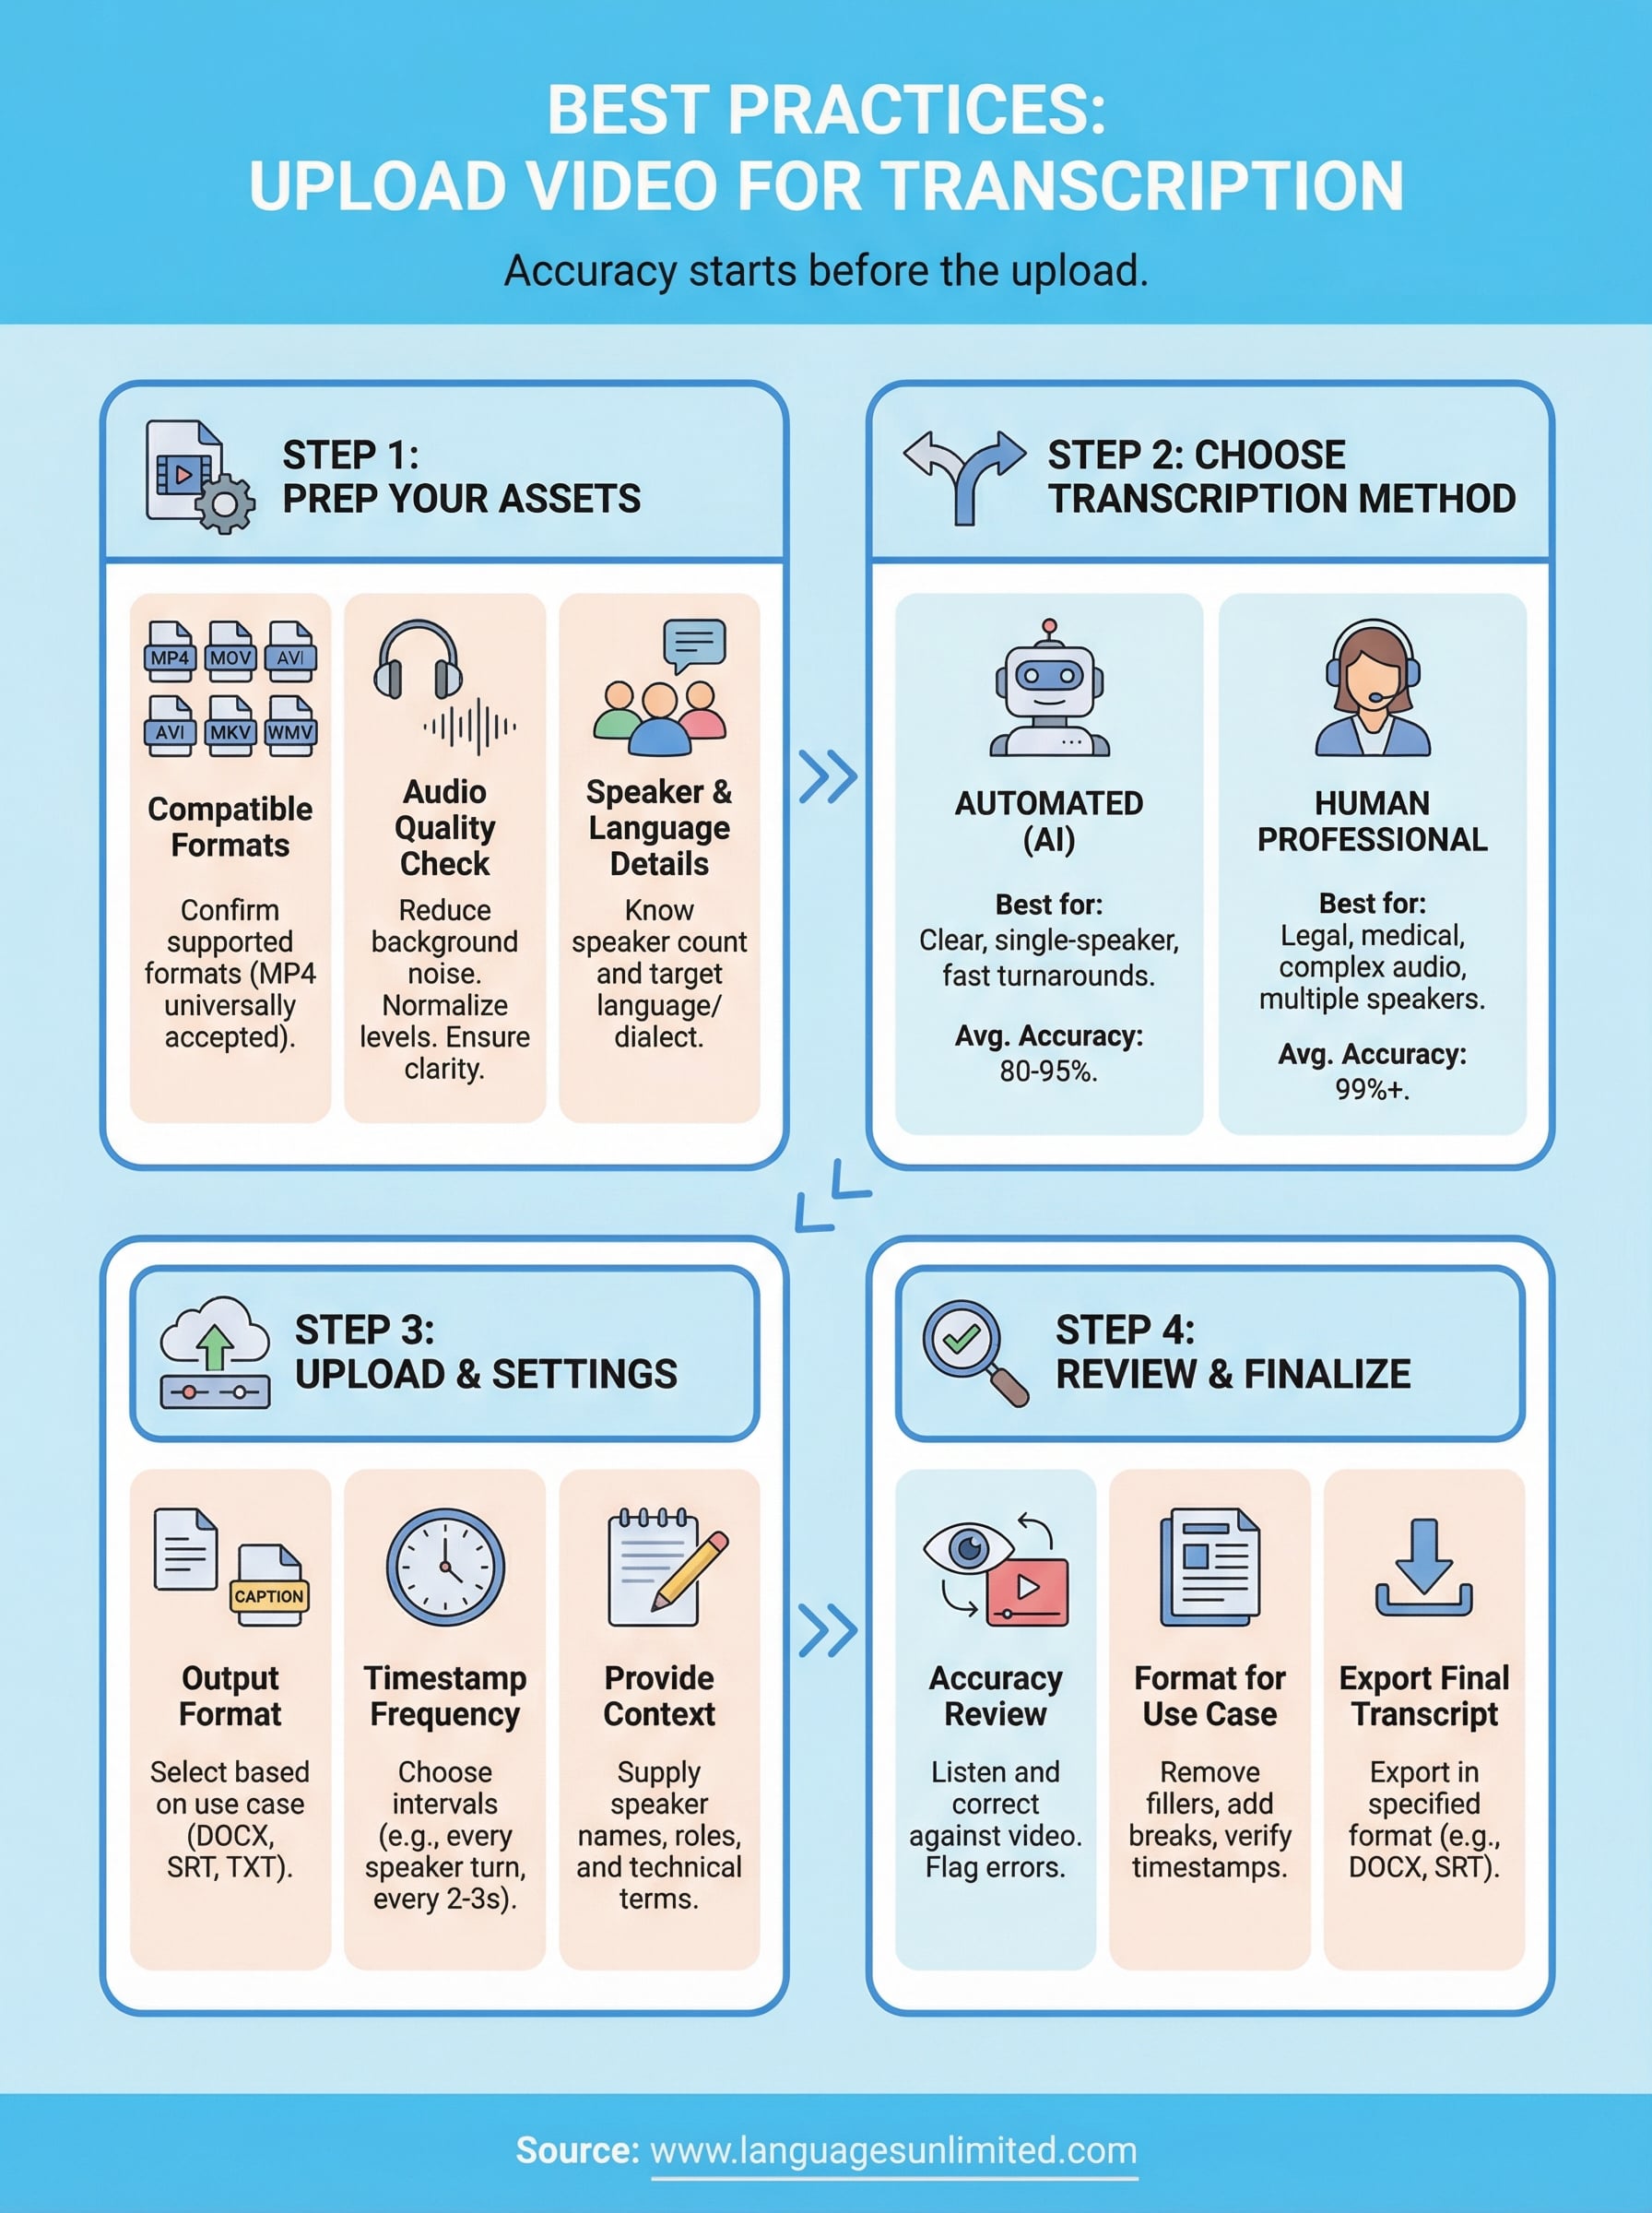
Before you upload video for transcription, a few things need to be in order. Rushing into the upload process without checking your file setup is one of the most common reasons transcripts come back with errors. Taking five minutes to review your assets upfront can save you significant time on the back end.
Compatible file formats
Not all transcription tools or services accept the same file types. Most platforms support common formats like MP4, MOV, AVI, MKV, and WMV, but you should always verify before uploading. If your file is in a less common format, convert it to MP4 first, since it is the most universally accepted container for transcription workflows.
Here are the most widely supported video formats for transcription:
| Format | Extension | Common Source |
|---|---|---|
| MPEG-4 | .mp4 | Most cameras and screen recorders |
| QuickTime | .mov | Apple devices and Final Cut Pro |
| Audio Video Interleave | .avi | Windows-based recordings |
| Matroska | .mkv | Multi-track video files |
| Windows Media Video | .wmv | Windows Media Player exports |
Audio quality requirements
Your transcript is only as accurate as the audio inside your video. Background noise, low volume, and overlapping speakers are the three biggest factors that degrade transcription accuracy, whether you’re using an automated platform or a professional service. Before uploading, play the video back at normal volume and confirm that each speaker is clearly distinguishable.

If your video has poor audio, even the best transcription service will produce a draft that requires extensive manual correction.
A fast quality check is to listen through headphones rather than speakers. You will catch audio issues like hiss, echo, or clipping far more easily that way, and you can decide whether the file needs any audio cleanup before submission.
Speaker and language details
Have your speaker count and target language confirmed before you start the upload process. Knowing how many distinct speakers appear in the video allows the transcription service to apply proper speaker labels, and identifying the language or dialect upfront ensures the right professional or AI model is assigned to your file. Skipping this step often leads to generic output that requires more manual editing to make usable.
Step 1. Pick the right transcription method
The method you choose before you upload video for transcription directly affects your accuracy, turnaround time, and total cost. Automated tools use AI to generate transcripts quickly and at low cost, while professional human transcription delivers higher accuracy for complex or sensitive content. Matching the method to your content type upfront prevents costly rework later.
For legal depositions, medical consultations, or recordings with multiple speakers, human transcription is almost always the better investment.
Automated transcription
Automated transcription works best for clear, single-speaker recordings with minimal background noise and straightforward vocabulary. Most AI platforms process your file within minutes and support common formats like MP4 and MOV. Accuracy rates typically range from 80% to 95%, and they drop significantly when audio quality is poor or speakers talk over each other.
Human transcription
Human transcription is the right choice when accuracy is non-negotiable. Professional transcriptionists handle difficult audio, overlapping speakers, technical terminology, and regional accents far better than any AI tool does. The output requires much less editing before it is ready for legal filings, medical records, or compliance documentation.
| Method | Best For | Avg. Accuracy | Turnaround |
|---|---|---|---|
| Automated | Clear audio, fast needs | 80-95% | Minutes |
| Human | Legal, medical, complex audio | 99%+ | Hours to days |
Step 2. Prepare your video for clean audio
Before you upload video for transcription, your audio needs to be clean enough for the transcription method you chose in Step 1. Even minor audio issues compound quickly, turning a 30-minute recording into hours of manual transcript correction. A small amount of prep work here pays off significantly in your final output quality.
Reduce background noise
Background noise is the single biggest accuracy killer in transcription. If your recording has HVAC hum, traffic, or keyboard clicks, use free tools like Audacity to run a noise reduction pass before you export the file. Extract the audio track, apply the noise reduction filter, then re-mux it back into your video container.
If the noise reduction changes the tone of a speaker’s voice noticeably, dial back the reduction strength to avoid introducing new artifacts.
Normalize audio levels
Inconsistent volume between speakers forces transcriptionists and AI models to misread quieter passages. Run a loudness normalization pass targeting -16 LUFS for stereo recordings, which is the standard broadcast level for spoken content. In Audacity, you do this through Effect > Loudness Normalization. Once your levels are consistent and your noise floor is clean, export the file as MP4 with AAC audio at a minimum of 128 kbps before moving to the upload step.
Step 3. Upload and set transcription options
Once your audio is clean, you are ready to upload video for transcription and configure the settings that shape your final output. Most platforms and professional services offer options that significantly affect the format, accuracy, and usability of the transcript, so do not skip past these settings using the default selections.
Choose your output format and timestamps
Your output format determines how easy the transcript is to use downstream. Select a format that matches your intended use case before you submit your file.
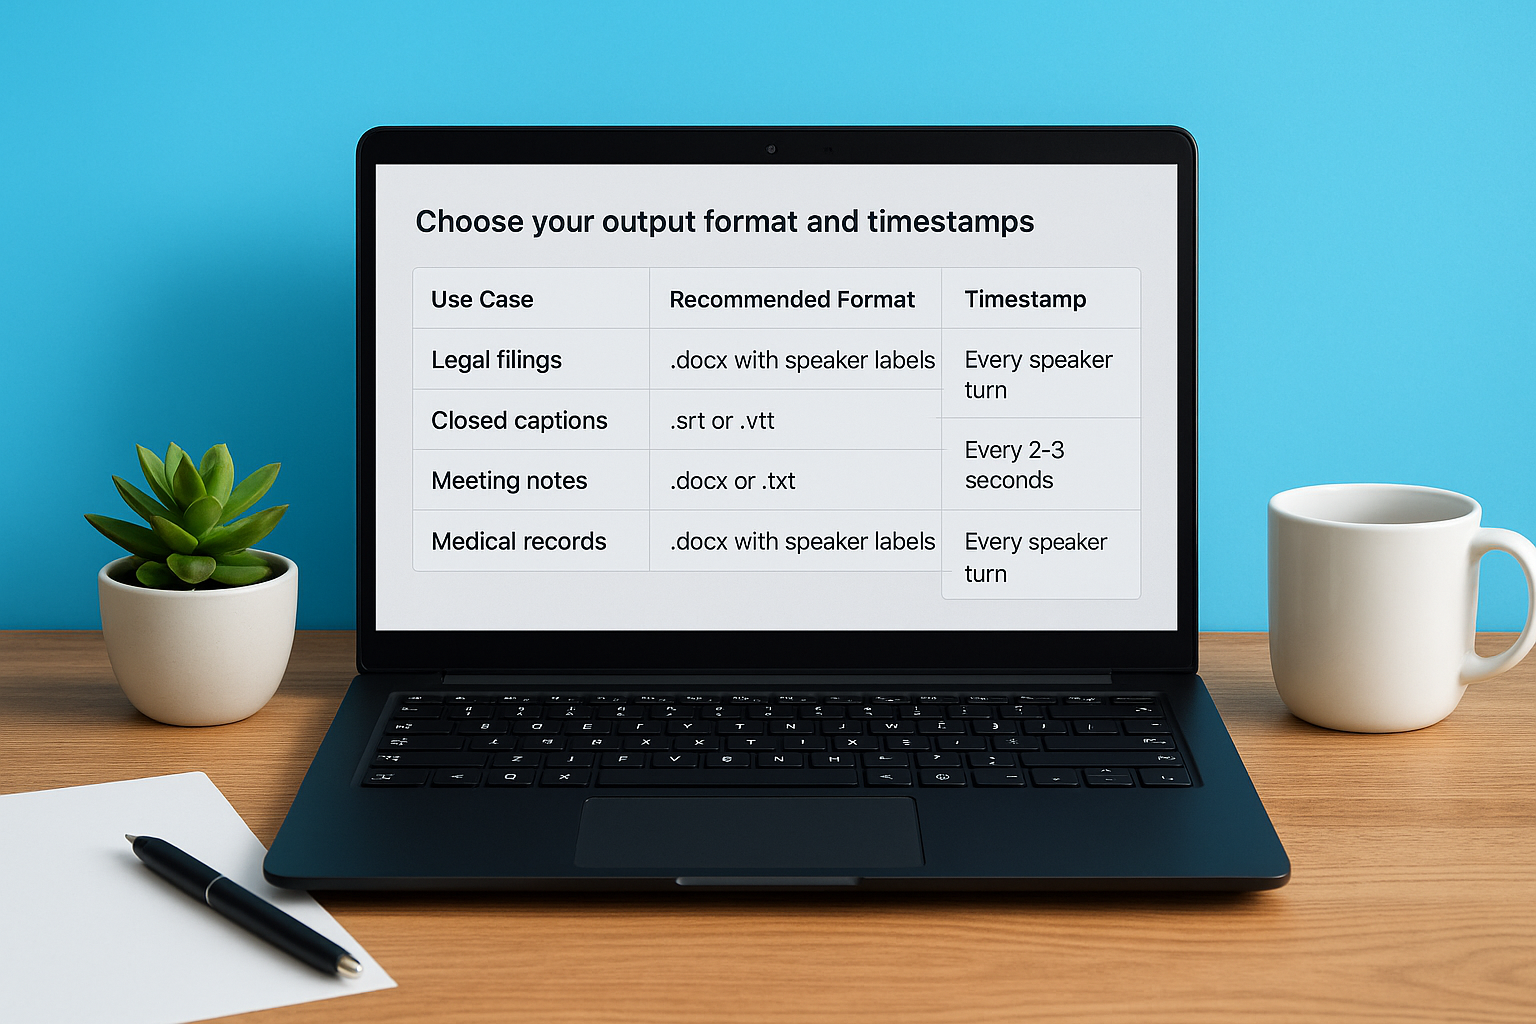
| Use Case | Recommended Format | Timestamp Frequency |
|---|---|---|
| Legal filings | .docx with speaker labels | Every speaker turn |
| Closed captions | .srt or .vtt | Every 2-3 seconds |
| Meeting notes | .docx or .txt | Every 5 minutes |
| Medical records | .docx with speaker labels | Every speaker turn |
Provide speaker and content context
Give the transcription service a short brief alongside your upload. Supplying names, roles, and any technical vocabulary upfront allows human transcriptionists to produce accurate output from the first draft rather than flagging unknowns throughout.
A one-paragraph brief with speaker names, subject matter, and any acronyms in the recording can cut your review time in half.
Include the following in your brief:
- Number of speakers and their names or roles
- Subject matter or industry context
- Any acronyms, product names, or technical terms
- Preferred formatting style (verbatim vs. clean read)
Step 4. Edit, quality-check, and format the transcript
Once you receive your transcript after you upload video for transcription, the raw output is a starting point, not a finished document. Every transcript, whether AI-generated or human-produced, needs a thorough review pass before it goes into any official record, legal filing, or publication.
Skipping the quality-check step is the fastest way to introduce errors into legal, medical, or compliance documents.
Review for accuracy
Work through the transcript while playing the video in a separate window. Flag every section where the text diverges from what the speaker said, including misheard words, dropped phrases, and incorrect speaker labels. Pay extra attention to proper nouns, technical terms, and numbers, since these are the most common error points in both AI and human output.
Format for your use case
Once you confirm accuracy, apply formatting that matches your delivery format. Your final output format determines how useful the transcript is for its intended audience. Work through this checklist before you close the file:
- Remove filler words ("um," "uh") if you selected clean-read style
- Add paragraph breaks at natural topic shifts
- Verify timestamps align with the correct video timecodes
- Export in the format you specified during upload (.docx, .srt, or .txt)
Next steps
Following the four steps in this guide gives you a clear process every time you need to upload video for transcription: check your file format and audio quality first, pick the right method for your content, configure your settings carefully, and review the output before it goes anywhere official. Most transcription mistakes happen because one of those steps gets skipped, not because the tools are inadequate.
If your project involves legal depositions, medical consultations, multilingual content, or compliance-sensitive recordings, automated tools will not get you to the accuracy level you need. Languages Unlimited has been delivering professional transcription services since 1994, with a network of over ten thousand language professionals covering hundreds of languages and dialects across all 50 states.
When accuracy is not optional, work with a team that makes it a standard. Contact Languages Unlimited to get a quote for your next transcription project.