Your Unity game works perfectly in English. Expanding to new markets means translating UI text, audio, and assets into multiple languages. Manual translation file management gets messy. Different character sets break your UI layouts. Switching between languages requires extensive code changes you’d rather avoid.
Unity’s official Localization package handles all of this for you. It provides a complete system for managing translations, handling text interpolation with smart strings, supporting right to left languages like Arabic, and switching locales at runtime through code. The package integrates directly with Unity’s addressables system and works seamlessly with TextMesh Pro components.
This guide shows you exactly how to install and use the Unity Localization package from beginning to end. You’ll learn to set up locales, create and manage string tables, localize UI elements and assets, handle dynamic content with variables, and build production ready projects with multiple languages. Each step includes code examples and practical solutions to common problems you’ll encounter.
What you need before you start
You need a Unity Editor version 2019.4 or later to use the unity localization package. The package works best with Unity 2020.3 LTS or newer versions because Unity improved the addressables system and Package Manager stability in these releases. Download the appropriate version from Unity Hub before proceeding.
Software and version requirements
Your project needs TextMesh Pro installed for text localization. Unity includes TextMesh Pro by default in recent versions, but you can install it through Window > TextMesh Pro > Import TMP Essential Resources if it’s missing. You also need the Addressables package installed, though the localization package installs this dependency automatically.
Check your Unity version by opening Unity Hub and looking at the version number next to your project. Projects built with older Unity versions may require updates to work properly with modern localization features. The package supports Windows, macOS, Linux, iOS, Android, WebGL, and console platforms.
Prior knowledge needed
You should understand basic Unity concepts like GameObjects, Components, and the Inspector panel before starting. Familiarity with Unity’s UI system and Canvas components helps you localize interface elements faster. Working knowledge of prefabs and scenes makes organizing your localized content easier.
You don’t need prior localization experience. This guide walks you through every step from installation to production builds.
Basic C# programming knowledge helps when you need to switch languages through code or access localized strings in scripts. Understanding how to use Unity’s Package Manager and create ScriptableObjects streamlines your workflow. Experience with TextMesh Pro components makes text localization more intuitive, though you can learn these tools alongside the localization system.
Step 1. Install the Unity Localization package
Opening Unity’s Package Manager gives you access to the unity localization package and its dependencies. The installation process takes only a few minutes and requires no additional downloads or external tools.
Open the Package Manager window
You access the Package Manager through Unity’s main menu bar. Click Window > Package Manager to open the Package Manager window. The window displays all available packages for your Unity project, both installed packages and those you can add from Unity’s official registry.
Wait for the Package Manager to load the complete package list. Unity retrieves package information from its servers, which takes a few seconds depending on your internet connection. The left panel shows your currently installed packages, while the search and filter options appear at the top of the window.
Add the package from Unity Registry
Change the packages dropdown at the top left of the Package Manager window from "In Project" to "Unity Registry". This filter shows all official Unity packages available for installation. Type "localization" into the search bar to find the package quickly instead of scrolling through the entire list.
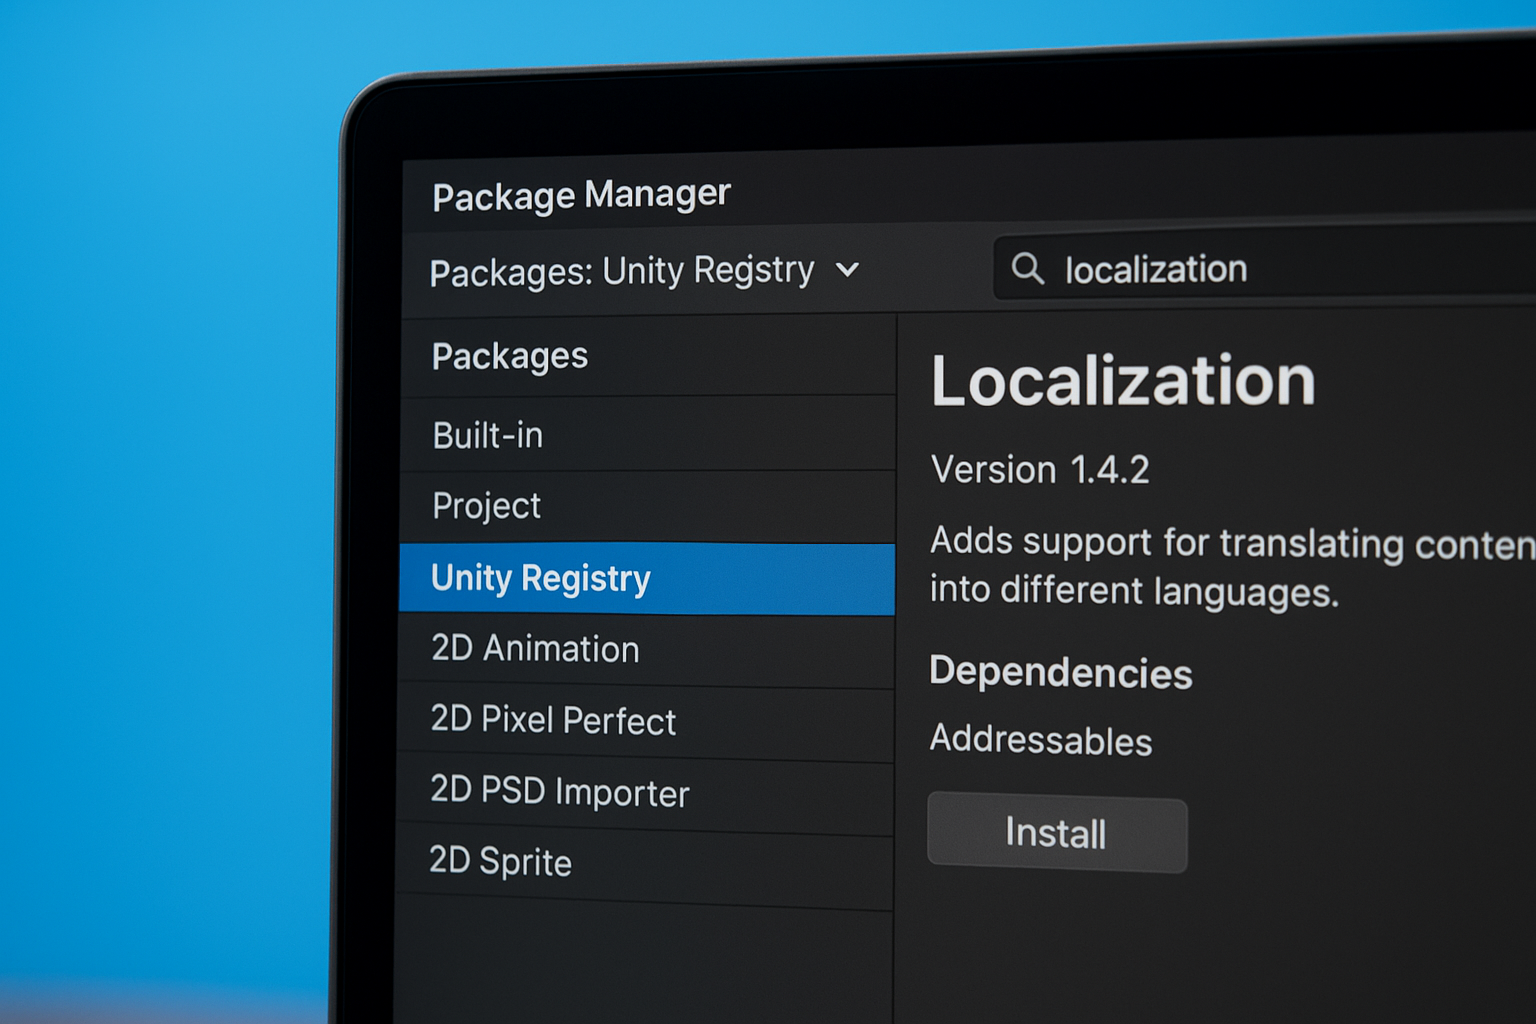
Select the Localization package from the search results. The right panel displays the package description, version number, and installation status. Click the Install button in the bottom right corner to begin installation. Unity downloads the package and its dependencies automatically, including the Addressables package if your project doesn’t already have it.
The installation process typically completes in under a minute for most internet connections.
Verify the installation
Check your project’s Packages folder in the Project window after installation completes. You should see com.unity.localization listed under Packages. The Package Manager window shows an installed checkmark next to the Localization package name, confirming successful installation.
Open Edit > Project Settings from the menu bar and look for Localization in the left sidebar. This new settings category appears only after successful package installation. If you don’t see it, restart Unity Editor and check again. The presence of this settings panel confirms that the unity localization package installed correctly and integrated with your Unity project.
Step 2. Configure project localization settings
The unity localization package requires a Localization Settings asset before you can add any languages to your project. This central configuration file controls which languages your game supports, how Unity selects the active language at runtime, and where your translation data lives. Without this settings asset, the localization system remains inactive even though the package is installed.
Create the Localization Settings asset
Navigate to Edit > Project Settings and select Localization from the left sidebar. You’ll see an empty panel with a blue Create button in the center. Click this button to generate your project’s Localization Settings asset. Unity automatically creates the asset in your Assets folder and activates it immediately for your project.
The settings asset appears in your Project window at the root level by default. Move this asset into an organized folder structure like Assets/Localization/Settings to keep your project clean. Renaming the asset doesn’t affect functionality, but keeping the default name "Localization Settings" makes it easier for team members to find.
Creating this settings asset only once per project ensures all your localization configurations stay centralized and accessible.
Set your project’s default locale
Your project needs a fallback language that loads when Unity can’t determine the player’s system language or when that language isn’t supported. Scroll down in the Localization Settings window to find the Locale Selectors section. Expand the Specific Locale Selector entry at the bottom of the list.
Click the small circle icon next to the Locale Id field. This opens a locale picker, but it appears empty because you haven’t created any locales yet. Don’t worry about setting this value now because you’ll return to configure it after creating your supported locales in the next step. The default configuration uses system locale detection first, which works well for most projects.
Configure locale selector options
The Locale Selectors list in your settings determines how Unity chooses which language to display when your game starts. Each selector runs in order from top to bottom until one successfully identifies a locale. The package includes three selector types by default: Command Line Argument (for testing), System Locale (matches player’s operating system), and Specific Locale (your fallback).
Drag the selector rows to reorder their priority based on your project needs. Most production games keep System Locale at the top so players automatically see their preferred language. Development builds often move Command Line Argument to the top for easier testing. You can remove selectors you don’t need by clicking the minus icon next to each entry, or add new ones through the plus button at the bottom of the list.
Step 3. Create locales and string tables
Locales define which languages your game supports, while string tables store your actual translations for each locale. The unity localization package requires you to create both before you can localize any content in your project. These assets work together as the foundation of your entire localization system, with locales acting as language identifiers and string tables holding the translated text for each language.
Generate locale assets for your supported languages
Open the Localization Settings window through Edit > Project Settings > Localization. Click the Locale Generator button near the top of the window to access the locale creation tool. This opens a comprehensive list of every language and regional variant Unity supports, organized alphabetically by language code.
Check the box next to each language you want to support in your game. Common choices include English (en), Spanish (es), French (fr), German (de), and Japanese (ja). Regional variants like English (United States) or Spanish (Spain) appear as separate options if you need location specific formatting for dates, numbers, or currency. Select at least two languages to see how localization works, even if you plan to add more later.
Click the Create Locales button at the bottom of the window after selecting your languages. Unity generates a locale asset file for each selected language in your Assets folder. Move these locale assets into a dedicated folder like Assets/Localization/Locales to keep your project organized. Each locale asset contains metadata about its language, including plural rules, formatting standards, and optional fallback locales for missing translations.
Creating locale assets early in development prevents restructuring your localization system later when you have hundreds of translated strings.
Create your first string table collection
Navigate to Window > Asset Management > Localization Tables to open the localization tables window. Click the New Table Collection button in the top left corner of this window. A dialog appears asking you to select which locales this collection will support and what type of table to create.
Check the boxes next to all the locales you created in the previous step. Choose String Table Collection as the type since you’re localizing text content first. Give your collection a meaningful name like "UI" for interface text, "Dialogue" for character conversations, or "Tutorial" for instructional content. Organizing translations into separate collections based on their purpose makes them easier to manage as your project grows.
Click Create and select a save location when prompted. Unity recommends saving table collections in Assets/Localization/Tables to maintain a clean folder structure. The system creates multiple files: one shared data asset and individual table assets for each locale you selected. These files contain your actual translation strings and must stay together in the same folder to function correctly.
Add translation entries to your tables
Select your newly created string table collection in the Localization Tables window to view its contents. The window displays a spreadsheet style interface with your locales as column headers and empty rows ready for translation entries. Click Add New Entry at the bottom of the window to create your first translatable string.
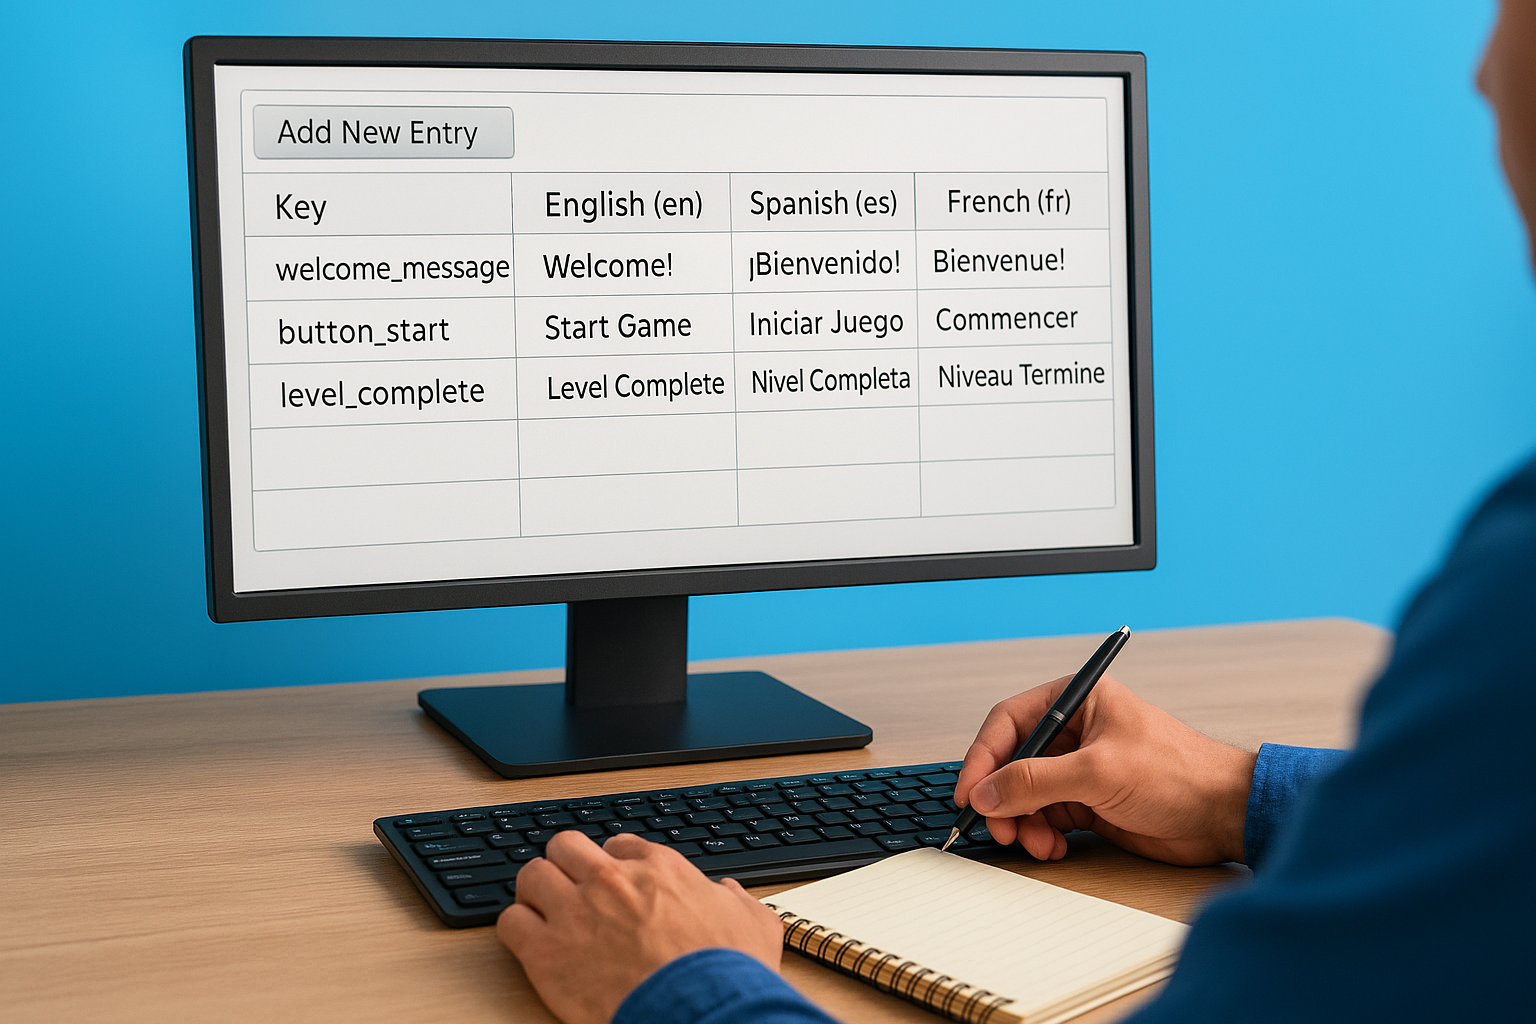
Type a unique key name in the Key column that describes what this string represents, like "welcome_message" or "button_start". Keys use snake_case or camelCase naming conventions without spaces. Enter the translated text for each locale in its respective column. Your English column might contain "Start Game" while your Spanish column shows "Iniciar Juego" for the same key.
Key                    | English (en)      | Spanish (es)       | French (fr)
-----------------------|-------------------|--------------------|-----------------
welcome_message        | Welcome!          | ¡Bienvenido!       | Bienvenue!
button_start           | Start Game        | Iniciar Juego      | Commencer
level_complete         | Level Complete    | Nivel Completado   | Niveau Terminé
Continue adding entries for all the text your game needs to display. The string table saves automatically as you type, but you can click the Save button at the top of the window to force an immediate save. Each entry you create becomes accessible throughout your Unity project for localizing UI elements, dialogue systems, and any other text based content.
Step 4. Localize UI text with TextMesh Pro
TextMesh Pro components display your translated text in Unity’s UI system, but they need a connection to your string tables to show the correct language. The unity localization package provides the Localize String Event component that bridges this gap automatically. This component pulls translations from your string tables and updates your TextMesh Pro text whenever the active locale changes.
Add a Localize String Event component
Select the GameObject containing your TextMesh Pro component in the Hierarchy window. This works with both TextMeshPro UGUI components on Canvas elements and TextMeshPro 3D components in your game world. Click Add Component in the Inspector panel and search for "Localize String Event" to add it to your GameObject.
The component appears below your TextMesh Pro component in the Inspector. You can also right click directly on your TextMesh Pro component and select Localize from the context menu as a faster alternative. This shortcut adds the Localize String Event component and automatically wires it to update your TextMesh Pro text field, saving you manual configuration steps.
Connect the component to your string table
Look for the String Reference section at the top of your Localize String Event component. Click the None (Localized String) dropdown to reveal two options: using a table reference or creating an inline string. Choose TableReference since you created string tables in the previous step.
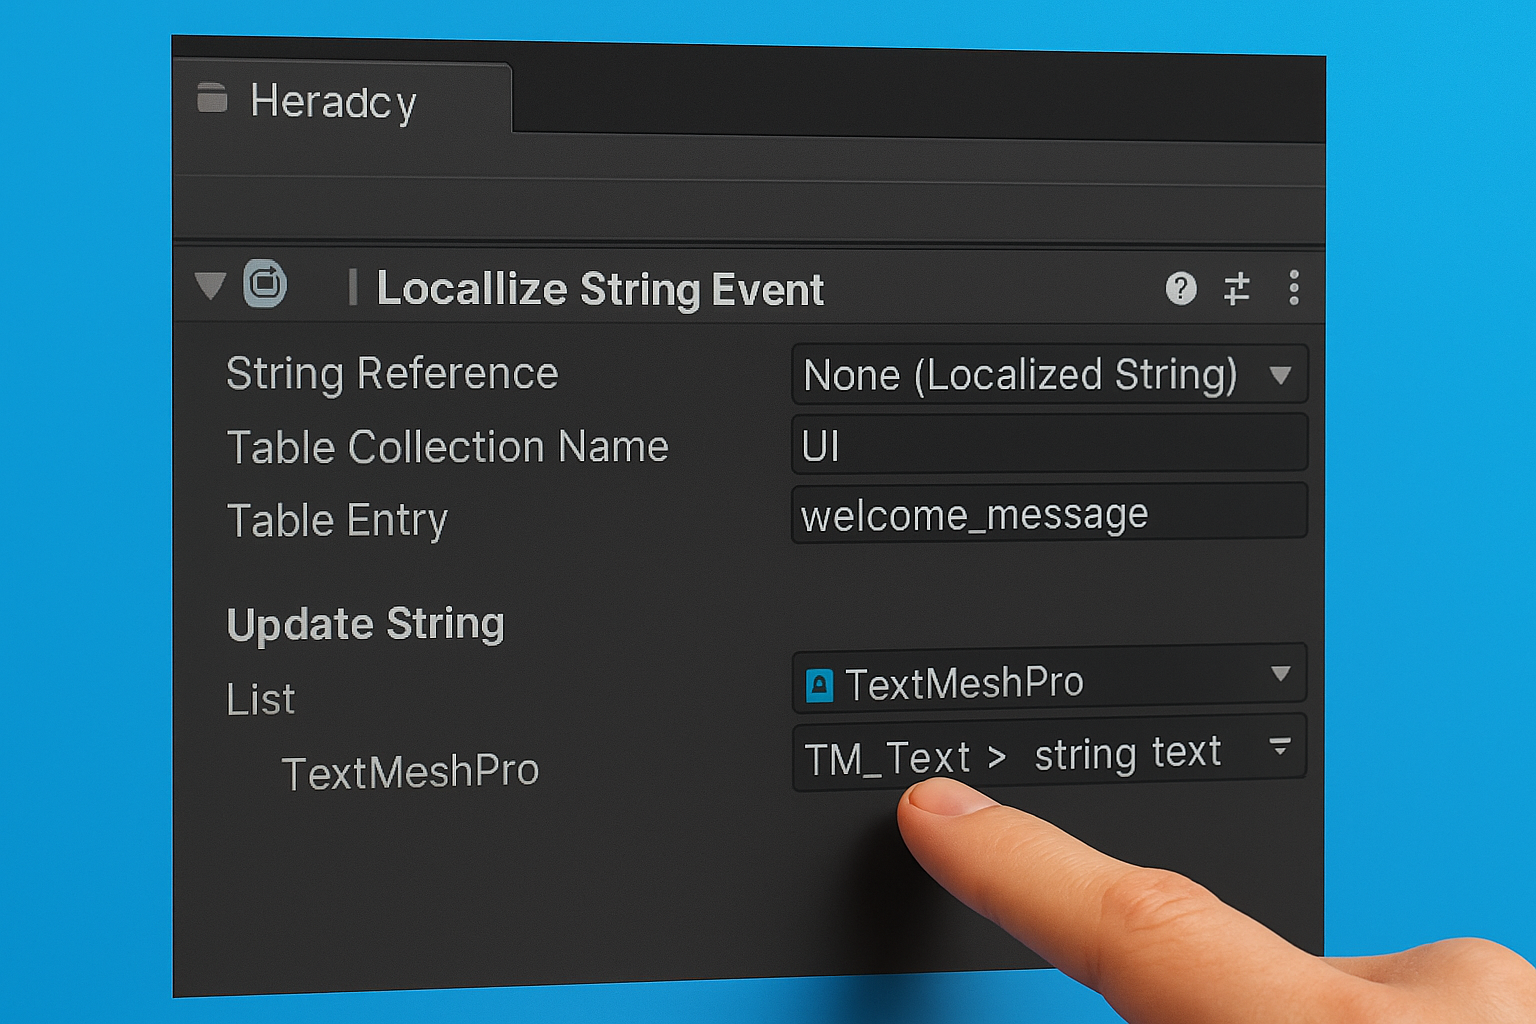
Two new fields appear: Table Collection Name and Table Entry. Click the circle icon next to Table Collection Name and select your string table collection from the picker. The Table Entry dropdown populates with all the keys you added to your tables. Select the key that contains the translation you want this TextMesh Pro component to display.
String Reference
├── Table Collection Name: UI
└── Table Entry: welcome_message
Setting up table references instead of inline strings keeps your translations centralized and easier to manage across your entire project.
Wire up TextMesh Pro for automatic updates
Scroll down to the Update String section of the Localize String Event component. This event list tells Unity which component receives the translated text. Click the plus button to add a new event listener if one doesn’t exist already. The shortcut method from earlier creates this automatically, but manual setup requires this step.
Drag your GameObject into the object field of the event listener or click the circle icon to select it from your scene. Click the function dropdown on the right side that currently shows "No Function". Navigate through TMP_Text > string text to select the text property. Your TextMesh Pro component now receives translated strings automatically whenever Unity initializes the localization system or when you change languages at runtime.
Test your setup by entering Play mode and using the locale switcher in the top right corner of your Game view. The debug menu lets you switch between locales instantly to verify your translations display correctly. Your TextMesh Pro text updates immediately when you select different languages, confirming your localization setup works as intended.
Step 5. Use smart strings and interpolation
Your translations often need dynamic content like player names, item counts, or damage numbers that change during gameplay. Hard coding these values into separate translation strings creates maintenance problems and limits flexibility. The unity localization package solves this through smart strings, a powerful formatting system that lets you insert variables into your translations using placeholder syntax.
Enable smart strings in your table entries
Open your string table collection in the Localization Tables window by navigating to Window > Asset Management > Localization Tables. Select an existing entry or create a new one where you want to use dynamic content. Look for the Smart checkbox above each translation column and check it for every locale that will use variable interpolation.
Smart strings use curly braces to mark where variables appear in your text. Type {VariableName} directly into your translation string where you want the dynamic value to appear. The variable name inside the braces must match exactly what you provide in code later, including capitalization. Your English translation might read "Welcome back, {PlayerName}!" while your Spanish version shows "¡Bienvenido de nuevo, {PlayerName}!".
Key: player_greeting
English: Welcome back, {PlayerName}!
Spanish: ¡Bienvenido de nuevo, {PlayerName}!
French: Bon retour, {PlayerName}!
Smart strings support pluralization, number formatting, date formatting, and conditional logic without writing custom code for each locale.
Add variables to your translation strings
Variables handle more than just simple text substitution. You can format numbers with specific decimal places, display dates in locale appropriate formats, and handle plural forms automatically. Use format specifiers after your variable name to control how Unity displays the value: {Count:N2} shows a number with two decimal places, while {Amount:C} formats as currency for the current locale.
Plural handling requires a special syntax that lists all plural forms for your language separated by pipe characters. English needs two forms: {ItemCount:plural:{} item|{} items}. Arabic requires six forms because the language has complex plural rules. The empty braces {} in each form get replaced with the actual count value at runtime.
Provide runtime values through code
Create a MonoBehaviour script that holds your dynamic values as public fields. The field names must match your variable names exactly, including capitalization. Unity automatically finds these fields and uses their values when rendering your localized strings.
using UnityEngine;

public class GameValues : MonoBehaviour
{
    public string PlayerName = "Alex";
    public int ItemCount = 5;
    public float Amount = 99.99f;
}
Attach this script to the same GameObject as your Localize String Event component. Find the Format Arguments section in the Localize String Event component and expand it. Click the plus button to add a new entry, then drag your values script into the object field. Unity now passes these values into your smart strings automatically, updating the displayed text whenever the values change or the locale switches.
Step 6. Localize sprites audio and other assets
Text translations cover only part of your localization needs. Your game’s sprites, audio clips, textures, and prefabs often need language specific versions too. A character portrait might show different clothing based on regional preferences, or button icons might display text that requires translation. The unity localization package handles these non-text assets through Asset Table Collections, which work exactly like string tables but store references to Unity assets instead of text.
Create an asset table collection
Navigate to Window > Asset Management > Localization Tables to open the tables window. Click the New Table Collection button just like you did for string tables, but this time select Asset Table Collection as the type when the dialog appears. Check the boxes next to all your supported locales to ensure each language gets its own asset table.
Name your collection based on what assets it contains. Use "UI_Images" for interface sprites, "Character_Portraits" for character art, or "Voice_Clips" for audio files. Click Create and save the collection in your Assets/Localization/Tables folder alongside your string tables. Unity generates separate asset table files for each locale, ready to store references to your localized assets.
Add localized assets to your table
Select your new asset table collection in the Localization Tables window to view its contents. The interface looks identical to string tables, with columns for each locale and rows for individual entries. Click Add New Entry at the bottom to create your first localized asset slot.
Type a unique key name that identifies what the asset represents, like "flag_icon" or "background_music". Unlike string tables where you type text directly, asset tables show object picker fields for each locale. Click the circle icon in each locale column and select the appropriate asset from your project. Your English locale might reference a US flag sprite while your Spanish locale points to a Spanish flag sprite for the same key.
Key                    | English (en)           | Spanish (es)           | French (fr)
-----------------------|------------------------|------------------------|------------------
flag_icon              | Sprite: flag_us        | Sprite: flag_es        | Sprite: flag_fr
menu_background        | Texture: bg_english    | Texture: bg_spanish    | Texture: bg_french
narrator_intro         | AudioClip: intro_en    | AudioClip: intro_es    | AudioClip: intro_fr
Asset tables maintain strong references to your localized assets, preventing Unity from accidentally excluding them from builds.
Use Localize Sprite Event for images
Select the GameObject containing your Image component in the Hierarchy window. Add a Localize Sprite Event component through the Inspector’s Add Component button, or right click your Image component and choose Localize for automatic setup. This component works identically to Localize String Event but updates Image components instead of TextMesh Pro text.
![]()
Configure the Asset Reference section by clicking the dropdown and selecting TableReference. Choose your asset table collection name from the first dropdown, then select the appropriate table entry key from the second dropdown. These dropdowns populate automatically with your existing tables and keys.
Scroll to the Update Asset event list and add a new listener if needed. Drag your GameObject into the object field, then select Image > sprite from the function dropdown. Your Image component now displays the correct sprite for each locale automatically. Audio sources, raw images, and other components work the same way using their respective Localize Event components: Localize Audio Clip Event, Localize Texture Event, and more.
Step 7. Switch languages at runtime in code
Players expect language switchers in your game’s settings menu that change the interface immediately without restarting. The unity localization package exposes a simple API through LocalizationSettings.SelectedLocale that lets you read and change the active language from any script. Your UI buttons, dropdown menus, or console commands can trigger locale changes with just a few lines of code.
Access the active locale in scripts
You access the current language through LocalizationSettings.SelectedLocale, which returns a Locale object representing the active language. This property lives in the UnityEngine.Localization.Settings namespace, so add the appropriate using statement at the top of your script. The selected locale updates automatically when your game starts or when you change languages through code.
using UnityEngine;
using UnityEngine.Localization.Settings;

public class LocaleDisplay : MonoBehaviour
{
    void Start()
    {
        var currentLocale = LocalizationSettings.SelectedLocale;
        Debug.Log($"Current language: {currentLocale.LocaleName}");
        Debug.Log($"Language code: {currentLocale.Identifier.Code}");
    }
}
Check for null values before accessing locale properties because the localization system initializes asynchronously when your game starts. Wrap your locale code in a null check or wait for the LocalizationSettings.InitializationOperation to complete. Your locale related code executes safely after initialization finishes without throwing null reference exceptions.
Change locale programmatically
Setting LocalizationSettings.SelectedLocale to a different Locale object switches your game’s language instantly. All active Localize String Event components and Localize Asset Event components update automatically to show content for the new locale. You retrieve available locales through LocalizationSettings.AvailableLocales.Locales, which returns a list of every locale you configured in your project settings.
using UnityEngine;
using UnityEngine.Localization.Settings;

public class LanguageSwitcher : MonoBehaviour
{
    public void SetEnglish()
    {
        var englishLocale = LocalizationSettings.AvailableLocales
            .GetLocale("en");
        LocalizationSettings.SelectedLocale = englishLocale;
    }

    public void SetSpanish()
    {
        var spanishLocale = LocalizationSettings.AvailableLocales
            .GetLocale("es");
        LocalizationSettings.SelectedLocale = spanishLocale;
    }
}
Setting the selected locale persists between play sessions automatically, so players only choose their language once.
Create a language switcher UI
Button components trigger language changes through OnClick events that call your switcher methods directly. Create buttons for each supported language in your settings menu, then wire each button’s OnClick event to the appropriate locale method. Dropdown menus work better for games supporting many languages because they save screen space compared to individual buttons.
using UnityEngine;
using UnityEngine.UI;
using UnityEngine.Localization.Settings;

public class DropdownLanguageSwitcher : MonoBehaviour
{
    public Dropdown languageDropdown;

    void Start()
    {
        languageDropdown.ClearOptions();
        var options = new List<string>();

        foreach (var locale in LocalizationSettings.AvailableLocales.Locales)
        {
            options.Add(locale.LocaleName);
        }

        languageDropdown.AddOptions(options);
        languageDropdown.onValueChanged.AddListener(OnLanguageChanged);
    }

    void OnLanguageChanged(int index)
    {
        var selectedLocale = LocalizationSettings.AvailableLocales.Locales[index];
        LocalizationSettings.SelectedLocale = selectedLocale;
    }
}
Attach this script to a GameObject containing your Dropdown component and assign the dropdown reference through the Inspector. The dropdown populates automatically with your supported languages when the scene loads, letting players select their preferred language from the list.
Step 8. Support right to left languages
Languages like Arabic, Hebrew, Farsi, and Urdu write from right to left instead of left to right, which creates unique challenges for Unity developers. TextMesh Pro doesn’t include built-in RTL support, so your Arabic text appears backwards with disconnected characters that look broken. The unity localization package handles translations perfectly, but you need an additional solution to render RTL text correctly on screen.
Install RTLTMPro for text rendering
Download the RTLTMPro package from its GitHub releases page to add right to left rendering capabilities to your project. The latest release comes as a Unity package file with a .unitypackage extension that installs directly into your project. Navigate to Assets > Import Package > Custom Package in Unity’s menu bar and select the downloaded RTLTMPro file to begin installation.
Keep all folders and files checked in the import dialog that appears, then click the Import button to complete the process. Unity creates a new RTLTMPro folder in your Assets directory containing the scripts, shaders, and sample fonts you need. The package includes pre-made Arabic font assets in the Fonts subfolder that work immediately without additional configuration, though you can create custom RTL fonts later if your design requires specific typefaces.
Replace TextMesh Pro with RTL components
Right click your GameObject in the Hierarchy window and look for the new UI menu options that RTLTMPro added. Select UI > Text – RTLTMP instead of the standard TextMeshPro component for any text that displays right to left languages. The RTL component looks and functions identically to normal TextMesh Pro, with the same font, size, color, and alignment properties you already know.
// RTL Text component properties
RTL Text Input Box: Your Arabic text here
Font Asset: Cairo-Regular SDF (or custom RTL font)
Font Size: 24
Alignment: Right (for RTL languages)
Assign an RTL-compatible font asset to the Font Asset field of your new component. The fonts included with RTLTMPro support Arabic and Farsi by default, with proper character connection and diacritic positioning. Your Localize String Event components work with RTL Text components exactly like they do with standard TextMesh Pro, requiring no changes to your existing localization setup.
RTL Text components automatically handle character shaping and joining, so your Arabic text displays with proper connections between letters.
Handle mixed direction content
Enable the Force Fix option on your RTL Text component when your localized strings begin with English text or numbers. Mixed direction strings like "Welcome 5 مرات" need this setting checked to prevent the entire string from rendering left to right incorrectly. Find this checkbox in the component’s properties panel below the text input box.
Create separate text objects for UI elements that combine static icons with dynamic text in RTL layouts. Your button might have an arrow icon on the left that points right in English but needs to flip and move to the right side for Arabic. Using separate GameObjects for icons and text lets you reposition them programmatically based on the active locale without complex text wrapping calculations.
Step 9. Test build and troubleshoot issues
Testing your localized game reveals problems that never appear in the Unity Editor. Translations might fail to load, text overflows UI boundaries, or addressables throw errors during runtime. The unity localization package relies on addressables system for loading translations, which behaves differently in builds compared to editor playmode. You need to test standalone builds for each target platform and prepare your addressables properly before distribution.
Test translations in editor and builds
Use the locale game view menu in the top right corner of your Game window during playmode to switch between languages instantly. This debug menu appears automatically when the localization package is active and lets you verify translations without building your project. Check every UI screen, dialogue sequence, and localized asset for each supported language to catch missing translations or formatting issues early.
Editor testing catches most problems, but standalone builds reveal addressables issues that playmode testing misses. Build for your target platform through File > Build Settings and run the executable to test how translations load in production. Your game might work perfectly in the editor but show empty text fields or English fallbacks in builds if you skip the addressables build step. Test language switching in your production build by using your in-game language selector to confirm the locale change persists between sessions.
Testing on actual devices catches platform-specific issues that desktop builds might miss, especially for mobile games with varied screen sizes and aspect ratios.
Build addressables for production
Open the Addressables Groups window through Window > Asset Management > Addressables > Groups before creating any production builds. Click Build > New Build > Default Build Script to compile your localization data into addressable bundles that your game can load at runtime. This step packages all your string tables and asset tables into optimized files that ship with your game.
Your translations won’t appear in builds if you forget this step because addressables don’t build automatically when you build your game. The localization system throws errors or falls back to your default locale when it can’t find the addressable bundles. Rebuild your addressables whenever you add new translations, change existing strings, or update localized assets to ensure your latest content appears in production.
Fix common localization errors
Missing translations show warnings in the console that tell you exactly which key and locale failed to load. Check your string tables for empty cells or typos in key names that prevent the system from finding your translations. The Table Entry dropdown in your Localize String Event components only shows keys that exist in your tables, so errors usually come from deleted keys or mismatched table references.
Addressables package version 1.16.16 has a known bug that prevents localization data from loading in builds. Downgrade to version 1.16.15 through the Package Manager if your translations work in the editor but fail in production builds. Right-to-left text appearing backwards means you forgot to check the Force Fix option on your RTL Text component when your string begins with English characters or numbers.
// Debug current locale and available translations
Debug.Log($"Active Locale: {LocalizationSettings.SelectedLocale.Identifier.Code}");
Debug.Log($"Available Locales: {LocalizationSettings.AvailableLocales.Locales.Count}");

// Check if localization initialized
if (!LocalizationSettings.InitializationOperation.IsDone)
{
    Debug.LogWarning("Localization system still initializing");
}

Wrap up and next steps
You now have a complete unity localization package setup that handles text translations, asset localization, and runtime language switching. Your game supports multiple languages with smart strings for dynamic content, proper RTL rendering for Arabic and Hebrew, and tested production builds that load translations correctly. The system automatically detects player language preferences and falls back gracefully when translations are missing.
Start expanding your language support by adding more locales to your project settings and populating your string tables with translations. Your next challenge involves managing professional translations for all your game content across multiple languages. Professional translation services ensure your game resonates with players in each market while maintaining consistent tone and cultural appropriateness. Contact our translation experts to discuss how we can help localize your Unity game for global audiences with accuracy and cultural sensitivity.