Microsoft Teams includes a dedicated accessibility feature that many meeting organizers and participants don’t know exists. The Microsoft Teams sign language view lets deaf and hard-of-hearing participants keep their sign language interpreter visible on screen at all times, without relying on manual pinning that resets every time someone new speaks. It’s a small setting that makes a significant difference in how accessible your virtual meetings actually are.
At Languages Unlimited, we provide professional sign language interpretation services, including ASL interpreters for remote and on-site settings. Our team works with healthcare providers, government agencies, legal professionals, and organizations across all 50 states, and we regularly support clients who need interpreters placed into virtual meeting environments like Teams, Zoom, and WebEx. A feature like sign language view directly impacts how effectively our interpreters can serve participants during live meetings, which is why we put this guide together.
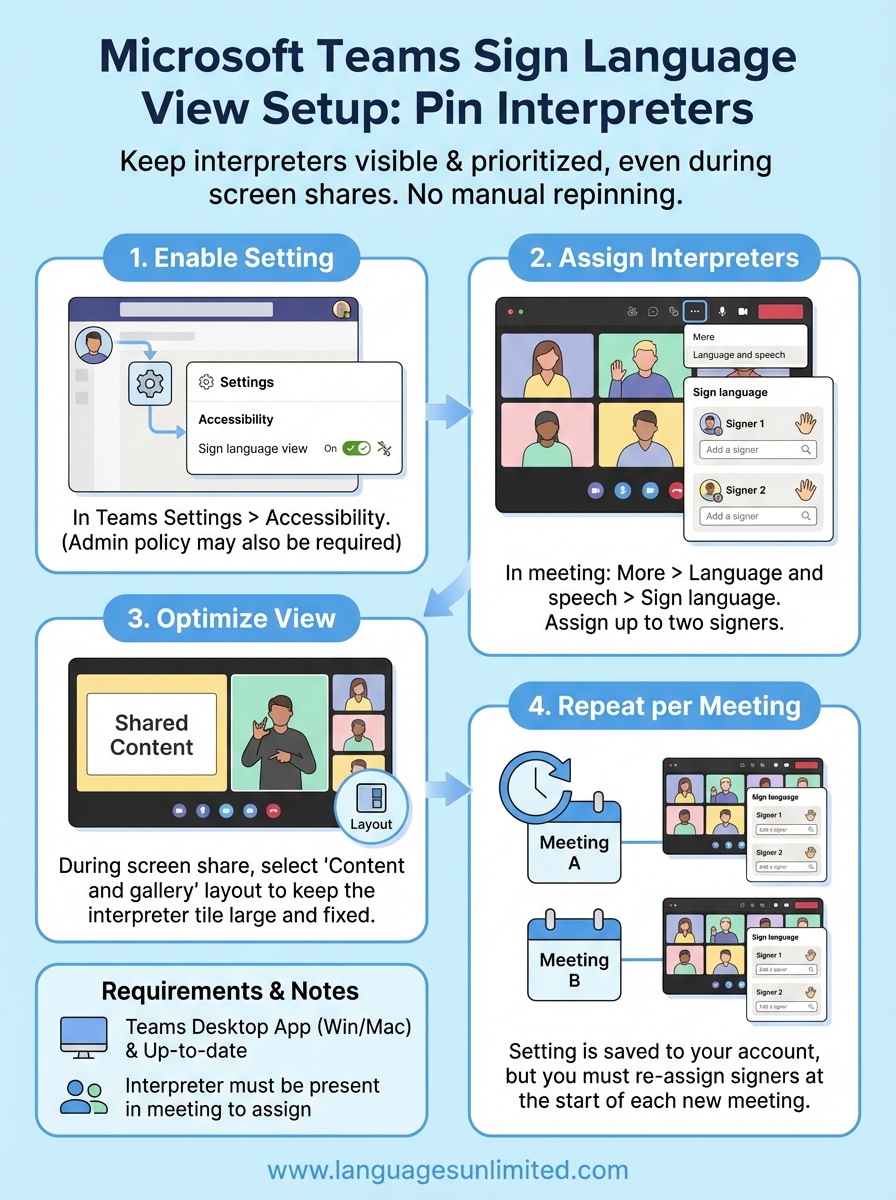
Below, you’ll find step-by-step instructions for enabling sign language view in Microsoft Teams, assigning interpreters to the dedicated video slots, and adjusting the settings at both the user and admin level. Whether you’re an IT administrator configuring Teams for your organization or a meeting host preparing for an accessible event, this guide covers exactly what you need to get it working correctly.
What sign language view does in Teams
Sign language view is a built-in Microsoft Teams feature that keeps a designated interpreter’s video feedvisible and prioritized throughout a meeting, regardless of who is speaking. In a standard Teams meeting, the active speaker takes over the main video window and other participants’ tiles shift around or disappear. For a deaf or hard-of-hearing participant who depends on watching an interpreter in real time, that default behavior creates constant, disruptive interruptions. Sign language view solves this by locking the interpreter’s tile into a fixed, prominent position on screen that does not respond to speaker changes.
How it differs from pinning a video manually
Most Teams users know that you can right-click a participant’s video tile and select "Pin," which keeps that tile visible while others speak. Sign language view goes further than a manual pin in several important ways. A manual pin only applies to your own device and your own session, and if the meeting layout shifts or you click elsewhere, the pin breaks without warning. Sign language view creates a stable, dedicated display slot that stays intact even when someone shares their screen, when the meeting switches to a presentation layout, or when new participants join mid-session.
Sign language view is the only setting in Teams that keeps an interpreter’s video visible and locked in place even during active screen sharing.
Screen sharing is where a manual pin typically fails. When a participant shares their screen, Teams pushes the video gallery to the side or collapses it entirely, which makes the interpreter’s tile small, hard to locate, or completely hidden. Sign language view prevents that collapse by treating the interpreter’s tile as a priority element in the layout, separate from the standard video grid. That distinction matters enormously in practice, especially in meetings that involve heavy use of presentations or shared documents.
What participants see when sign language view is active
When you enable microsoft teams sign language view, you see the interpreter’s video displayed in a larger, fixed tile that holds its position throughout the meeting. The other participants appear in their normal spots in the gallery or speaker view, but the interpreter’s tile does not move, shrink, or get displaced when someone new starts talking. A deaf or hard-of-hearing participant can watch the interpreter continuously without scanning the screen or adjusting their view mid-meeting.

Teams supports up to two active sign language interpreters displayed simultaneously in the dedicated sign language view slots. This covers situations where a meeting uses both ASL and another signed language, or where two interpreters rotate to manage fatigue during a long session. Both interpreter tiles stay visible and fixed while other participants cycle through the standard speaker view as normal.
The following list summarizes what sign language view controls compared to a manual pin:
- Fixed tile position: stays in place through speaker changes, screen sharing, and layout switches
- Priority display: interpreter video does not shrink when others share content
- Dual interpreter support: accommodates two interpreters at the same time
- Session-level stability: does not reset when new participants join
- Admin and user configuration: can be set by the individual or enforced organization-wide by an IT admin
The feature is available on the Teams desktop app for Windows and Mac, which are the two environments where it performs reliably. Mobile support is more limited, so if your deaf participants use Teams on a phone or tablet, you will want to confirm their experience separately before the meeting begins.
Before you start: requirements and limitations
Before you configure anything, confirm that your setup actually supports the feature. Microsoft Teams sign language view is not available in every version of Teams, and missing one requirement means the setting either won’t appear or won’t function correctly during a live meeting. Running through this checklist before the meeting saves you from troubleshooting at the worst possible moment.
Software and account requirements
You need the Teams desktop app installed on Windows or Mac to use sign language view. The feature does not appear in the browser-based version of Teams, and mobile apps on iOS and Android do not fully support it. Your Teams client also needs to be up to date, as Microsoft rolled sign language view out incrementally and older app versions will not show the setting even if your admin has enabled it at the policy level.
If sign language view does not appear in your accessibility settings, updating the Teams desktop app is the first fix to try.
On the admin side, your organization’s Teams meeting policy must have the sign language interpretation feature enabled. If you manage your own Teams environment, you can check and adjust this in the Microsoft Teams admin center. If your organization’s IT department controls the policy, you need to request that they enable it before you can configure anything at the user level.
Known limitations to plan around
The two-interpreter limit is the most common constraint teams run into during longer or multi-language sessions. Sign language view holds a maximum of two interpreter tiles at one time, so if your meeting uses three or more signed languages simultaneously, you will need a different strategy for managing visibility. Planning your interpreter roster before the meeting starts prevents last-minute confusion.
Mobile participants cannot use sign language view the same way desktop users can, which matters when your deaf or hard-of-hearing attendees join from a phone. Teams on mobile does not give them the same fixed tile behavior, so their interpreter may still shift position during screen shares. Communicate this limitation to affected participants ahead of time and suggest they join from a desktop device whenever possible.
Step 1. Turn on sign language view
Turning on microsoft teams sign language view happens at two levels: the individual user setting and the organization-wide admin policy. You only need the user-level setting to start using the feature yourself, but if the admin policy is off for your tenant, the option will not appear at all. Start with your own settings first, then check the admin layer if the setting is missing.
Enable sign language view in your personal settings
Open the Teams desktop app on Windows or Mac and click your profile picture in the top-right corner. Select "Settings" from the dropdown menu, then click "Accessibility" in the left-hand navigation panel. You will see a section labeled "Sign language," which contains a toggle to turn sign language view on. Flip that toggle to the on position, and Teams will immediately activate the feature for your account. No restart is required.
Once you turn on sign language view in Accessibility settings, Teams saves the preference and applies it automatically to every meeting you join going forward.
After you enable the toggle, a "Sign language" section appears in your in-meeting controls, which is where you will assign specific interpreters to the display slots in Step 2. If you do not see the Accessibility section in your Settings menu, your Teams app likely needs an update. Go to your profile picture, select "Check for updates," let Teams install the latest version, and then return to Settings.
Enable sign language view through the Teams admin center
If you manage Teams for your organization, you need to confirm the feature is active at the policy level before users can turn it on themselves. Sign in to the Microsoft Teams admin center using your admin credentials. Navigate to "Meetings," then select "Meeting policies." Open the policy assigned to the relevant users, scroll to the "Meeting engagement" section, and look for the "Sign language interpretation" toggle. Switch it to "On" and save the policy. Policy changes can take up to 24 hours to propagate across all user accounts, so make this change at least a day before any scheduled meetings that require sign language view.
Step 2. Add interpreters as signers
With sign language view turned on in your accessibility settings, the next step is assigning the specific interpreters who will appear in the fixed display slots during your meeting. Until you add them as signers, Teams treats them as regular participants and their video feed will behave like everyone else’s. This step locks their tile into the priority position that sign language view creates.
Find the sign language panel during a live meeting
Once your meeting starts, look for the "More" button (the three-dot icon) in your meeting toolbar at the top or bottom of the screen, depending on your display layout. Click it and select "Language and speech," then choose "Sign language." A side panel will open showing your sign language view controls, including the slots available for interpreter assignment. You will see up to two empty slots labeled for signers, ready for you to populate before or during the meeting.
Open the sign language panel before the meeting reaches full attendance so you can assign interpreters while the participant list is still short and easy to scan.
Assign an interpreter to each signer slot
Inside the sign language panel, click the "Add a signer" button next to the first empty slot. Teams will display a searchable list of current meeting participants. Type the interpreter’s name into the search field, select them from the results, and confirm the assignment. Their video tile will immediately shift into the fixed sign language view position on your screen and on the screens of any other participants who have also enabled sign language view in their own settings.
Repeat the process for a second interpreter if your meeting requires one. The table below shows how the two slots work:
| Slot | Purpose | Participant required |
|---|---|---|
| Signer 1 | Primary interpreter | Must be in the meeting |
| Signer 2 | Second interpreter or rotation partner | Must be in the meeting |
For the assignment to work, the interpreter must already be present in the meeting at the moment you add them. If they have not joined yet, their name will not appear in the participant list. Coordinate with your interpreters ahead of time and ask them to join a few minutes early so you can complete the microsoft teams sign language view setup before the session officially starts.
Step 3. Keep interpreters visible during sharing
Screen sharing is the moment sign language view gets its real test. When a participant or presenter shares their screen, Teams reorganizes the layout and collapses the video gallery by default. Without the right configuration in place, even an assigned interpreter can shrink to a thumbnail or disappear from view entirely. This step walks you through exactly what to adjust so the interpreter’s tile stays visible and large the moment sharing begins.
Why screen sharing disrupts interpreter visibility
Teams uses a layout algorithm that prioritizes shared content over participant video during a screen share session. The gallery shifts to the side, participant tiles reduce in size, and anyone not actively speaking can vanish from the visible row. For deaf and hard-of-hearing participants who rely on a continuous view of their interpreter, that automatic reshuffle creates a real barrier to following the meeting.
Sign language view overrides the default collapse behavior, but only when the interpreter has been assigned as a signer before sharing starts.
If you assign the interpreter to the signer slot after sharing has already begun, the fixed tile behavior may not apply cleanly. Always complete Step 2 before the presenter activates their screen share to make sure the priority display locks in correctly.
Adjust your layout when sharing starts
When the presenter starts sharing, open the view controls in your meeting toolbar and switch to the layout that keeps the video strip visible alongside the shared content. In Teams, this is the option labeled "Content and gallery" or "Side-by-side," depending on your app version. Selecting this layout tells Teams to display the video gallery alongside the shared screen rather than replacing it, which keeps your interpreter tile in the fixed sign language view position where you assigned it.
The following layout options affect how visible the interpreter remains during sharing:
| Layout option | Interpreter visibility | Best for |
|---|---|---|
| Content only | Low, gallery collapses | Presenter-only sessions |
| Content and gallery | High, tiles stay visible | Meetings with active interpretation |
| Large gallery | Medium, depends on pinning | Larger group meetings |
Once you select "Content and gallery," your microsoft teams sign language view assignment holds its position for the remainder of the share session. You do not need to reassign the interpreter when the presenter stops sharing or when a different participant starts a new share.
Step 4. Set it as your default for all meetings
The toggle you enabled in Step 1 already saves your sign language view preference to your Teams account profile, but your signer assignments do not carry over automatically from one meeting to the next. Teams remembers that you want sign language view active, but it does not remember which specific participants you assigned as interpreters, because those people change depending on the meeting. Understanding what persists and what resets keeps you from being caught off guard at the start of a session.
Understand what Teams saves automatically
When you switch the sign language view toggle to "On" in your Accessibility settings, Teams stores that preference permanently in your account. Every meeting you join going forward will have sign language view active by default, without you returning to the settings menu each time. The interpreter slots in the sign language panel will be ready and visible the moment a meeting starts, waiting for you to assign signers as soon as your interpreters appear in the participant list.
Your sign language view toggle persists across all sessions, but signer assignments reset with each new meeting because participant rosters change.
Build a repeatable pre-meeting routine
Your interpreter assignment resets between meetings, so the most reliable approach is to create a short pre-meeting routine that you run at the start of every session. Ask your interpreters to join two to three minutes before the official start time, then open the sign language panel and complete the assignments before the broader audience arrives. Once you have done it a few times, the whole process takes under sixty seconds.
The checklist below gives you a consistent sequence to follow before each meeting:
- Confirm interpreters have joined the meeting
- Open "More" > "Language and speech" > "Sign language"
- Assign Signer 1 using the participant search field
- Assign Signer 2 if your session uses a second interpreter
- Verify both fixed interpreter tiles appear in the correct position before starting
Following this sequence every time keeps microsoft teams sign language view working reliably across all your meetings. If your organization runs recurring sessions hosted by different people, share this checklist with anyone who takes the host role so the setup stays consistent regardless of who is running the meeting that day.
Fixes when sign language view is missing or fails
Even after completing the setup steps, sign language view can go missing or stop working the way you expect. The causes almost always fall into a short list of fixable issues: an outdated app, a disabled admin policy, or a timing error during signer assignment. Running through the checks below will resolve the problem in most cases without a support ticket.
The setting does not appear in Accessibility
If you open Settings, click Accessibility, and see no sign language section, your Teams app is either out of date or running under a policy that has the feature disabled. Update the desktop app first by clicking your profile picture and selecting "Check for updates." After the update installs, return to Accessibility settings and look again.
If the toggle still does not appear after updating, your IT administrator has not enabled the sign language interpretation policy for your account.
When the admin policy is the issue, share the following fix list with your IT team so they can resolve it from the Microsoft Teams admin center:
- Navigate to "Meetings" then "Meeting policies"
- Open the policy assigned to affected users
- Find the "Sign language interpretation" toggle under "Meeting engagement"
- Switch it to "On" and save
- Allow up to 24 hours for the policy to propagate to user accounts
The interpreter tile disappears mid-meeting
If your interpreter was displaying correctly and then vanished, the most likely cause is a layout change triggered by screen sharing or a new participant joining. Check your current view setting first. Open the view controls in your meeting toolbar and confirm you are on "Content and gallery" rather than "Content only," which collapses the video strip entirely.
A second common cause is the signer assignment dropping when the interpreter’s connection briefly disconnects and reconnects. Teams treats a reconnect as a new session, which clears the signer slot automatically. Reopen the sign language panel using "More" then "Language and speech" then "Sign language," and reassign the interpreter immediately. This is also why coordinating with interpreters before the meeting starts matters: a stable connection from the beginning prevents the most disruptive version of this problem when using microsoft teams sign language view in a live session.
Wrap up and get more help
You now have everything you need to configure microsoft teams sign language view from start to finish: enabling the toggle, assigning interpreters as signers, keeping their tile visible through screen shares, and running a repeatable pre-meeting routine. The feature works reliably once the admin policy is active and your app is current, and the pre-meeting checklist from Step 4 keeps the setup consistent no matter who hosts the session.
Getting the technology right is only half of the equation. The other half is having a qualified, professional interpreter in that signer slot. Languages Unlimited provides ASL and sign language interpretation services for virtual meetings, legal proceedings, medical appointments, and government sessions across all 50 states. Our interpreters are experienced in remote environments and ready to join your Teams meeting on short notice. If you need to staff an upcoming session, contact our interpretation team and we will match you with the right interpreter for your needs.