Subtitles make your videos accessible to a wider audience, including viewers who are deaf or hard of hearing, non-native speakers, and anyone watching on mute in a crowded place. Learning how to add subtitles to a video doesn’t require expensive software or technical expertise. With the right tools, you can create clean, readable captions in minutes.
Whether you’re producing content for social media, corporate training, or online courses, subtitles boost engagement and comprehension. Studies consistently show that captioned videos perform better across nearly every metric, from watch time to audience retention.
At Languages Unlimited, we’ve provided professional subtitling and captioning services since 1994, so we know what separates amateur captions from polished, broadcast-quality subtitles. This guide walks you through the DIY methods, from free automatic tools to manual editing techniques, so you can choose the approach that fits your project and budget.
What you need before you add subtitles
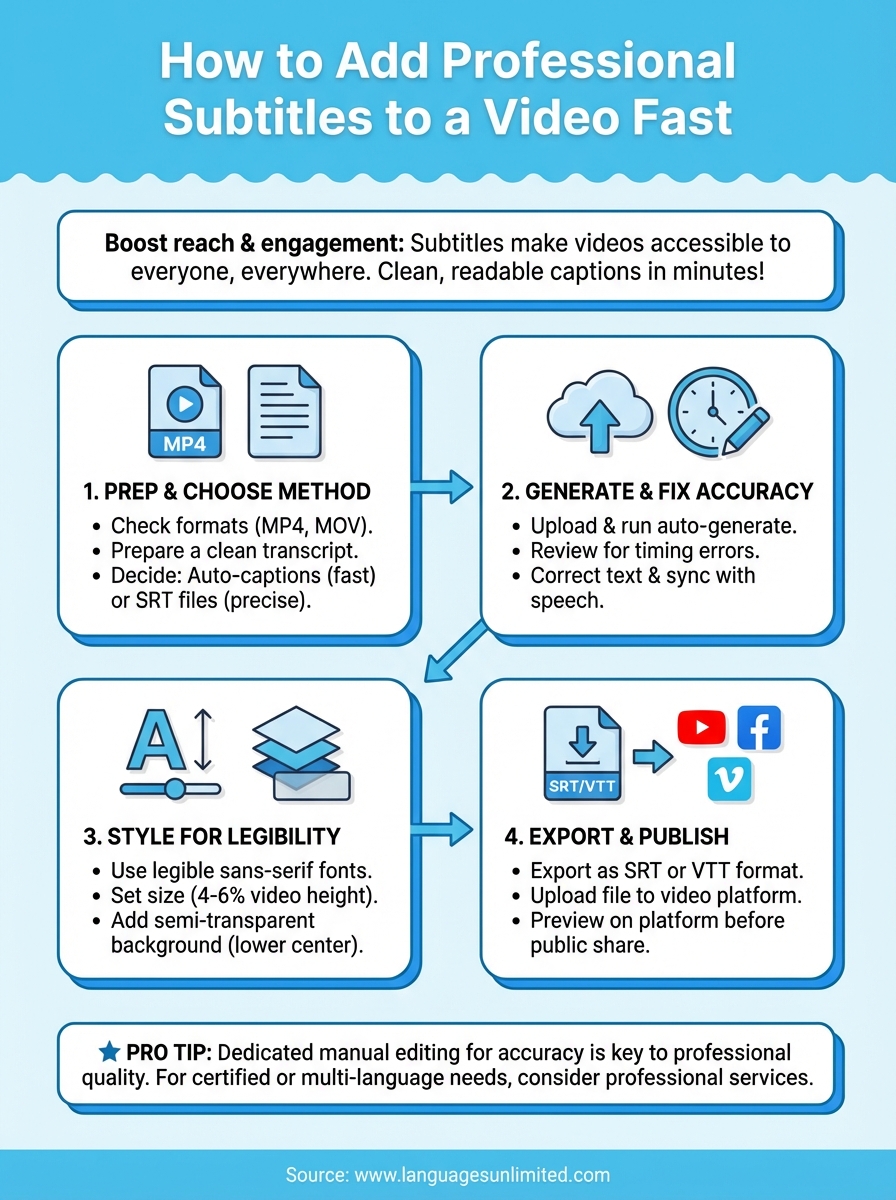
Before you start the subtitle process, gather a few essential items that will make your workflow smoother and faster. Most subtitle tools work with common video formats like MP4, MOV, and AVI, but you should verify your file is compatible with your chosen platform. You’ll also want to decide whether you’re uploading to social media platforms, embedding on your website, or distributing through video hosting services, since each has different technical requirements for subtitle files.
Check your video file format and quality
Your video should be in a standard format that subtitle tools can read. MP4 works universally across nearly every platform and subtitle generator. If you’re working with less common formats like MKV or WMV, you may need to convert your video first using free tools available from major tech companies. The audio quality matters too, since automatic caption generators rely on clear speech recognition to create accurate subtitles.
Prepare your script or transcript
Having a pre-written transcript speeds up subtitle creation dramatically, especially if you’re editing auto-generated captions for accuracy. You don’t need a perfectly formatted script, but a document with your spoken content helps you catch errors quickly during the editing phase. If you’re creating subtitles for professional content, a transcript also serves as your quality control checklist to ensure nothing gets missed or misrepresented.
A clean transcript cuts your subtitle editing time in half and improves accuracy across all languages.
Select your subtitle creation method
You need to decide between automatic subtitle generators built into video platforms, dedicated subtitle software, or manual SRT file creation. Free options exist for basic projects, while professional tools offer more control over timing, styling, and multi-language support.
Step 1. Choose auto captions or an SRT file
When you learn how to add subtitles to a video, your first decision is whether to use automatic caption generators or create a separate subtitle file. Automatic captions are built into platforms like YouTube, while SRT (SubRip Subtitle) files are standalone text documents you can upload to any video player. Each method has distinct advantages depending on your project requirements and timeline.
Auto-captions for speed and convenience
Automatic subtitle generators use speech recognition to transcribe your audio instantly, making them ideal for quick turnarounds on social media content or internal training videos. YouTube’s auto-caption feature processes your video within minutes of upload, and platforms like Vimeo offer similar functionality. The trade-off is accuracy, since automatic systems struggle with technical terminology, accents, and background noise, requiring manual review before publishing.
SRT files for precision control
SRT files give you complete control over subtitle timing, text formatting, and placement, which professional broadcasters and corporate communications teams prefer for polished deliverables. You create these files in a text editor or dedicated subtitle software, then upload them alongside your video. This method works across multiple platforms without relying on each platform’s automatic captioning quality, and you can reuse the same SRT file for different video hosting services.
Step 2. Generate subtitles and fix accuracy fast
Once you’ve chosen your subtitle method, you need to generate the initial captions and clean up any errors that automatic systems introduce. Most platforms process your audio within five to ten minutes, giving you a rough transcript that requires manual editing to reach professional quality. When you learn how to add subtitles to a video, this editing phase determines whether your captions help or confuse your audience.
Upload your video and run auto-generation
Start by uploading your video to your chosen platform and activating the automatic subtitle feature in the settings menu. YouTube places this option under the "Subtitles" tab in your video editor, while dedicated subtitle tools typically show a "Generate Captions" button on your project dashboard. The system analyzes your audio track and creates time-stamped text entries that sync with your spoken content.
Review and correct timing errors
Open the subtitle editor and play through your video, watching for words that appear too early or too late relative to the speech. You’ll find the most errors in sections with fast dialogue, overlapping speakers, or technical terms that the recognition software misinterprets. Click each subtitle entry to adjust the start and end times, ensuring text appears exactly when the speaker says those words.
Accurate timing matters more than perfect grammar, since viewers lose trust in subtitles that lag behind or jump ahead of the audio.
Step 3. Style subtitles so they look professional
Once your subtitle timing is accurate, you need to apply formatting that ensures readability across all screen sizes and viewing conditions. Professional subtitles use consistent fonts, appropriate sizing, and strategic positioning that never obscures important visual elements. The styling choices you make when learning how to add subtitles to a video directly impact whether viewers can read your captions comfortably or struggle through each frame.

Choose font and size settings
Select sans-serif fonts like Arial or Helvetica that remain legible at small sizes on mobile devices. Your subtitle font should be large enough to read on a smartphone screen, typically 4-6% of the video height, which translates to roughly 20-24 pixels for standard 1080p video. Avoid decorative or script fonts that reduce readability, especially for viewers with vision impairments or those watching on older displays.
Set background and positioning
Add a semi-transparent black box behind your text to ensure visibility against any background color in your video. Most professional captioning standards specify positioning subtitles in the lower center of the frame, about 10% up from the bottom edge to avoid covering important action or graphics. You can adjust this positioning for specific shots where lower-third graphics or on-screen text require moving captions to the top of the frame.
Black backgrounds with 70-80% opacity provide the best contrast without feeling visually heavy.
Step 4. Export and publish on each platform
After styling your subtitles, you need to export them in the correct format for your target platform and upload them properly to ensure they display without technical issues. Each platform handles subtitle files differently, with specific format requirements and upload procedures that determine whether your captions work correctly. When you complete this final step of learning how to add subtitles to a video, you’ll have working captions across all your distribution channels.
Export subtitle files in the right format
Save your subtitle file as an SRT or VTT format depending on your platform’s specifications. YouTube accepts both SRT and VTT files, while Facebook and Instagram prefer SRT format exclusively. Most subtitle editors let you export directly from the file menu, where you select your format and save the file with a clear name that identifies the language, like "video_name_english.srt" for organization.
Upload captions to each platform
Navigate to your video’s settings page and locate the subtitle or caption upload section, which YouTube places under "Subtitles" and Vimeo lists under "Distribution." Click the upload button, select your subtitle file, confirm the language selection, and preview the video to verify timing and placement before publishing.
Always preview your uploaded subtitles on the actual platform before sharing publicly to catch display errors.
Quick wrap-up
You now have the complete process for how to add subtitles to a video, from choosing your generation method through styling and publishing your captions across multiple platforms. These four steps work whether you’re creating content for social media, corporate communications, or educational platforms, and the techniques scale from single videos to large content libraries without requiring expensive software or technical expertise.
The key to professional results is accuracy in both timing and text formatting, which requires careful manual review regardless of which automatic tools you start with. Most creators underestimate how much dedicated editing time improves subtitle quality, but investing 15-20 minutes in thorough review separates amateur captions from professional deliverables that viewers actually trust.
If your project requires certified subtitles, multiple languages, or Section 508 compliance for accessibility standards, working with experienced professionals ensures accuracy and meets all regulatory requirements. Contact our team to discuss your specific subtitle requirements and receive a detailed quote for professional captioning services.