Building a multilingual web application starts with the right tools, and Vue i18n documentation is the go-to resource for developers working with Vue.js. Whether you’re adding two languages or twenty, Vue I18n gives you the framework to manage translations, switch locales, and deliver content that actually speaks to your users, no matter what language they prefer.
At Languages Unlimited, we’ve spent over 30 years helping organizations communicate across language barriers, through professional translation, interpretation, and multilingual staffing in 200+ languages. We know firsthand that localization isn’t just a technical checkbox. It shapes how people experience your product. That’s why getting the implementation right matters from the start.
This guide walks you through the full process: installing Vue I18n, configuring it in your project, structuring your translation files, and handling common scenarios like lazy loading and pluralization. Every step references the official documentation so you’re never guessing. By the end, you’ll have a working multilingual setup ready for real-world use.
What Vue I18n does and what you need
Vue I18n is the official internationalization plugin for Vue.js, maintained by the Vue.js core team. It lets you store translation strings in structured message files, then call them from your templates and JavaScript using a simple function. Instead of scattering hardcoded text across your components, you centralize every string by locale, making your app easy to update and scale across languages without touching your component logic.
How Vue I18n handles translations
At its core, Vue I18n maps locale keys to translated strings. You define a message object for each language, register it with the plugin, and then use the $t() function in your templates to retrieve the right string based on the active locale. The vue i18n documentation refers to this pattern as the "message format," and it forms the foundation of everything else the plugin does.
Keeping all your translation strings in one place per locale prevents duplication and makes handoff to professional translators far easier down the line.
Beyond basic string lookup, Vue I18n supports pluralization rules, named parameters, datetime formatting, and number formatting. This means you can handle sentences that change structure depending on quantity, inject dynamic values like usernames or item counts, and format currency according to regional conventions, all without writing custom logic from scratch.
Here’s what a basic message object looks like for two locales:
const messages = {
  en: {
    welcome: 'Welcome, {name}!',
    items: 'No items | One item | {count} items'
  },
  es: {
    welcome: '¡Bienvenido, {name}!',
    items: 'Sin elementos | Un elemento | {count} elementos'
  }
}
This structure scales cleanly. You can split messages across multiple JSON files as your app grows, then merge them at setup time so your main configuration stays lean.
What you need before you start
Before you install Vue I18n, confirm that your environment meets the minimum version requirements. Vue I18n v9 (the current major version) works exclusively with Vue 3. If your project still runs on Vue 2, you need Vue I18n v8, which has a different API surface. Check your package.json to confirm your Vue version before proceeding.
Your project also needs a working module bundler. Vue I18n works with Vite and webpack, both of which are standard in modern Vue setups built with the official scaffolding tools. If you started your project with npm create vue@latest, you already have what you need to move forward.
Here is a quick checklist of everything to have in place before starting:
| Requirement | Details |
|---|---|
| Node.js version | 18 or later |
| Vue version | Vue 3.x |
| Bundler | Vite (recommended) or webpack |
| Package manager | npm, yarn, or pnpm |
| API familiarity | Composition API or Options API (Vue I18n supports both) |
No prior experience with i18n libraries is required to follow the steps in this guide. The official Vue I18n reference site at vue-i18n.intlify.dev is the authoritative source maintained by the plugin authors if you want to explore advanced features beyond what this guide covers.
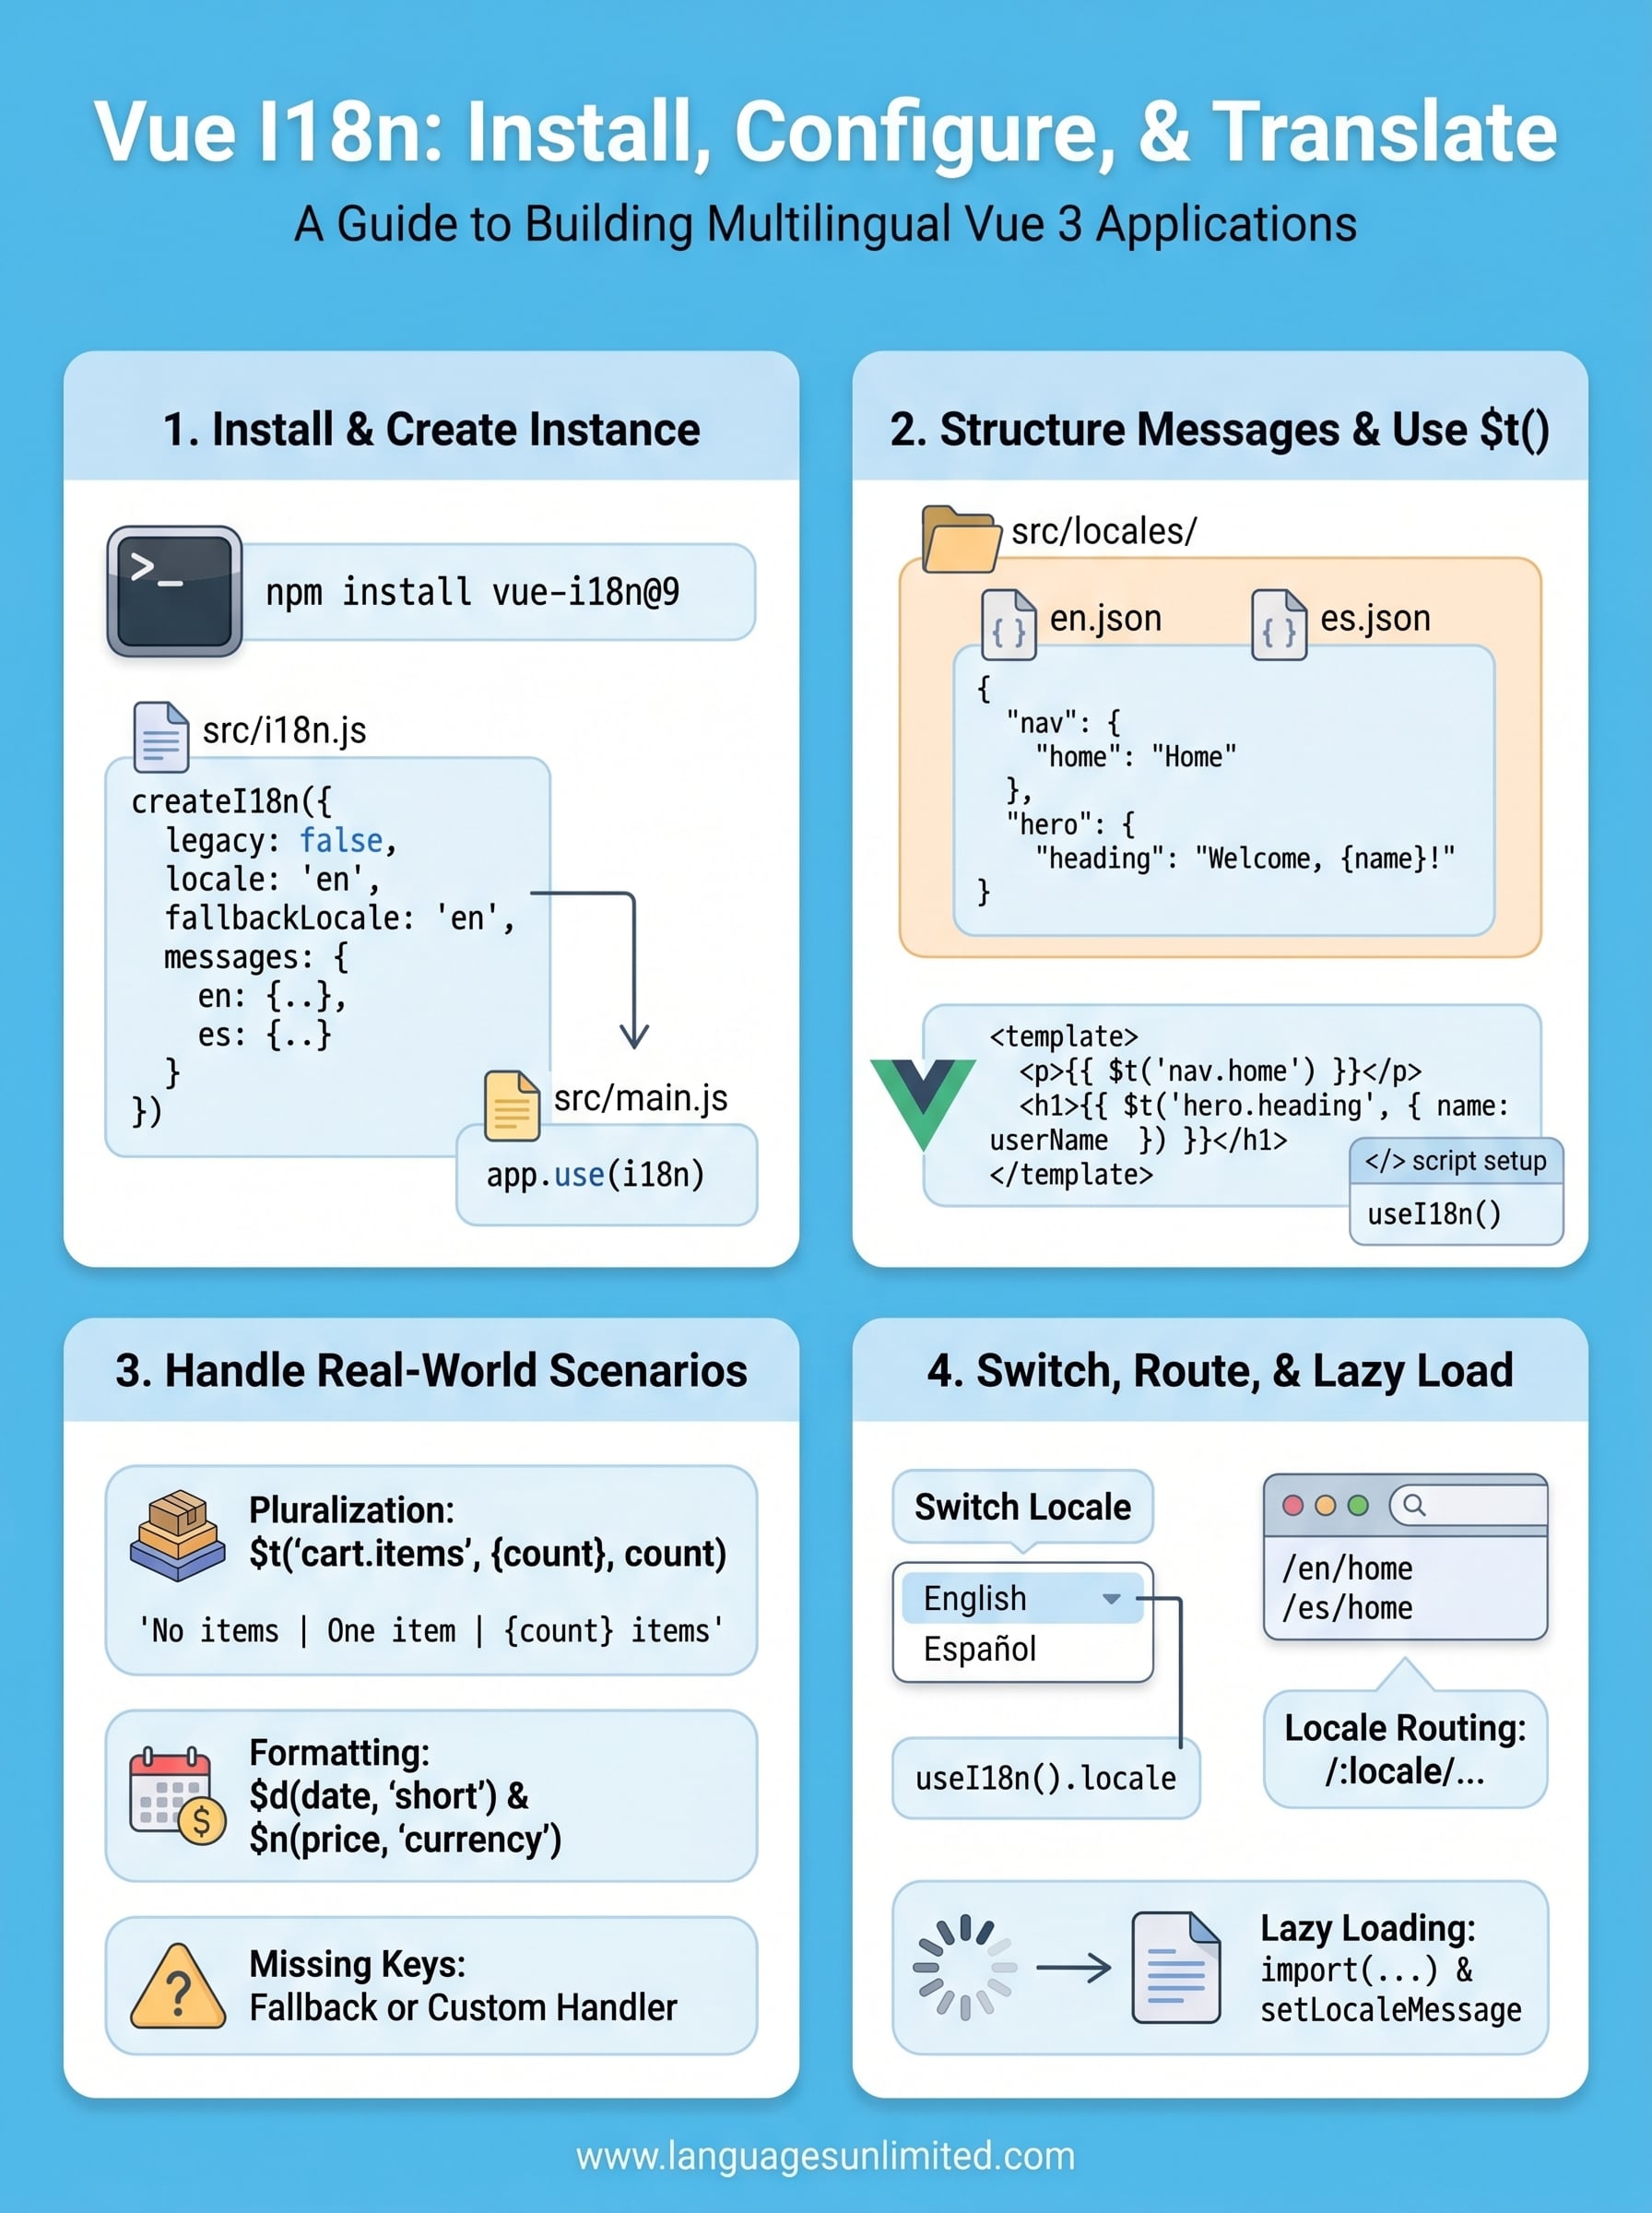
Step 1. Install Vue I18n and create the i18n instance
Run the install command and build your i18n instance before writing a single translation key. These two tasks take less than five minutes, but getting them right from the start prevents configuration errors that become harder to trace once your component tree grows. The official vue i18n documentation recommends installing v9 for all Vue 3 projects, so that’s the version this step covers.
Install the package
Open your terminal at the root of your Vue 3 project and run the command for your package manager:
# npm
npm install vue-i18n@9

# yarn
yarn add vue-i18n@9

# pnpm
pnpm add vue-i18n@9
Once the install finishes, open your package.json and confirm that vue-i18n appears in the dependencies section with a v9 version number. If your project uses TypeScript, Vue I18n ships with built-in type declarations, so you don’t need a separate @types package.
Create the i18n instance
Create a dedicated setup file at src/i18n.js rather than placing everything inside main.js. Keeping this logic separate makes the file easier to maintain as your translation messages grow. Add the following to src/i18n.js:
import { createI18n } from 'vue-i18n'

const i18n = createI18n({
  legacy: false,         // use Composition API mode
  locale: 'en',          // default locale
  fallbackLocale: 'en',
  messages: {
    en: {
      greeting: 'Hello, {name}!'
    },
    es: {
      greeting: '¡Hola, {name}!'
    }
  }
})

export default i18n
Setting legacy: false switches Vue I18n into Composition API mode, which matches how modern Vue 3 apps are built. The fallbackLocale option ensures every user sees a readable string even when their locale is missing a specific key.
Always define a fallbackLocale. Without it, missing keys render their raw key name in the UI, so users can see strings like "greeting" in production.
Register the plugin with your app
Open src/main.js and register the i18n instance the same way you register any other Vue plugin:
import { createApp } from 'vue'
import App from './App.vue'
import i18n from './i18n'

const app = createApp(App)
app.use(i18n)
app.mount('#app')
Your app now has full access to $t() in every component template, and the useI18n() composable is available inside any <script setup> block. With the plugin registered, you’re ready to start translating your first templates.
Step 2. Add messages and translate templates
With your i18n instance registered, the next step is building out your message files and putting the $t() function to work inside your components. This is where the translation layer becomes visible to users, so the structure you choose here shapes how easy maintenance will be as your app grows.
Structure your message files
Keeping all your strings inside createI18n() works fine for small projects, but as soon as you have more than a dozen keys, split each locale into its own JSON file. Store them in a src/locales/ folder and name each file after its locale code. Here is what that looks like for English and Spanish:
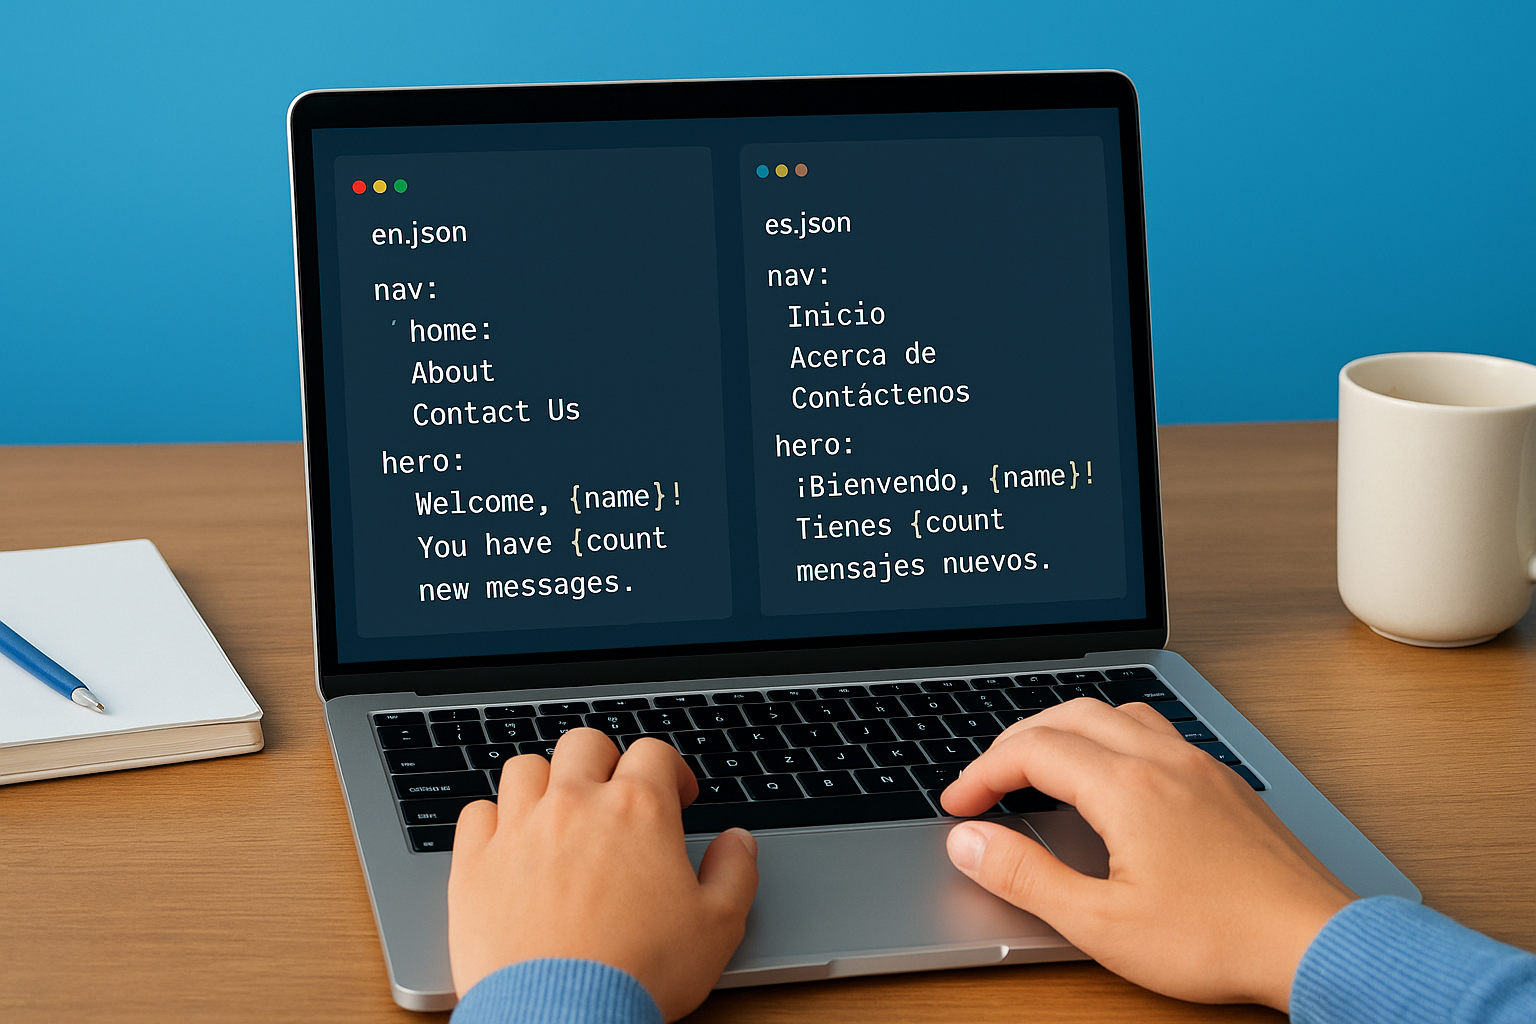
// src/locales/en.json
{
  "nav": {
    "home": "Home",
    "about": "About",
    "contact": "Contact Us"
  },
  "hero": {
    "heading": "Welcome, {name}!",
    "subheading": "You have {count} new messages."
  }
}
// src/locales/es.json
{
  "nav": {
    "home": "Inicio",
    "about": "Acerca de",
    "contact": "Contáctenos"
  },
  "hero": {
    "heading": "¡Bienvenido, {name}!",
    "subheading": "Tienes {count} mensajes nuevos."
  }
}
Update your src/i18n.js to import these files directly instead of hardcoding the strings inline:
import { createI18n } from 'vue-i18n'
import en from './locales/en.json'
import es from './locales/es.json'

const i18n = createI18n({
  legacy: false,
  locale: 'en',
  fallbackLocale: 'en',
  messages: { en, es }
})

export default i18n
Nested keys like
nav.homekeep large message files readable and make it easier to hand off specific sections to professional translators without exposing unrelated strings.
Use $t() in your templates
Inside any component, call $t() with the dot-notation key path that matches your message file structure. For components using <script setup>, destructure t from useI18n() instead. Both approaches produce identical output, so pick the one that matches your component style.
<template>
  <nav>
    <a href="/">{{ $t('nav.home') }}</a>
    <a href="/about">{{ $t('nav.about') }}</a>
  </nav>
  <h1>{{ $t('hero.heading', { name: userName }) }}</h1>
</template>

<script setup>
import { useI18n } from 'vue-i18n'
const { t } = useI18n()
// Use t('nav.home') anywhere in your script logic
</script>
The vue i18n documentation confirms that named parameters like {name} get resolved automatically when you pass a matching object as the second argument to $t(). This keeps your template markup clean and moves all dynamic data injection into a single, predictable call.
Step 3. Handle real-world translations
Basic string lookups cover a lot of ground, but real applications need more. You’ll run into sentences that change based on quantity, strings that need formatted numbers or dates, and keys that might be missing in some locales. The vue i18n documentation covers each of these scenarios in detail, and this step walks you through the patterns you’ll actually use in production.
Pluralization
English and Spanish both handle plural forms differently, and Vue I18n gives you a built-in pipe syntax to manage those variations without writing conditional logic in your templates. You define multiple plural forms separated by | characters inside your message string, then pass a count to $t() to pick the right form automatically.
// src/locales/en.json
{
  "cart": {
    "items": "No items in cart | One item in cart | {count} items in cart"
  }
}
Call the translation with the { count } parameter and Vue I18n resolves the correct plural form based on the value you pass:
<p>{{ $t('cart.items', { count: itemCount }, itemCount) }}</p>
The third argument to
$t()is the number Vue I18n uses to select the plural form. Without it, the plugin always picks the singular string regardless of your count value.
Date and number formatting
Register named datetime and number formats directly in your createI18n() config, then call $d() for dates and $n() for numbers anywhere in your templates. This keeps formatting logic centralized and avoids scattering Intl calls across your components.
const i18n = createI18n({
  legacy: false,
  locale: 'en',
  fallbackLocale: 'en',
  datetimeFormats: {
    en: { short: { year: 'numeric', month: 'short', day: 'numeric' } }
  },
  numberFormats: {
    en: { currency: { style: 'currency', currency: 'USD' } }
  },
  messages: { en, es }
})
Use these named formats in your templates by passing the format name as the second argument:
<p>{{ $d(orderDate, 'short') }}</p>
<p>{{ $n(totalPrice, 'currency') }}</p>
Handling missing translation keys
When a key exists in one locale but not another, Vue I18n falls back to your configured fallbackLocale rather than rendering the raw key string. For a more explicit safety net, add a custom missing handler so your team gets a clear signal whenever a translator misses a key during a new language rollout:
const i18n = createI18n({
  legacy: false,
  locale: 'en',
  fallbackLocale: 'en',
  missing: (locale, key) => {
    console.warn(`Missing translation: [${locale}] ${key}`)
  },
  messages: { en, es }
})
This approach keeps your production UI readable while giving developers the visibility they need to catch gaps before users ever see them.
Step 4. Switch locales, routes, and lazy load
Letting users change their language at runtime and loading only the translation files they need are two of the most practical patterns in any multilingual app. The vue i18n documentation covers both topics, but this step gives you the working code to implement them without hunting through multiple reference pages. Combined with locale-aware routing, these three patterns form the backbone of a production-ready internationalization setup.
Switching the active locale at runtime
In Composition API mode, you access the active locale as a reactive ref through useI18n(). Updating its value immediately re-renders every translated string across your entire component tree, which makes building a language switcher straightforward.
<template>
  <select v-model="locale">
    <option value="en">English</option>
    <option value="es">Español</option>
  </select>
</template>

<script setup>
import { useI18n } from 'vue-i18n'
const { locale } = useI18n()
</script>
Persist the user’s selected locale to
localStorageso returning visitors always see their preferred language without needing to reselect it on every page load.
Locale-based routing with Vue Router
Prefixing your routes with a locale segment like /en/ or /es/ makes the active language visible in the URL, which helps with SEO and lets users share language-specific links. Add a dynamic :locale param to your router configuration and read it inside a navigation guard to keep your i18n instance in sync.
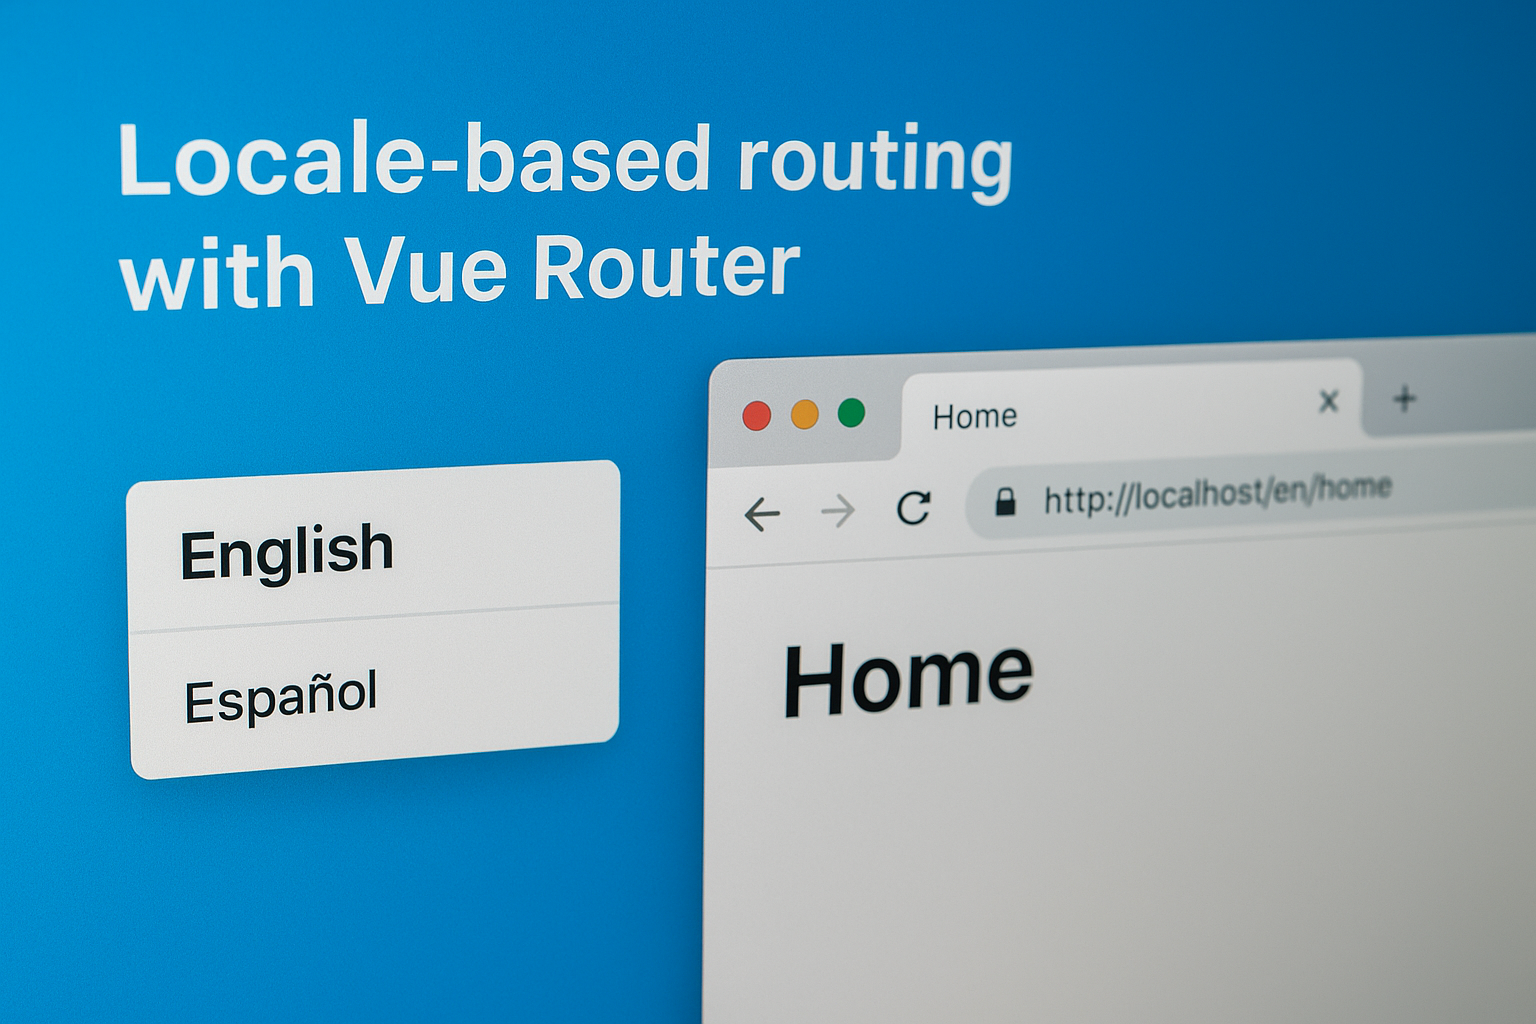
// src/router/index.js
import { createRouter, createWebHistory } from 'vue-router'
import i18n from '../i18n'

const router = createRouter({
  history: createWebHistory(),
  routes: [
    { path: '/:locale/home', component: () => import('../views/Home.vue') }
  ]
})

router.beforeEach((to) => {
  const lang = to.params.locale || 'en'
  i18n.global.locale.value = lang
})

export default router
This guard runs on every route change, so the language always matches the URL segment without extra logic in your components.
Lazy loading translation files
Loading all locale files upfront increases your initial bundle size for users who only ever need one language. Instead, load each locale on demand using a dynamic import and register the messages before switching the active locale.
// src/i18n.js
export async function loadLocale(locale) {
  const messages = await import(`./locales/${locale}.json`)
  i18n.global.setLocaleMessage(locale, messages.default)
  i18n.global.locale.value = locale
}
Call loadLocale('es') from your language switcher component whenever a user selects a new language. The first load fetches the file from your server; subsequent switches reuse the already-registered messages, keeping network requests to a minimum.
Next steps
You now have a complete path from installation to production-ready internationalization. The vue i18n documentation at vue-i18n.intlify.dev goes deeper on advanced topics like custom pluralization rules, message compilation, and TypeScript integration if you want to extend what you’ve built here. Start with the patterns in this guide, then pull in those features as your app’s language requirements grow.
The technical side of localization only takes you so far. Once your app loads the right strings for each locale, your translation content itself needs to be accurate, culturally appropriate, and professionally reviewed. Relying on machine-generated strings for legal, medical, or customer-facing copy introduces errors that erode user trust in ways that are hard to recover from.
If your project needs human-reviewed translations in 200+ languages, a professional language services team can close that gap fast. Contact our translation specialists to discuss what your project needs.