Building a multilingual React application starts with choosing the right tools, and for most developers, that means reaching for react-i18next. At Languages Unlimited, we’ve spent over 30 years helping organizations communicate across language barriers through professional translation, interpretation, and localization services. We understand that effective multilingual communication extends beyond human translation; it also lives inside the software your users interact with every day. Getting the react-i18next documentation right from the start saves you from painful refactors down the road.
This library is the most widely adopted i18n framework in the React ecosystem, but its documentation can feel scattered when you’re trying to piece together setup steps, hook usage, and namespace configuration all at once. Whether you’re internationalizing your first app or migrating an existing project, having a clear reference makes all the difference between a smooth implementation and hours of debugging.
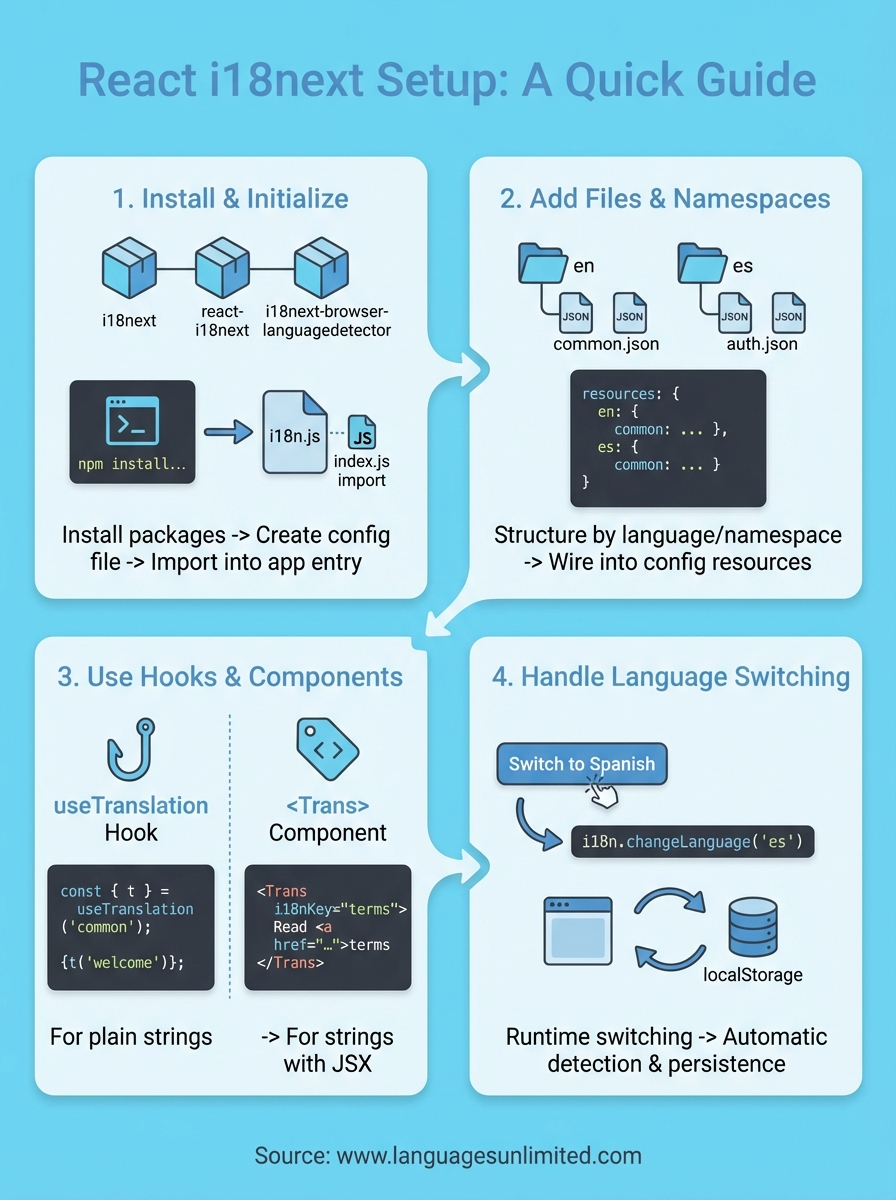
This guide walks you through the complete react-i18next setup process, from installation and configuration to using hooks like useTranslation and organizing your translations with namespaces. Each section includes practical code examples you can apply immediately, so you can get your app speaking multiple languages without guesswork.
What react-i18next is and when to use it
React-i18next is a React-specific binding layer built on top of i18next, a full-featured internationalization framework for JavaScript. It gives you a set of hooks, components, and utilities that connect your React component tree to i18next’s translation engine. The result is a library that handles string lookups, pluralization, interpolation, and language detection without you needing to wire everything up manually.
The core architecture
The library separates two concerns cleanly. i18next manages the translation data, language detection, and plugin ecosystem. React-i18next handles the React side, exposing hooks like useTranslation and components like <Trans> so your components stay readable. This split matters because it means you can swap out plugins for loading, caching, or detecting languages without touching your component code.
Understanding this two-layer architecture is the key to making sense of the react i18next documentation when you read it for the first time.
When to choose react-i18next over alternatives
You should reach for react-i18next when your project needs more than simple string replacement. If you’re building an application with multiple locales, plural forms, nested translation keys, or dynamic content with variables, this library handles all of it out of the box. Smaller projects sometimes get by with a basic context-based solution, but those break down fast as complexity grows.
The table below shows the most common use cases where react-i18next is the right fit:
| Use case | Why react-i18next fits |
|---|---|
| Multiple language support | Built-in language switching and detection |
| Large translation files | Namespace splitting keeps files manageable |
| Pluralization rules | i18next handles complex plural forms per locale |
| Server-side rendering | Compatible with Next.js and other SSR setups |
| Dynamic strings | Interpolation and formatting built in |
Step 1. Install and initialize i18next in React
Before you write a single translation string, you need to install the right packages. The react i18next documentation recommends installing three packages together: i18next, react-i18next, and i18next-browser-languagedetector for client-side language detection.
Install the required packages
Run this command in your project root to get everything in place:
npm install i18next react-i18next i18next-browser-languagedetector
This pulls in the core engine, the React bindings, and the detection plugin in a single step. Once that finishes, you’re ready to create your configuration file.
Create your i18n configuration file
Create a file called i18n.js at the root of your src folder and add the following:
import i18n from 'i18next';
import { initReactI18next } from 'react-i18next';
import LanguageDetector from 'i18next-browser-languagedetector';

i18n
  .use(LanguageDetector)
  .use(initReactI18next)
  .init({
    fallbackLng: 'en',
    interpolation: { escapeValue: false },
    resources: {}
  });

export default i18n;
Setting
escapeValue: falseis safe here because React already escapes output by default.
Import this file once in your index.js before rendering your app. That single import is enough to activate i18next across every component in your tree.
Step 2. Add translation files and namespaces
With i18next initialized, your next task is creating the translation files that your app will load at runtime. Organizing these files thoughtfully from the start prevents bloated, unmanageable string lists as your project scales. The react i18next documentation recommends using namespaces to split translations by feature area rather than dumping everything into a single file.
Structure your translation files
Store your translations in a locales folder inside src. Each language gets its own subfolder, and each namespace maps to a separate JSON file. A typical structure looks like this:

src/
  locales/
    en/
      common.json
      auth.json
    es/
      common.json
      auth.json
Each JSON file holds key-value pairs for that namespace. Your common.json for English might look like:
{
  "welcome": "Welcome",
  "logout": "Log out"
}
Wire the files into your config
Update the resources object in your i18n.js file to import and register each namespace by language. This approach keeps your config explicit and avoids lazy-loading complexity for smaller apps:
import commonEN from './locales/en/common.json';
import commonES from './locales/es/common.json';

resources: {
  en: { common: commonEN },
  es: { common: commonES }
}
Keeping one namespace per feature area makes it far easier to hand off specific files to a professional translation team without sharing your entire codebase.
Step 3. Use hooks and components in your UI
With your translation files in place, you can now pull strings into your components. The react i18next documentation covers two main tools for this: the useTranslation hook for plain strings and the <Trans> component for strings that contain JSX elements.
The useTranslation hook
The useTranslation hook is the primary way to access translations inside a functional component. You pass it your namespace name, and it returns a t function that accepts a translation key and returns the matching string:

import { useTranslation } from 'react-i18next';

function Header() {
  const { t } = useTranslation('common');
  return <h1>{t('welcome')}</h1>;
}
You can pass a second argument to
tto supply interpolation variables, for example:t('greeting', { name: 'Maria' }).
When to use the Trans component
Use <Trans> when your translated string needs to wrap a React element like a link or a bold tag. The component keeps your HTML structure intact while still pulling the string from your JSON file:
import { Trans } from 'react-i18next';

<Trans i18nKey="common:terms">
  Read our <a href="/terms">terms</a> before continuing.
</Trans>
Step 4. Handle language switching and detection
Once your translations are wired up, you need a way for users to switch languages at runtime and for your app to detect the right language on load. The react i18next documentation covers both scenarios, and combining them gives your app a seamless multilingual experience without forcing users to pick a language every time they visit.
Trigger a language change from a component
Your i18n instance exposes a changeLanguage method that you can call from any component. Import the instance and attach it to a button click or a dropdown onChange event:
import { useTranslation } from 'react-i18next';

function LanguageSwitcher() {
  const { i18n } = useTranslation();
  return (
    <button onClick={() => i18n.changeLanguage('es')}>
      Switch to Spanish
    </button>
  );
}
Calling
changeLanguageupdates every component usinguseTranslationimmediately, so your UI re-renders without a page reload.
Configure automatic language detection
The i18next-browser-languagedetector plugin you installed in Step 1 reads the browser’s language preference automatically when your app loads. You can control the detection order by passing a detection config block to your init call:
detection: {
  order: ['navigator', 'localStorage', 'htmlTag'],
  caches: ['localStorage']
}
This tells i18next to check the browser first, then fall back to localStorage, so returning users keep their last selection.
Final checks and next steps
You now have a working react-i18next setup with translation files, namespaces, hooks, and language switching all configured. Before you ship, run through a few quick checks: confirm your fallbackLng is set to a language that has complete translation coverage, test that changeLanguage updates every visible string immediately, and verify that localStorage persists the user’s selection across page reloads.
From here, the react i18next documentation points to several useful next steps. If your app grows beyond a handful of locales, add i18next-http-backend to load translation files on demand instead of bundling them. For production, consider a professional review of your translated strings to catch awkward phrasing or cultural mismatches that automated tools miss.
When you need human translators to review or produce your locale files, contact the Languages Unlimited team to connect with certified language professionals who work across more than 200 languages.