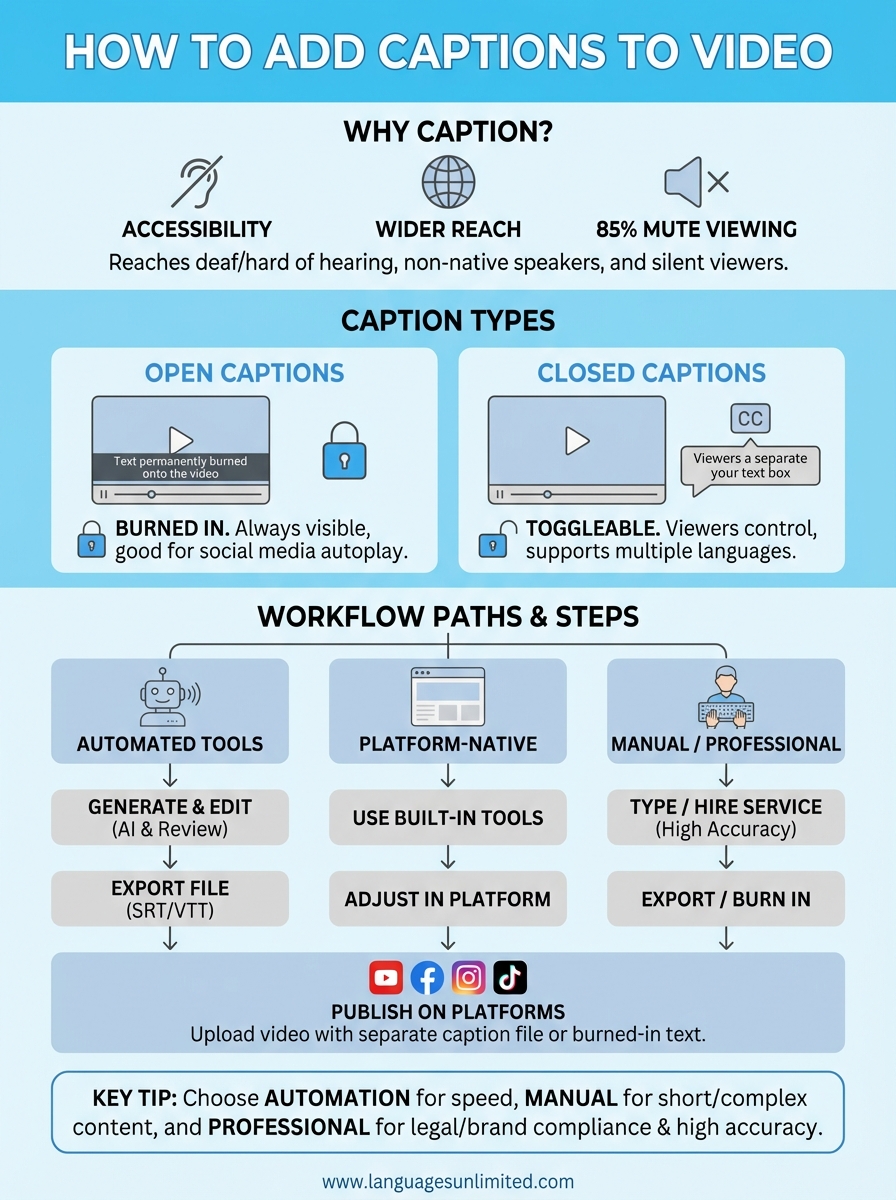
Video content without captions misses a significant portion of its potential audience. Whether you’re creating content for social media, corporate training, or public-facing communications, knowing how to add captions to video makes your work accessible to viewers who are deaf or hard of hearing, non-native speakers, and the 85% of people who watch videos on mute.
Adding captions doesn’t have to be complicated. From AI-powered auto-generators to built-in platform tools, you have more options than ever to get accurate text on your videos, regardless of your technical skill level or budget.
This guide walks you through the most effective methods for captioning videos across popular platforms and tools. At Languages Unlimited, we’ve provided professional captioning and accessibility services since 1994, giving us firsthand insight into what works. Below, you’ll find practical steps you can follow today to caption your own content or decide when professional support makes sense.
Caption types and what you need first
Before you learn how to add captions to video, you need to understand what format works best for your project. Open captions burn directly into your video file and appear to every viewer, while closed captions exist as a separate text file that viewers can toggle on or off. Most platforms like YouTube and Facebook prefer closed captions because they give viewers control and support multiple languages.
Open vs. closed captions
Open captions work best when you need guaranteed visibility across all playback scenarios, particularly for social media where autoplay often happens without sound. You’ll see these frequently on Instagram Reels or TikTok videos because they ensure your message gets through even when users scroll in silence. Closed captions give you more flexibility since viewers who don’t need them can disable them, and you can offer multiple language tracks without creating separate video files.
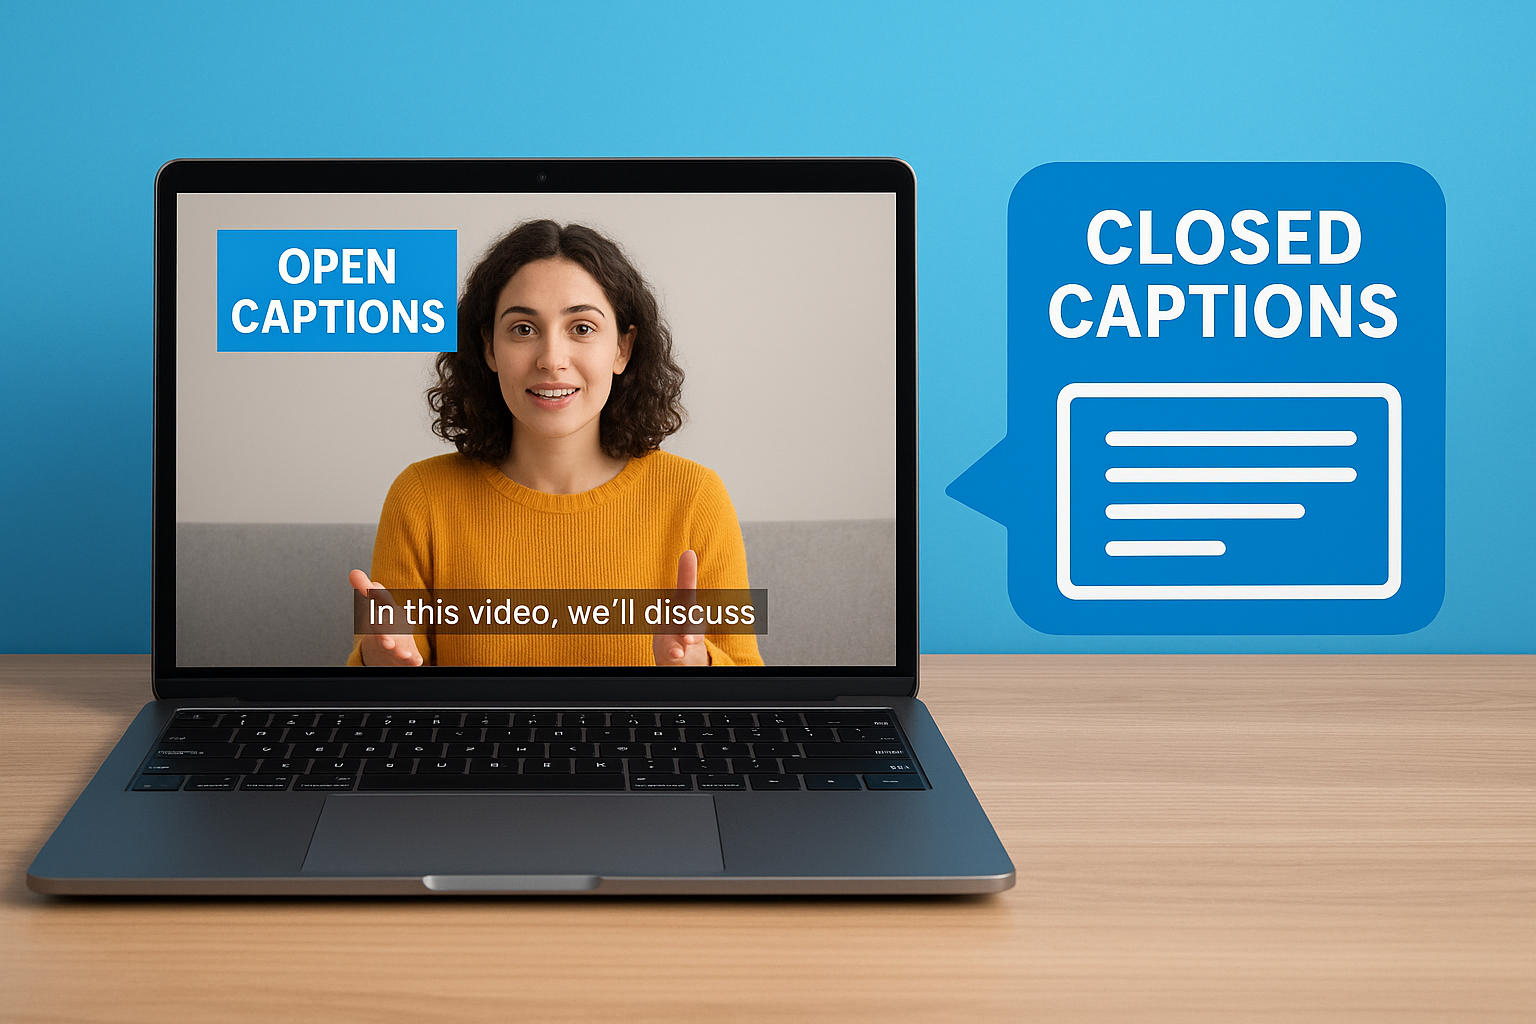
Closed captions reach a wider audience because they support multiple languages and viewer preferences without duplicating your video content.
What you’ll need before you start
Gathering your materials upfront makes the captioning process smoother regardless of which method you choose. You’ll need your finalized video file in a common format like MP4, MOV, or AVI, plus a clear audio track since caption accuracy depends heavily on speech clarity. Having a script or transcript prepared speeds up the editing process, though auto-generation tools can create one if you don’t.
Your preparation checklist includes:
- Video file exported and saved locally
- Audio track with minimal background noise
- Script or transcript (optional but helpful)
- Access to your chosen captioning tool or platform
- Style preferences for font, size, and positioning
Step 1. Choose your caption workflow
Your workflow choice depends on your budget, timeline, and accuracy requirements. If you need to know how to add captions to video efficiently, you’ll save time by matching your method to your project’s specific demands. A quick social media clip might only need an AI auto-generator, while legal or medical content requires human review to meet compliance standards.
Three main workflow paths
You can caption videos through automated tools, platform-native features, or manual methods. Automated tools like speech recognition software generate captions in minutes but require editing for accuracy, typically achieving 70-85% accuracy depending on audio quality. Platform-native options like YouTube’s auto-caption feature work well for content that stays on that platform, though you’ll still need to review and correct errors before publishing.
Manual captioning gives you complete control but takes considerably longer. You type every word yourself while watching your video, which works best for short clips under five minutes or content with challenging audio. Professional captioning services combine human expertise with quality assurance workflows, delivering 99%+ accuracy for regulated industries or multilingual projects.
Choose automation for speed and volume, manual methods for precision on short content, or professional services when accuracy affects legal compliance or brand reputation.
Step 2. Generate and edit captions
Once you’ve selected your workflow, you need to actually create the caption file. Most users start with automatic speech recognition (ASR) tools that transcribe your audio, then refine the output to fix errors. This step determines your caption quality and how well your audience understands your message.
Using auto-generation tools
Upload your video to your chosen platform or tool and let the speech recognition engine process your audio. YouTube Studio, for instance, analyzes your video and produces a draft caption file within minutes of upload. Third-party tools like Google Cloud Speech-to-Text or platform-specific features work similarly but vary in processing time based on video length.
The auto-generated output gives you a starting point but requires review. You’ll find mistakes in proper nouns, technical terms, and homophones where the software guesses incorrectly between words like "their" and "there."
Correcting common errors
Review your generated captions line by line, watching your video simultaneously to catch timing mismatches. Fix any misspelled names, incorrect punctuation, and speaker misidentifications that automated tools typically struggle with. Pay special attention to industry-specific vocabulary and acronyms since these trip up standard ASR models.
Add speaker labels when multiple people talk, and break long sentences into shorter caption segments for easier reading on screen.
Step 3. Export or burn in captions
After you polish your captions, you need to decide whether to export them as a separate file or burn them permanently into your video. This choice affects where you can use your video and how much flexibility you maintain for future edits. Understanding how to add captions to video through both methods gives you options for different distribution channels.
Exporting separate caption files
Save your captions as a standalone text file in formats like SRT (SubRip), VTT (WebVTT), or SCC (Scenarist Closed Captions) depending on your target platform. SRT files work with most video players and social platforms, while VTT serves web-based video players better with enhanced styling options. Your captioning tool typically offers an export menu where you select your preferred format and download the file to match your video filename.
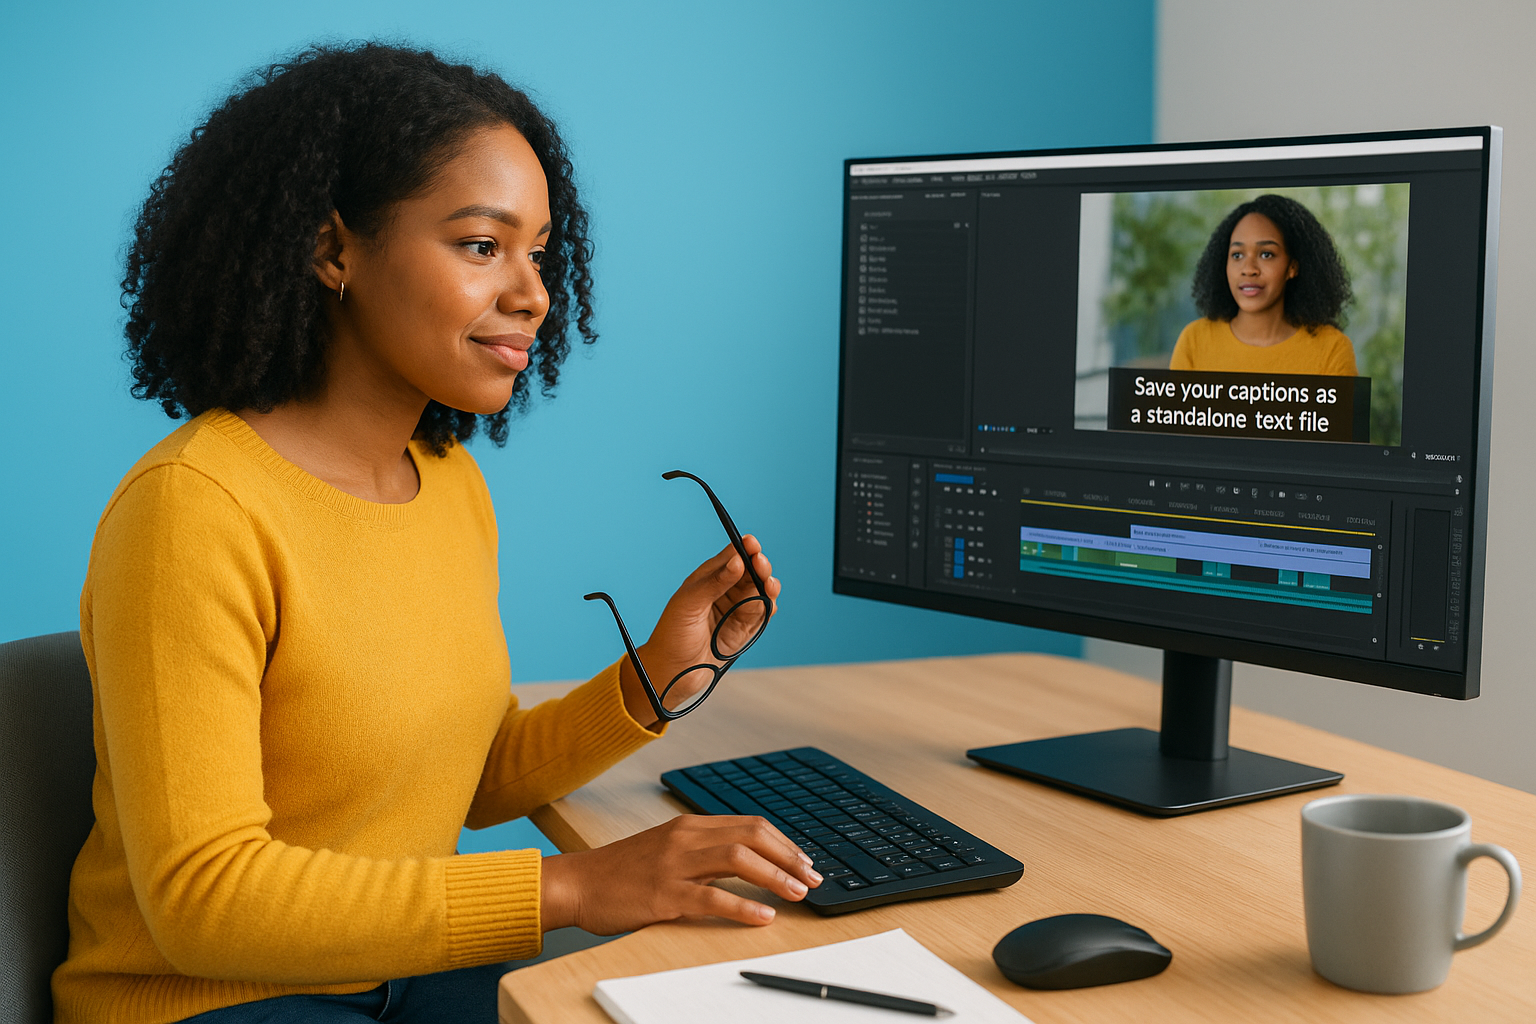
Separate caption files let you update text without re-encoding your entire video, saving hours when you need to fix errors or add translations.
Keep your caption file and video file in the same folder with matching names (like "video.mp4" and "video.srt") so platforms can automatically pair them during upload.
Burning captions into video
Embed captions directly into your video frames when you need guaranteed display across all viewing situations. Video editing software like Adobe Premiere Pro or DaVinci Resolve includes hardcoding features that overlay your text permanently onto the video picture. This method works best for social media posts where you can’t control caption settings or when distributing videos as standalone files without platform support.
Step 4. Publish on major platforms
Each platform handles captions differently, so understanding how to add captions to video for your specific destination saves you from reformatting headaches. Your caption method from the previous step determines whether you upload separate files or rely on burned-in text already embedded in your video.
YouTube and Facebook
Upload your video to YouTube Studio and navigate to the Subtitles section under your video details. Click "Add language" and select your target language, then upload your SRT or VTT file through the "Upload file" option. YouTube automatically syncs the captions with your video timeline, though you can review and adjust timing if needed.
Facebook requires you to upload your video first, then add captions through the video post settings. Click "Edit video" and select "Captions" to upload your SRT file, or let Facebook auto-generate captions that you can edit directly in their interface.
Platform-native caption uploads give you better control over styling and language options compared to burned-in captions.
Instagram and TikTok
Instagram and TikTok both prioritize burned-in captions since their mobile-first design favors guaranteed visibility. Upload your video with hardcoded text already embedded, or use their built-in caption tools that overlay text directly during the editing process. These platforms automatically position captions in the center of your frame to maximize readability on small screens.
Where to go from here
You now know how to add captions to video across multiple platforms and workflows. Start with automated tools for quick projects, then move to professional services when accuracy matters for your brand or compliance needs. Practice with short videos first to build confidence before tackling longer content.
Your next step depends on your video volume and quality requirements. Small teams handling occasional videos can manage with platform-native tools and manual editing. Organizations producing regular content or serving regulated industries save time and reduce risk by working with experienced captioning providers.
Contact Languages Unlimited if you need Section 508 compliant captions, multilingual subtitles, or professional review of your video accessibility. Our team has delivered accurate captions for legal proceedings, medical training videos, and corporate communications since 1994, helping organizations reach wider audiences while meeting accessibility standards.