Adding subtitles to your video projects makes your content accessible to wider audiences, including viewers who are deaf or hard of hearing, non-native speakers, and anyone watching without sound. If you’re working in Apple’s professional editing suite, this Final Cut Pro subtitles tutorial walks you through every method available: manual creation, SRT file imports, and the automatic AI captioning features introduced in recent updates.
Whether you’re producing corporate training videos, legal depositions, medical presentations, or social media content, accurate subtitles aren’t optional anymore. They’re expected. And getting them right, especially when multiple languages or compliance standards are involved, requires more than just pressing a button. That’s where understanding the tools (and their limits) matters.
At Languages Unlimited, we’ve provided professional subtitling, captioning, and Section 508–compliant accessibility services since 1994. We work with organizations across all 50 states that need subtitles done accurately in 200+ languages. This guide shares practical, hands-on steps so you can handle straightforward subtitle work in Final Cut Pro yourself, and know exactly when a project calls for professional language support to get it right.
Captions vs subtitles and when to use each
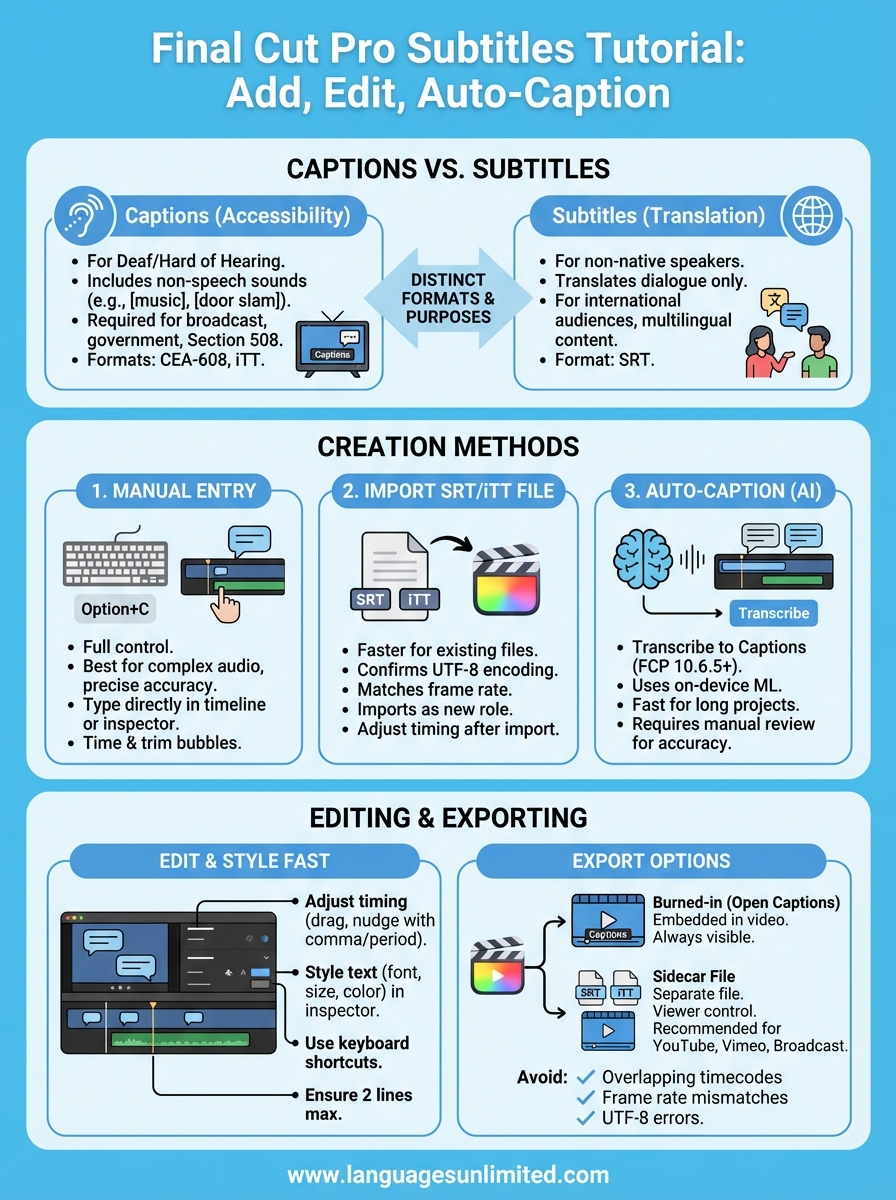
Most editors use "captions" and "subtitles" interchangeably, but Final Cut Pro treats them as distinct formats with different technical purposes. Knowing the difference before you start will save you from rebuilding tracks later, and it determines which workflow in this Final Cut Pro subtitles tutorial applies to your project.
What captions are and when to use them
Captions are designed for viewers who are deaf or hard of hearing. They include not only spoken dialogue but also relevant non-speech information like [music playing], [door slams], or [phone ringing]. In the United States, captions are often legally required for broadcast content, federally funded programs, and any material that must comply with Section 508 of the Rehabilitation Act or the Americans with Disabilities Act (ADA).
Final Cut Pro supports two caption formats natively: CEA-608 (used for broadcast and DVD delivery) and iTT (used for Apple platforms like iTunes and Apple TV). If you’re producing content for web platforms, you’ll often work with SRT files, which Final Cut Pro can import. Caption files carry timing data, speaker identification when needed, and sound descriptors that subtitles simply do not include.
If your project is for a government agency, healthcare institution, or any federally funded program, captions are not optional. They are a compliance requirement.
What subtitles are and when to use them
Subtitles assume the viewer can hear but does not understand the spoken language. They translate or transcribe dialogue only, without noting non-speech sounds. Subtitles are the right choice when you’re distributing a video to an international audience, localizing corporate training content, or adding a second-language track for a multilingual workforce.
In Final Cut Pro, subtitles operate within the same caption workflow, but the content and intent differ significantly. You’re not adding accessibility information for hearing-impaired viewers; you’re providing a language bridge. This distinction matters when you’re deciding what text to include, how much detail to add, and whether you need a professional translator to handle the content accurately.
Choosing the right format for your project
Use this table to match your project type to the correct format before you open Final Cut Pro:
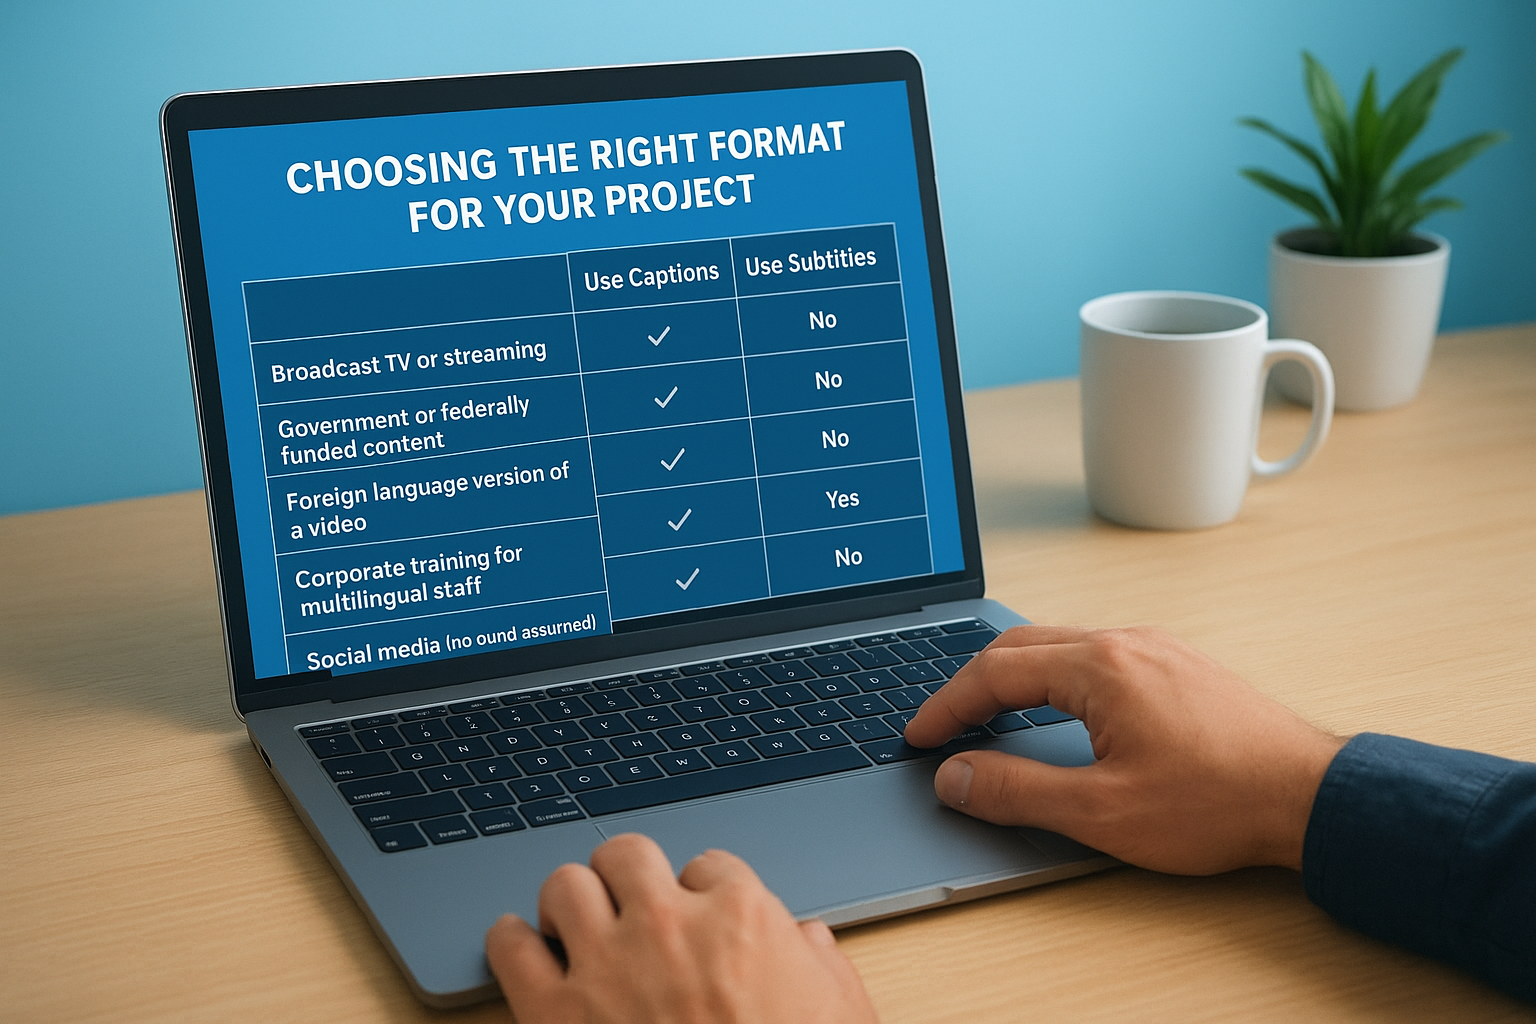
| Project Type | Use Captions | Use Subtitles |
|---|---|---|
| Broadcast TV or streaming (US) | Yes (CEA-608) | No |
| Government or federally funded content | Yes (Section 508) | No |
| Foreign language version of a video | No | Yes |
| Corporate training for multilingual staff | Sometimes both | Yes |
| Social media (no sound assumed) | Yes | No |
| Film festival or international distribution | No | Yes |
| Legal deposition or court video | Yes | No |
Picking the wrong format early means rebuilding your entire caption track later. For example, if you create a subtitle track for a federally funded health education video, you’ll miss the non-speech sound descriptors that Section 508 compliance requires. Taking two minutes to confirm your format before you touch the timeline saves hours of revision downstream.
Before you start in Final Cut Pro
Before you dive into any step of this final cut pro subtitles tutorial, a few setup choices will determine whether your workflow runs smoothly or stalls. Final Cut Pro’s caption tools have changed significantly across versions, and starting with the wrong project settings can lock you into formats that don’t match your delivery requirements.
Check your Final Cut Pro version
The Transcribe to Captions feature (Apple’s built-in AI captioning tool) requires Final Cut Pro 10.6.5 or later. If you’re running an older version, the auto-caption option won’t appear in your menus, and you’ll need to rely on manual entry or SRT imports instead. Check the Mac App Store for any pending updates before you start.
Running an outdated version is the most common reason editors can’t find the captioning tools shown in tutorials.
You can verify your installed version by opening Final Cut Pro and going to Final Cut Pro > About Final Cut Pro in the menu bar. If you see version 10.6.5 or higher, all three methods in this guide are available to you.
Confirm your project frame rate and language settings
Your project’s frame rate directly affects caption timing. A caption file timed for 29.97fps will drift noticeably in a 24fps timeline. Before you create or import any caption track, confirm that your project properties match your source footage. In Final Cut Pro, click on the project in the browser, then press Command+J to open Project Properties and review the frame rate, resolution, and audio settings.
Setting your primary story language at the project level also helps if you plan to add multiple language tracks later. You do this inside the Captions inspector after your first caption role is created, but deciding on language upfront prevents you from renaming and re-assigning roles across a large timeline.
Prepare your assets before opening the timeline
Gather everything you need before touching the caption tools. If you’re importing an SRT or iTT file, confirm it’s saved in UTF-8 encoding to avoid character errors with accented or non-Latin characters. If you plan to use AI transcription, make sure your audio levels are clean and consistent, since low-quality or noisy audio produces inaccurate auto-captions that require significant manual correction afterward.
Step 1. Create captions manually in the timeline
Manual caption entry gives you full control over every line, its timing, and its placement. This method works in every version of Final Cut Pro that supports captions, and it’s the most reliable approach when your audio is complex, includes multiple speakers, or requires precise legal or medical accuracy. In this part of the final cut pro subtitles tutorial, you’ll build a caption track from scratch directly inside your timeline.
Open the caption editor and add your first role
Start by opening your project in the timeline editor. Go to Edit > Captions > Add Caption in the menu bar, or use the keyboard shortcut Option+C. Final Cut Pro will insert a caption bubble at your playhead position and simultaneously open the Caption inspector on the right side of the interface. You’ll also notice a new caption role lane appearing above your primary story line in the timeline.
By default, Final Cut Pro assigns the CEA-608 format to your first caption. If your project requires iTT instead (for Apple platform delivery), click the caption bubble, open the inspector, and change the role format before you type anything. Changing the format after you’ve written 50 captions is tedious and error-prone.
Set your caption format before you type a single word. Changing it later means reassigning every caption individually.
Type, time, and trim each caption
Once your first caption bubble appears in the timeline, type your text directly into the caption bubble or into the text field in the inspector. Keep each caption to a maximum of two lines and 42 characters per line to stay within broadcast-safe limits and avoid text overflow on smaller screens.
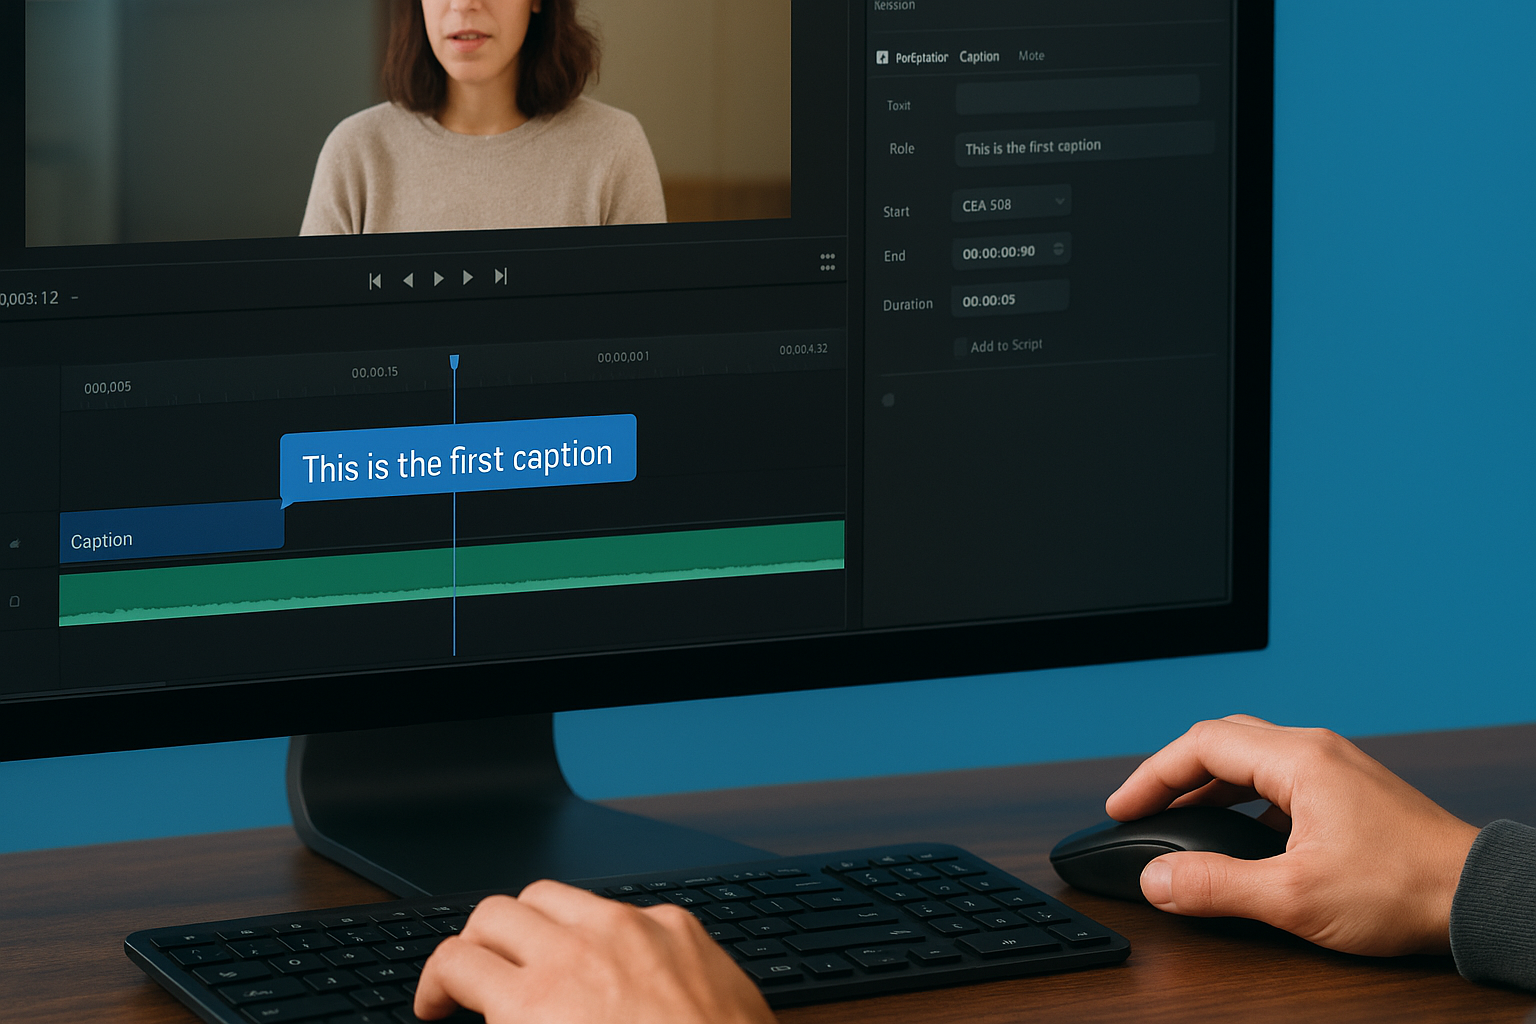
To set the in and out points, drag the left and right edges of the caption bubble in the timeline, just as you would trim a video clip. For finer control, position the playhead where you want the caption to start, select the bubble, and use the inspector’s Start Time and Duration fields to type in exact timecode values. Then move to the next subtitle by pressing Option+C again to insert the next bubble immediately after.
Work through your timeline in real-time playback to catch any timing drift or line breaks that don’t match natural speech pauses. Accurate manual captions take time, but they produce the cleanest result when your content demands precision.
Step 2. Import an SRT or iTT caption file
If you already have a caption file from a professional transcription service, a translation vendor, or a previous editing project, importing it into Final Cut Pro is faster than building captions from scratch. This method works well when you need multiple language tracks or when accuracy requirements mean a human translator or captioner prepared the file outside the app. In this part of the final cut pro subtitles tutorial, you’ll bring an external file into your timeline in just a few clicks.
Prepare your SRT or iTT file before importing
Before you import, confirm the file format and encoding. Final Cut Pro accepts SRT (SubRip Text) and iTT (iTunes Timed Text) files. SRT is the more universal format and works across most platforms, while iTT is Apple’s native format that supports richer styling and is preferred for Apple TV and iTunes Store delivery.
Always save your SRT file in UTF-8 encoding before importing. Any other encoding will produce broken characters for accented letters or non-Latin scripts.
Check your SRT file structure before importing. Each entry needs a sequential number, a timecode range using the format HH:MM:SS,mmm --> HH:MM:SS,mmm, and the subtitle text on the following line. Here is a short example:
1
00:00:01,000 --> 00:00:04,500
Welcome to today's training session.

2
00:00:04,800 --> 00:00:08,200
We'll cover the new compliance guidelines.
Mismatched frame rates between your file and your timeline are the most common cause of drifting captions after import. Open your Project Properties with Command+J and verify that your timeline frame rate matches the frame rate your caption file was timed against before you bring anything in.
Import the file into your timeline
With your project open, go to File > Import > Captions in the menu bar. Navigate to your SRT or iTT file and click Import. Final Cut Pro will automatically create a new caption role and populate the timeline with caption bubbles matching the timecodes in your file. The import takes only a few seconds, even for long files.
After importing, skim through the timeline to spot any captions that land too early, too late, or overlap with each other. Select any misaligned bubble and drag its edges to correct the timing, or enter exact values in the Caption inspector using the Start Time and Duration fields.
Step 3. Auto-caption with Transcribe to Captions
Final Cut Pro’s Transcribe to Captions feature uses on-device machine learning to generate a full caption track from your audio automatically, saving significant time on long-form projects. This is one of the most practical additions to this final cut pro subtitles tutorial, but it works best when you treat the output as a starting point rather than a finished product.
Run the transcription on your clip or project
To run the transcription, right-click your primary storyline clip in the timeline and select Transcribe to Captions from the context menu. If you want to caption your entire project at once, select all clips in the timeline with Command+A before right-clicking. A dialog box will appear asking you to confirm the language and whether you want Final Cut Pro to insert the captions into the active project or a separate role. Choose your target language, then click Transcribe.
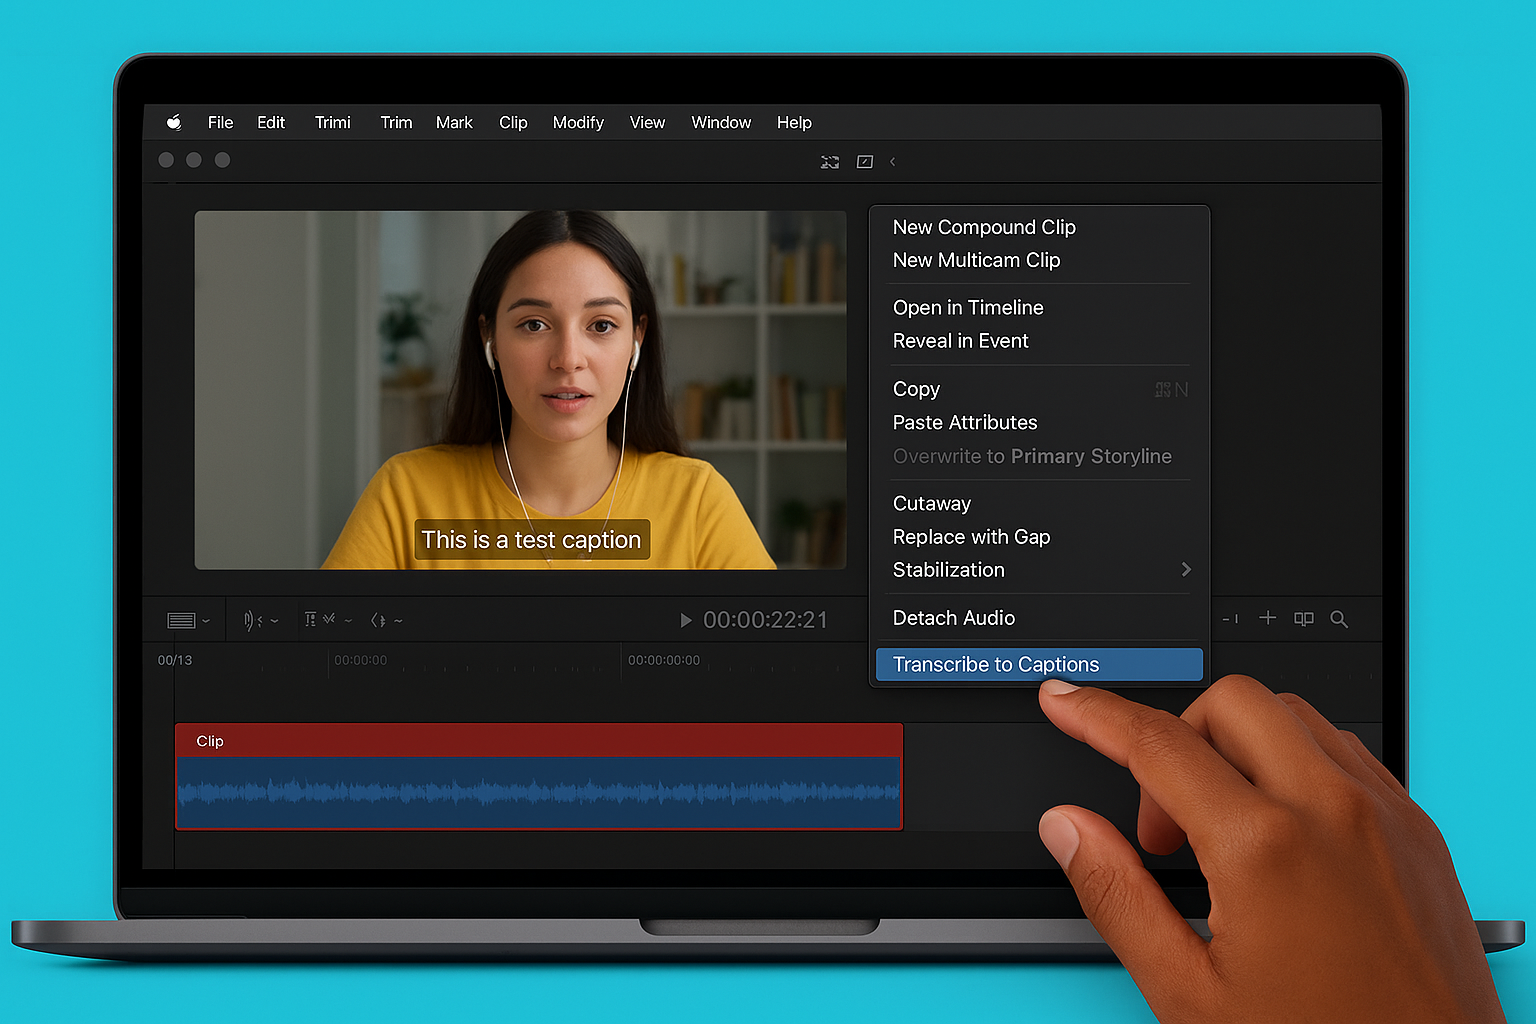
The transcription runs entirely on your Mac using Apple Silicon’s Neural Engine, so no audio is sent to external servers, which matters when working with confidential legal or medical content.
Final Cut Pro will process the audio and automatically populate your timeline with caption bubbles timed to match the speech. Processing time depends on clip length and your hardware, but most editors see results within a minute or two for standard-length videos.
Review and correct the output
Automatic transcription is not production-ready without a manual review pass. Background noise, overlapping speakers, strong accents, technical terminology, and medical or legal vocabulary all increase the error rate. After the transcription completes, play through your timeline from the beginning and compare each caption bubble against the actual audio.
Select any caption bubble that contains an error or timing issue and edit it directly in the inspector’s text field, or drag the bubble edges to fix the timing. Pay particular attention to proper nouns, brand names, drug names, and legal terms, since these consistently trip up AI transcription tools. For any project where accuracy is a compliance requirement, such as healthcare training videos or government communications, plan on a full line-by-line review before you consider the captions final.
Use this quick correction checklist as you work through the timeline:
- Correct misspelled proper nouns and technical terms
- Fix captions that cut off mid-sentence due to brief audio pauses
- Merge or split bubbles where the auto-timing creates awkward breaks
- Remove duplicate words caused by repeated speech or stuttering
- Confirm speaker-change labels if your content includes multiple voices
Edit, style, and time subtitles fast
Once your captions are in the timeline, the real work begins. Whether you built them manually, imported an SRT file, or used AI transcription, every caption track needs editing before it’s ready to deliver. This section of the final cut pro subtitles tutorial covers the fastest, most reliable ways to adjust timing, apply consistent styling, and move through corrections without slowing down your edit.
Adjust timing across multiple captions at once
Final Cut Pro lets you select and move a group of caption bubbles simultaneously, which is essential when your audio edit shifts and your entire caption track falls out of sync. Hold Shift and click to select a range of captions in the timeline, then drag them left or right as a unit. For precise nudging, use the comma and period keys to shift selected captions one frame at a time, or type exact timecode values into the Start Time field in the Caption inspector.
If you need to close a gap or tighten spacing across many captions, select the captions you want to adjust, open the Edit menu, and use Trim End or Trim Start to shorten or extend bubbles without affecting adjacent ones. This approach saves considerable time compared to dragging each bubble individually on a long timeline.
Style your captions with the inspector
You apply font, size, color, and position changes through the Caption inspector on the right side of the interface. Select any caption bubble, then look for the Text Style options in the inspector panel. From here, you can change the typeface, adjust the font size, and set text color to meet your delivery platform’s requirements.
For broadcast or Section 508–compliant projects, keep your font size at a minimum of 18pt and maintain strong contrast between the text color and background to meet accessibility standards.
Use the position controls in the inspector to move captions from the default bottom-center placement if your video has lower-third graphics or on-screen text that would overlap. Most delivery specs expect bottom-center placement, so only move captions when a specific visual conflict makes it necessary. Apply a consistent style across all captions by selecting all bubbles with Command+A and setting your preferred text attributes once rather than adjusting each caption one by one.
Use keyboard shortcuts to speed up corrections
Keyboard shortcuts cut caption editing time significantly. Here are the most useful shortcuts to keep within reach:
| Action | Shortcut |
|---|---|
| Add new caption at playhead | Option+C |
| Move to next caption | Control+Right Arrow |
| Move to previous caption | Control+Left Arrow |
| Nudge caption one frame right | Period (.) |
| Nudge caption one frame left | Comma (,) |
| Select all captions | Command+A |
| Open inspector | Command+4 |
Running through your timeline using Control+Arrow to jump between captions keeps your hands off the mouse and your corrections moving quickly. Combine this with the period and comma nudge keys and you can refine an entire caption track without lifting your fingers from the keyboard.
Export subtitles and avoid common mistakes
Getting your captions into the timeline is only part of the job. How you export your captions determines whether they survive the delivery process intact or disappear completely when your video reaches its destination. This final step of the final cut pro subtitles tutorial covers the export settings that matter and the mistakes that waste hours of correction work.
Choose the right export format for your platform
Final Cut Pro gives you two ways to export captions: burned-in (open captions) that are permanently embedded in the video frame, and sidecar files that travel alongside the video as separate caption files. Burned-in captions work for any platform but cannot be turned off by the viewer. Sidecar files give viewers control and are required by platforms like YouTube, Vimeo, and most broadcast delivery systems.
If you burn captions into your video for a platform that also accepts a sidecar file, viewers with assistive technology may experience duplicate or conflicting caption display.
To export with a sidecar file, go to File > Share > Master File and click the Settings tab. Under the Roles section, confirm your caption role is set to "Subtitles File" rather than burned in. Final Cut Pro will export an SRT or iTT file alongside your video. Use this table to match your export format to your delivery destination:
| Delivery Platform | Recommended Format | Export Method |
|---|---|---|
| YouTube | SRT sidecar | Master File + Subtitles File role |
| Apple TV / iTunes | iTT sidecar | Master File + Subtitles File role |
| Broadcast / DVD | CEA-608 embedded | Compressor or Master File |
| Social media (burned in) | Open captions | Master File, burn in role |
| Section 508 delivery | SRT or iTT sidecar | Master File + Subtitles File role |
Avoid the most common captioning mistakes
Even well-timed captions fail at delivery if you overlook a few common errors. Reviewing this list before you export saves you from sending a project back through the pipeline after client review.
Watch for these mistakes before finalizing any caption track:
- Overlapping timecodes: Two captions occupying the same time range will cause display errors on most platforms
- Missing line breaks that push text beyond two lines per caption bubble
- UTF-8 encoding errors in imported SRT files that corrupt accented or non-Latin characters
- Frame rate mismatches between the caption file and the timeline that cause gradual drift
- Caption roles left set to "burn in" when the platform expects a separate sidecar file
- Captions that extend beyond the last frame of the video clip they reference
Wrap-up and next steps
This final cut pro subtitles tutorial has walked you through every method available in the app: manual caption entry, SRT and iTT file imports, and the AI-powered Transcribe to Captions workflow. You now know how to pick the right caption format for your project, set up your timeline correctly, style your text, and export without losing your caption track on delivery.
For straightforward projects with clean audio and English-only content, Final Cut Pro gives you solid tools to get the job done. For anything involving multiple languages, legal or medical accuracy, Section 508 compliance, or broadcast delivery standards, the stakes are too high to rely on AI output alone. Professional captioners and translators catch the errors that automated tools miss.
If your project requires certified subtitling, multilingual captions, or accessibility-compliant caption files, our team is ready to help. Contact Languages Unlimited to discuss your project requirements directly.