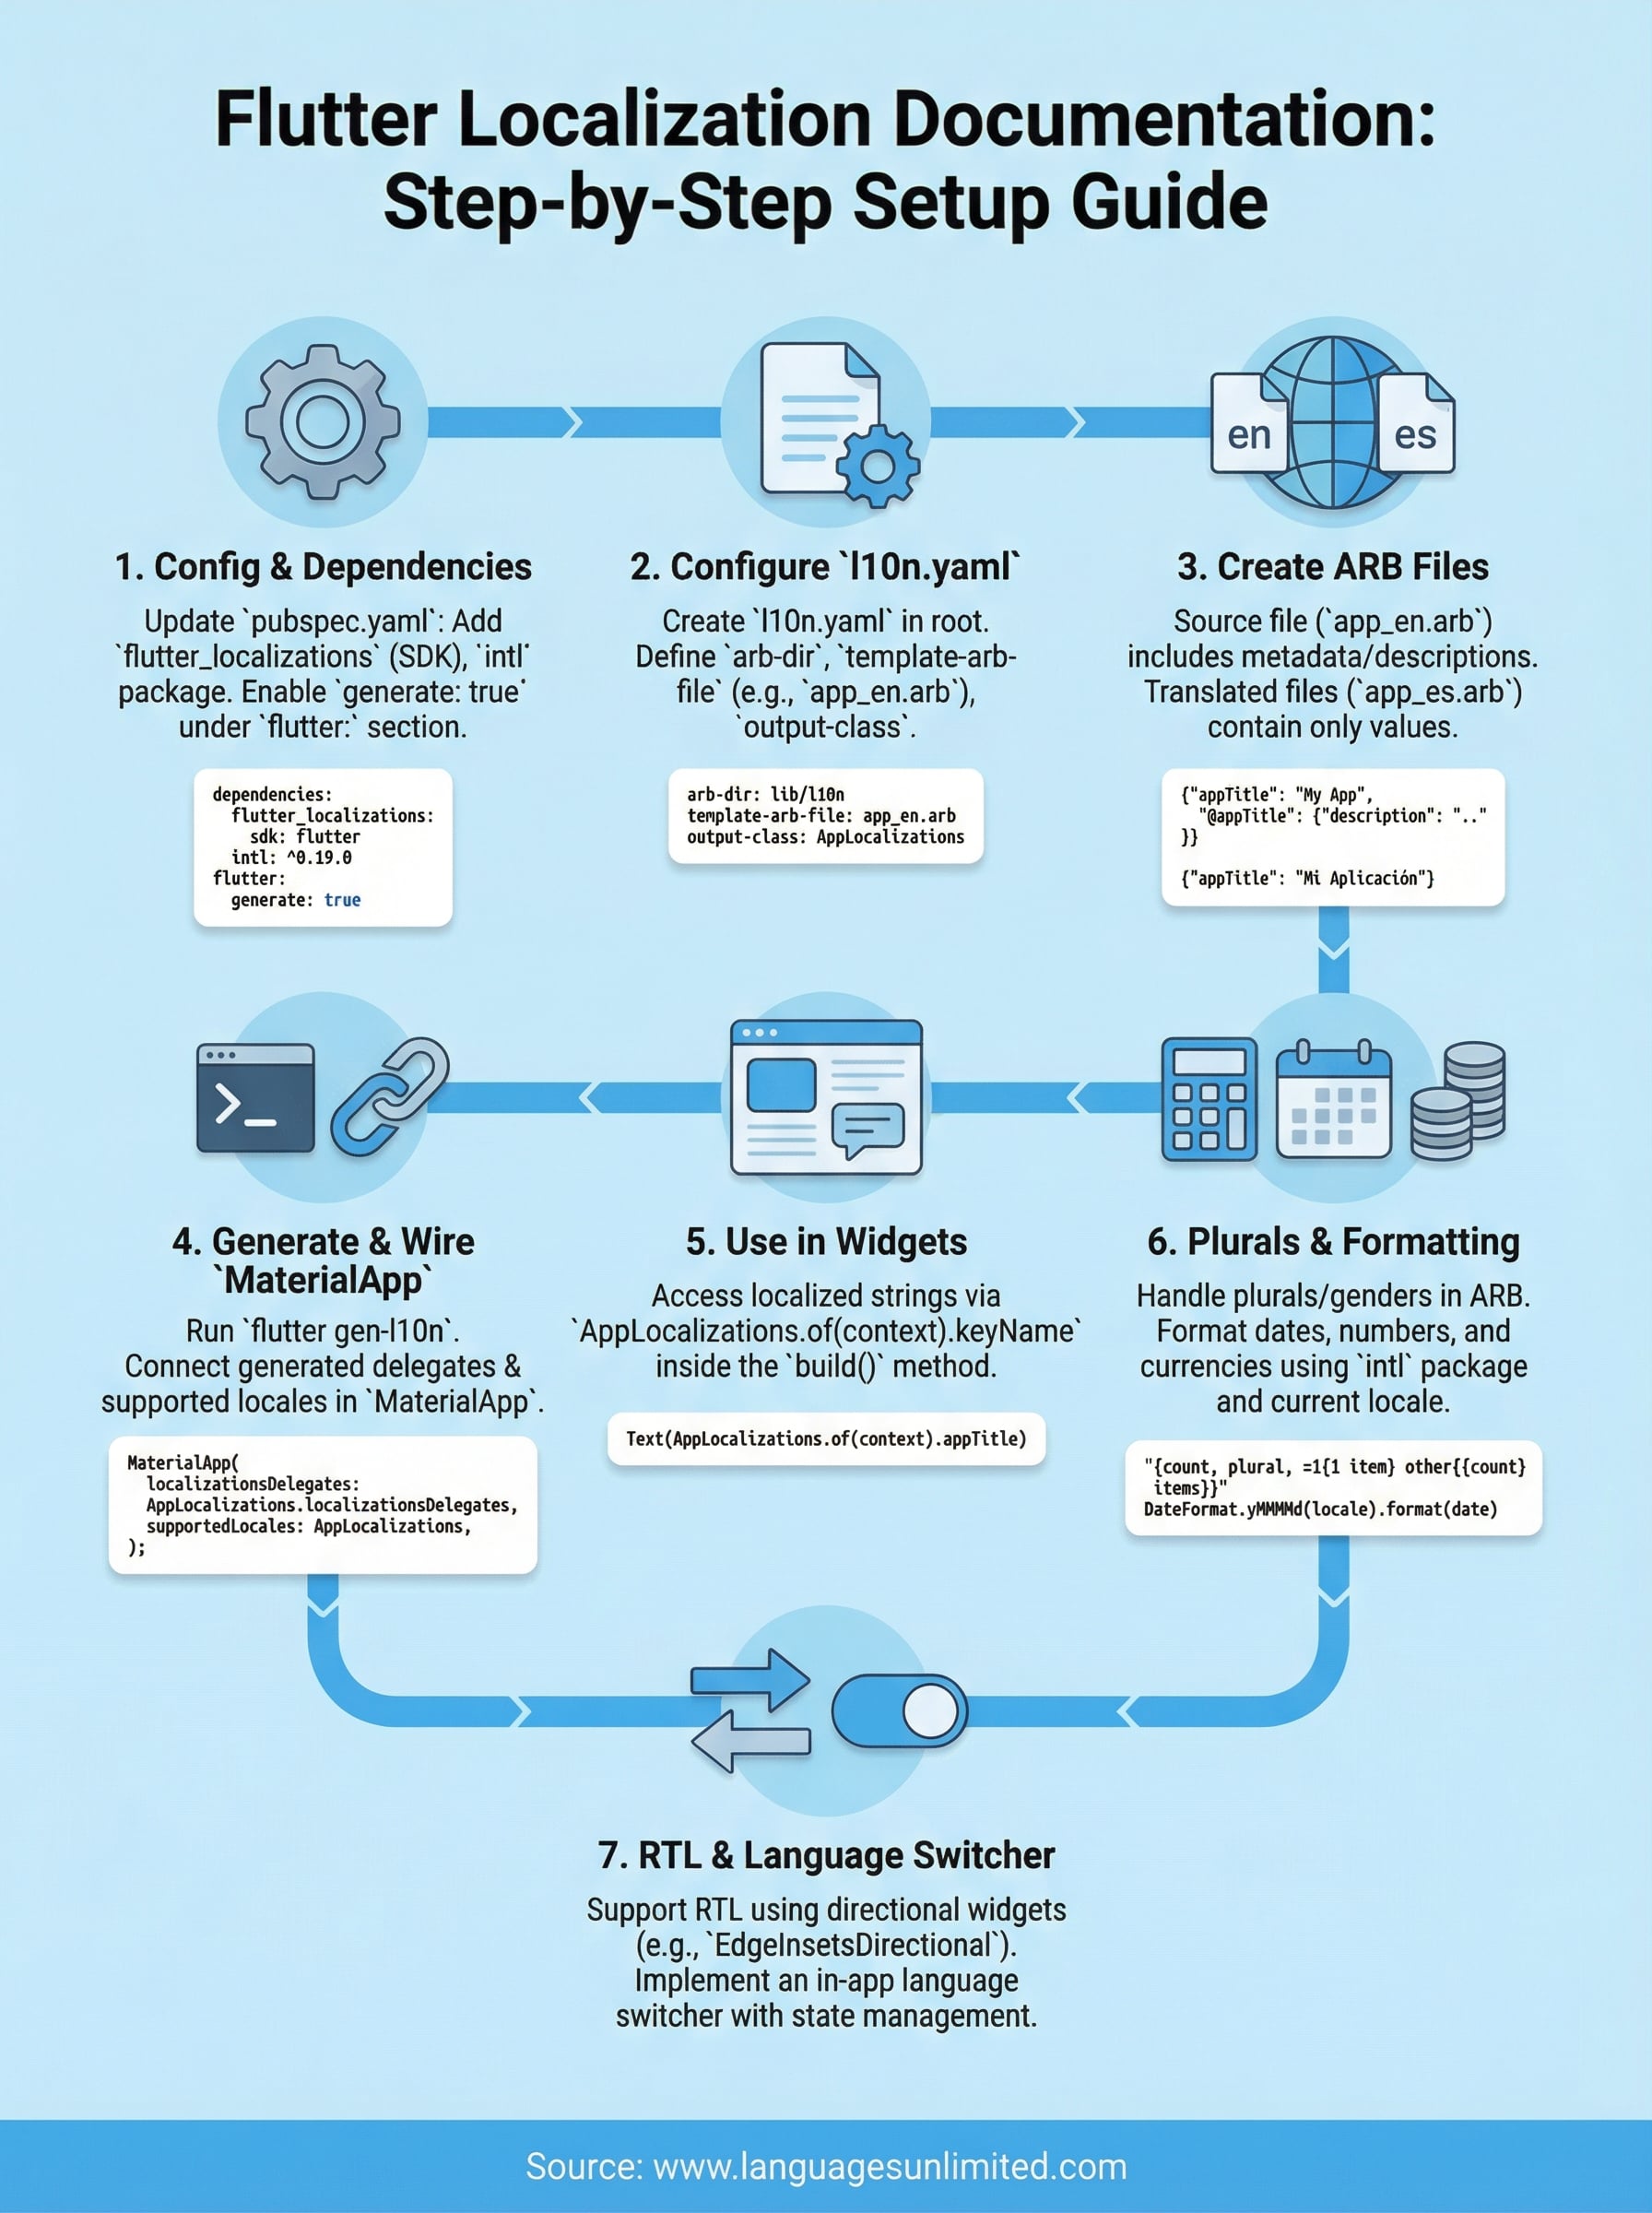
Getting your Flutter app to speak multiple languages starts with one thing: understanding the flutter localization documentation and how to actually implement it. Flutter’s built-in internationalization (i18n) tooling gives developers a structured way to adapt apps for different locales, from translating UI strings to formatting dates, numbers, and currencies correctly. But the official docs can feel scattered, and piecing together a working setup from multiple sources wastes time.
At Languages Unlimited, we’ve spent over 30 years helping organizations communicate across languages, from certified document translation to large-scale multilingual staffing. We understand that localization isn’t just a developer task; it’s a bridge between your product and the people using it. The technical implementation in Flutter is one half of that equation. High-quality, culturally accurate translations are the other.
This guide walks you through the complete Flutter localization setup, step by step. You’ll learn how to configure dependencies, create ARB translation files, generate localized code, handle locale switching, and manage locale-specific formatting. Whether you’re adding a second language or scaling to dozens, this article gives you a clear path from zero to a fully localized Flutter app.
What Flutter localization includes and what you need
Flutter localization is a system built on top of Dart’s intl package and Flutter’s own flutter_localizations library. When you follow the flutter localization documentation, you’re working with a pipeline that takes human-readable translation files, processes them with a code generator, and outputs typed Dart classes you can call directly in your widgets. The result is a strongly typed, IDE-friendly way to manage every string, date format, plural form, and currency value across all the languages your app supports.
The core components of Flutter localization
Flutter’s localization system has three moving parts that work together. First, you write ARB (Application Resource Bundle) files, which are JSON-like files that store your translated strings and metadata. Second, the gen-l10n tool reads those ARB files and generates Dart code automatically. Third, Flutter’s MaterialApp widget uses delegate classes to load the right translations at runtime based on the device’s locale settings.
The generated Dart code gives you compile-time safety, so a missing translation key causes a build error rather than a silent runtime bug.
Your app also relies on locale delegates to handle system-level translations for widgets like date pickers, input decorators, and form validators. Flutter ships with delegates for Material, Cupertino, and Widgets layers, and the intl package adds formatting support for numbers, dates, and currencies across hundreds of locales.
Prerequisites before you start
Before writing a single line of localization code, make sure your environment and project meet these requirements:
| Requirement | Minimum version or detail |
|---|---|
| Flutter SDK | 3.0 or later (3.16+ recommended) |
| Dart SDK | 2.17 or later |
| IDE | VS Code or Android Studio with Flutter plugin |
flutter_localizations |
Included in Flutter SDK, no separate install |
intl package |
Add manually via pubspec.yaml |
You also need a clear plan for which locales your app will support before you build the file structure. Each locale requires its own ARB file, so naming them consistently from day one prevents painful refactoring later. The standard naming pattern is app_en.arb for English, app_es.arb for Spanish, and so on, using BCP 47 language tags as suffixes.
What you do not need
Some developers reach for third-party localization packages before trying Flutter’s built-in tooling, which adds unnecessary complexity. Flutter’s native gen-l10n pipeline handles plurals, gender selections, named placeholders, and date formatting without extra dependencies. You do not need a separate state management library just for locale switching either. Flutter’s Localizations.of(context) lookup and a simple ValueNotifier or ChangeNotifier are enough for most apps.
The only external dependency you genuinely need is the intl package from the Dart team, which powers number formatting, date formatting, and bidirectional text utilities. Everything else in this guide uses tools already bundled with your Flutter installation. Keeping your dependency tree lean here also reduces build times and eliminates version conflict headaches as Flutter evolves.
Step 1. Add dependencies and enable localization generation
Two changes to your project unlock Flutter’s entire localization pipeline: adding the right packages to pubspec.yaml and turning on the code generation flag. The flutter localization documentation recommends this as your starting point because every subsequent step depends on these settings being correct. Skip either one and the gen-l10n tool either won’t run or won’t produce the output files your app needs.
Update pubspec.yaml with the required packages
Open your project’s pubspec.yaml and add flutter_localizations as a Flutter SDK dependency and intl as a standard package dependency. Both belong under the dependencies key, not dev_dependencies, because your app needs them at runtime.

dependencies:
  flutter:
    sdk: flutter
  flutter_localizations:
    sdk: flutter
  intl: ^0.19.0
After saving the file, run flutter pub get in your terminal to fetch the packages. The intl package version you specify here must stay consistent with whatever Flutter’s own internal intl reference expects. Run flutter pub deps | grep intl to confirm there are no version conflicts before moving on.
If you see a version conflict after running
flutter pub get, check the Flutter release notes for the exactintlversion that matches your SDK.
Enable the generate flag in pubspec.yaml
Flutter’s code generator does not run automatically unless you explicitly tell it to. Add the generate: true flag under the flutter section of your pubspec.yaml. This single line activates the gen-l10n tool whenever you run flutter pub get or flutter run.
flutter:
  generate: true
  uses-material-design: true
Place generate: true at the same indentation level as uses-material-design. Getting the indentation wrong causes Flutter to silently ignore the flag, which means no localization files get generated and you’ll spend time debugging a setup issue rather than building features. Once both changes are saved and flutter pub get has run successfully, your project is ready for the next configuration step.
Step 2. Configure the gen-l10n tool with l10n.yaml
The gen-l10n tool reads a single configuration file called l10n.yaml to know where your ARB files live, where to write the generated Dart code, and how to name the output class. Without this file, the tool falls back to defaults that rarely match a real project’s folder structure. Creating it explicitly gives you full control over the generation pipeline and makes the setup reproducible across your team.
Create the l10n.yaml file in your project root
Place l10n.yaml at the root of your Flutter project, at the same level as pubspec.yaml. The flutter localization documentation specifies this location because that’s where the tooling looks first when you run flutter gen-l10n or trigger generation through flutter run.
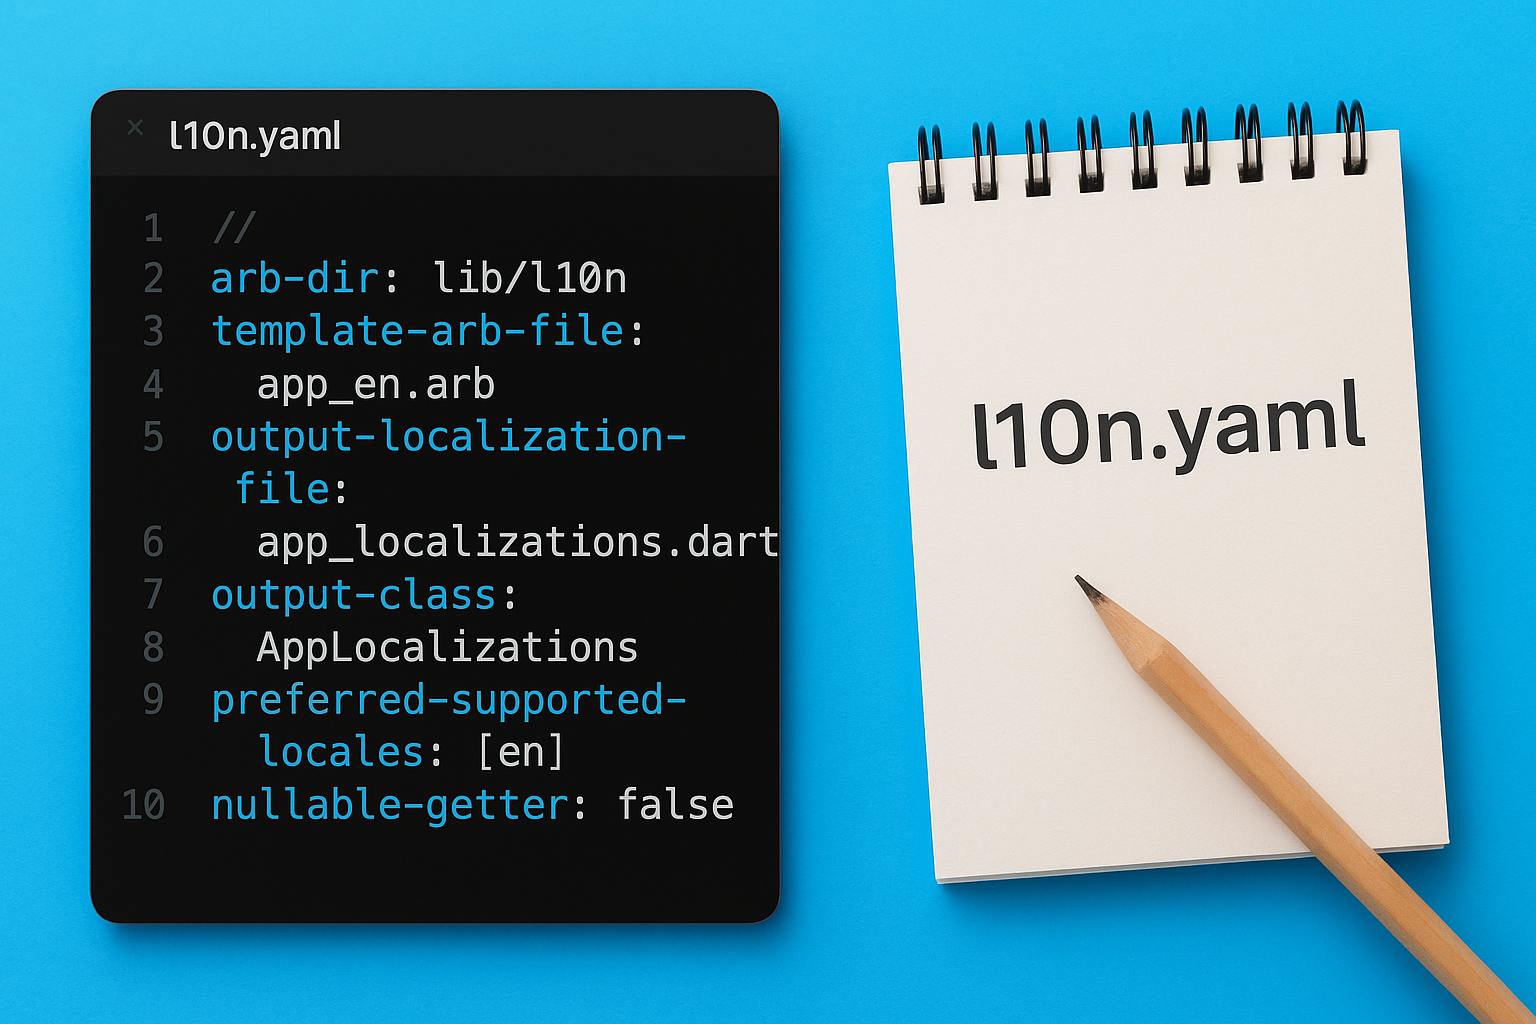
Here is a complete l10n.yaml file you can copy directly into your project:
arb-dir: lib/l10n
template-arb-file: app_en.arb
output-localization-file: app_localizations.dart
output-class: AppLocalizations
preferred-supported-locales: [en]
nullable-getter: false
Each line controls a specific behavior. The arb-dir key tells the tool where your translation files live, and template-arb-file points to the English ARB file that acts as the source of truth for all keys. The output-localization-file and output-class keys set the filename and class name of the generated Dart code, which you’ll import into your widgets later.
Setting
nullable-getter: falsemakes the generatedAppLocalizations.of(context)method return a non-nullable type, which eliminates null checks throughout your widget tree.
Key configuration options and what they control
The table below covers the options you’re most likely to adjust as your project grows:
| Option | What it controls | Recommended value |
|---|---|---|
arb-dir |
Folder containing your ARB files | lib/l10n |
template-arb-file |
Source ARB file with all keys | app_en.arb |
output-class |
Name of the generated Dart class | AppLocalizations |
nullable-getter |
Whether of(context) returns nullable |
false |
preferred-supported-locales |
Locale used as the app fallback | [en] |
After saving l10n.yaml, run flutter gen-l10n from your terminal to confirm the configuration is valid before adding your ARB files in the next step.
Step 3. Create ARB files that scale as your app grows
ARB files are where your actual translations live, and structuring them well from the start saves you significant cleanup work later. Each file maps to one locale and contains a flat JSON object with string keys, translation values, and optional metadata. The flutter localization documentation recommends keeping one ARB file per language, with the English file serving as your template that defines all keys.
Understanding ARB file structure
Your template file, app_en.arb, needs two things for each entry: the translation string itself and a metadata block prefixed with @. The metadata block is where you declare placeholders, plural rules, and descriptions that help translators understand context. Without descriptions, translators working on your non-English files have no way to know where a string appears or how it’s used.
Here is a solid starting template for lib/l10n/app_en.arb:
{
  "@@locale": "en",
  "appTitle": "My App",
  "@appTitle": {
    "description": "The title of the application shown in the app bar"
  },
  "welcomeMessage": "Welcome, {userName}!",
  "@welcomeMessage": {
    "description": "Greeting shown on the home screen after login",
    "placeholders": {
      "userName": {
        "type": "String",
        "example": "Alex"
      }
    }
  }
}
Always fill in the
descriptionfield for every key. Translators working onapp_es.arborapp_fr.arbrely on those descriptions to produce accurate, in-context translations.
Your non-English files, like app_es.arb, only contain the translated values. They do not repeat the @ metadata blocks, since the generator reads metadata exclusively from the template file.
{
  "@@locale": "es",
  "appTitle": "Mi Aplicación",
  "welcomeMessage": "¡Bienvenido, {userName}!"
}
Organizing keys for a growing project
Key naming is the most important structural decision you make in your ARB files. Use a consistent naming pattern from day one, grouping related strings by screen or feature using a prefix like home, auth, or settings. For example, homeTitle, homeSubtitle, and authLoginButton are immediately readable and easy to filter.
Avoid generic key names like button1 or label3, which become impossible to maintain once your app has hundreds of strings across a dozen screens.
Step 4. Generate localization code and wire up MaterialApp
Once your l10n.yaml and ARB files are in place, the flutter localization documentation directs you to generate the Dart code that ties everything together. This step produces the typed AppLocalizations class your widgets will call, and it configures MaterialApp so Flutter knows which locales your app supports and how to load them at runtime.
Run the code generator
Run the following command from your project root to trigger the gen-l10n tool and produce the localization output files:
flutter gen-l10n
Flutter writes the generated output files to a .dart_tool/flutter_gen/gen_l10n/ directory by default, or to the path you specified in l10n.yaml. You will see at minimum two files: app_localizations.dart and one delegate file per locale, such as app_localizations_en.dart and app_localizations_es.dart. If the command completes without errors, your ARB file structure is valid and the generator found your template correctly.
Re-run
flutter gen-l10nevery time you add a new key to your ARB files; the generated code will not update automatically until you do.
Wire up MaterialApp with delegates and supported locales
Your generated AppLocalizations class exposes two static properties that MaterialApp needs: localizationsDelegates and supportedLocales. Open your main.dart file and update the MaterialApp widget to include both, along with the standard Flutter delegates for system-level widget translations.

import 'package:flutter_localizations/flutter_localizations.dart';
import 'package:flutter_gen/gen_l10n/app_localizations.dart';

MaterialApp(
  localizationsDelegates: const [
    AppLocalizations.delegate,
    GlobalMaterialLocalizations.delegate,
    GlobalWidgetsLocalizations.delegate,
    GlobalCupertinoLocalizations.delegate,
  ],
  supportedLocales: AppLocalizations.supportedLocales,
  home: const HomeScreen(),
);
The AppLocalizations.supportedLocales list is generated automatically based on the ARB files the tool found in your arb-dir. You do not need to maintain that list by hand. Adding a new ARB file and re-running the generator updates supportedLocales for you, which means your MaterialApp configuration stays accurate without any manual edits as you expand your language support.
Step 5. Use localized strings in widgets the right way
With your MaterialApp wired up, every widget in your tree can now access translated strings through Flutter’s BuildContext. The pattern is simple: you call AppLocalizations.of(context) inside a build method to get the typed localization object, then access your keys as properties on that object. Getting this call right every time is what separates a clean localization architecture from a fragile one littered with null checks and repeated lookups.
Access AppLocalizations through the build context
You retrieve the localization object by passing the current context to the static of method that the generator created for you. Because you set nullable-getter: false in l10n.yaml, this method returns a non-nullable AppLocalizations instance, which means you can use it immediately without defensive null checks. Place the call at the top of your build method and assign it to a local variable so you only look it up once per rebuild.
@override
Widget build(BuildContext context) {
  final l10n = AppLocalizations.of(context);

  return Scaffold(
    appBar: AppBar(
      title: Text(l10n.appTitle),
    ),
    body: Center(
      child: Text(l10n.welcomeMessage(userName)),
    ),
  );
}
Assign
AppLocalizations.of(context)to a local variable at the top ofbuildrather than calling it inline for every string; this keeps your code readable and avoids redundant context lookups.
Avoid common widget-level mistakes
The flutter localization documentation flags one mistake repeatedly: calling AppLocalizations.of(context) outside a build method, such as in initState or inside an async function. Those contexts are not guaranteed to have a valid Localizations widget ancestor, which causes a runtime exception. If you need a translated string outside the widget lifecycle, pass it in as a parameter from a build call rather than fetching it directly.
Another common issue is storing the localization object as a class-level field. Do not cache AppLocalizations.of(context) in initState or as an instance variable. Locales can change at runtime when a user switches languages, and a stale cached reference means your widget shows the wrong language until it rebuilds. Always fetch it fresh inside build.
Step 6. Handle plurals, selections, and dynamic placeholders
The flutter localization documentation dedicates significant attention to plurals, selections, and dynamic placeholders because these are where most localization breaks happen in production. Different languages have different plural rules; Russian has four plural forms, Arabic has six, and English has two. If you hard-code plural logic in Dart, your app will display grammatically wrong text the moment you add a language that doesn’t follow English rules. Flutter’s ARB format handles all of this through the ICU message syntax, which offloads the plural and selection logic to the translation file rather than your widget code.
Define plural forms directly in your ARB file
You declare plural rules inside the placeholders metadata block using the {count, plural, ...} ICU syntax. The gen-l10n tool reads this syntax and generates a Dart method that accepts the count as a parameter and returns the correct form at runtime. Your widget calls one method; the plural logic lives entirely in the translation file.
Here is a working example for an item count string:
{
  "itemCount": "{count, plural, =0{No items} =1{One item} other{{count} items}}",
  "@itemCount": {
    "description": "Shows the number of items in the cart",
    "placeholders": {
      "count": {
        "type": "int",
        "example": "3"
      }
    }
  }
}
In your widget, you call l10n.itemCount(cartItems.length), and Flutter picks the right form automatically based on the count value.
Always include the
=0case explicitly in your plural strings; relying onotherfor zero often produces awkward output like "0 items" instead of a more natural phrase.
Use selection messages for gender and conditional text
Selection messages follow the same ICU pattern but branch on a string value instead of a number. This is useful for gender-aware sentences or any text that switches based on a discrete category. You define it with {variable, select, ...} syntax, and each branch maps a specific string value to its translation.
{
  "genderGreeting": "{gender, select, male{Welcome, sir.} female{Welcome, ma'am.} other{Welcome.}}",
  "@genderGreeting": {
    "description": "Greeting that adapts based on selected gender",
    "placeholders": {
      "gender": {
        "type": "String"
      }
    }
  }
}
Call it in your widget with l10n.genderGreeting(userGender) where userGender is a string like "male" or "female". The generator creates a typed method for you, so adding or removing a branch in the ARB file is all you need to do without touching any widget code.
Step 7. Localize dates, times, numbers, and currency
Raw dates and numbers break localization more quietly than missing strings do. A user in Germany expects 1.234,56 € where a US user sees $1,234.56, and a date like 03/04/2026 means March 4th in the US but April 3rd in most of Europe. The flutter localization documentation covers this through the intl package, which you already added in Step 1. The DateFormat and NumberFormat classes read the active locale from your app context and format values correctly without any manual locale detection code in your widgets.
Format dates and times with DateFormat
You access DateFormat by importing package:intl/intl.dart and passing the current locale string to the constructor. The Localizations.localeOf(context).toString() call returns the active locale, which you feed directly into the formatter. This keeps your formatting automatically in sync with whatever locale the user has selected, including after an in-app language switch.
import 'package:intl/intl.dart';

final locale = Localizations.localeOf(context).toString();
final dateFormatter = DateFormat.yMMMMd(locale);
final timeFormatter = DateFormat.jm(locale);

Text(dateFormatter.format(DateTime.now())); // e.g., "March 31, 2026" in en, "31 mars 2026" in fr
Text(timeFormatter.format(DateTime.now())); // e.g., "2:30 PM" in en, "14:30" in fr
Use named constructors like
DateFormat.yMMMMd()instead of pattern strings likeDateFormat('MM/dd/yyyy')so the output adapts to locale conventions rather than locking in a single format.
Format numbers and currency with NumberFormat
Currency formatting follows the same pattern. Pass your locale string and the ISO 4217 currency code to NumberFormat.simpleCurrency(), and the formatter handles symbol placement, decimal separators, and thousands grouping automatically. For plain numbers, NumberFormat.decimalPattern(locale) covers locale-aware digit grouping without any currency symbol.
final currencyFormatter = NumberFormat.simpleCurrency(
  locale: locale,
  name: 'USD',
);

final numberFormatter = NumberFormat.decimalPattern(locale);

Text(currencyFormatter.format(1234.56)); // "$1,234.56" in en, "1.234,56 $" in de
Text(numberFormatter.format(9876543));   // "9,876,543" in en, "9.876.543" in de
Always pass the locale string explicitly to every formatter constructor rather than relying on the system default, because the system default can differ from the locale your app is currently displaying.
Step 8. Support RTL layouts and locale-aware UI behavior
Right-to-left (RTL) layout support is not optional when you target Arabic, Hebrew, Farsi, or Urdu speakers. The flutter localization documentation covers this through Flutter’s Directionality widget and the TextDirection API, and the good news is that most of the RTL work happens automatically once your MaterialApp is configured correctly. When you list an RTL locale in supportedLocales and the device switches to that locale, Flutter flips padding, alignment, icon directions, and scroll behavior without any widget-level changes from you.
Verify your layout uses direction-aware properties
The most important step you can take is replacing hardcoded directional properties with their direction-aware counterparts throughout your widget tree. If you use EdgeInsets.only(left: 16), that padding stays on the left side regardless of locale. Swap it for EdgeInsetsDirectional.only(start: 16), and Flutter moves it automatically to the correct side based on the active text direction.
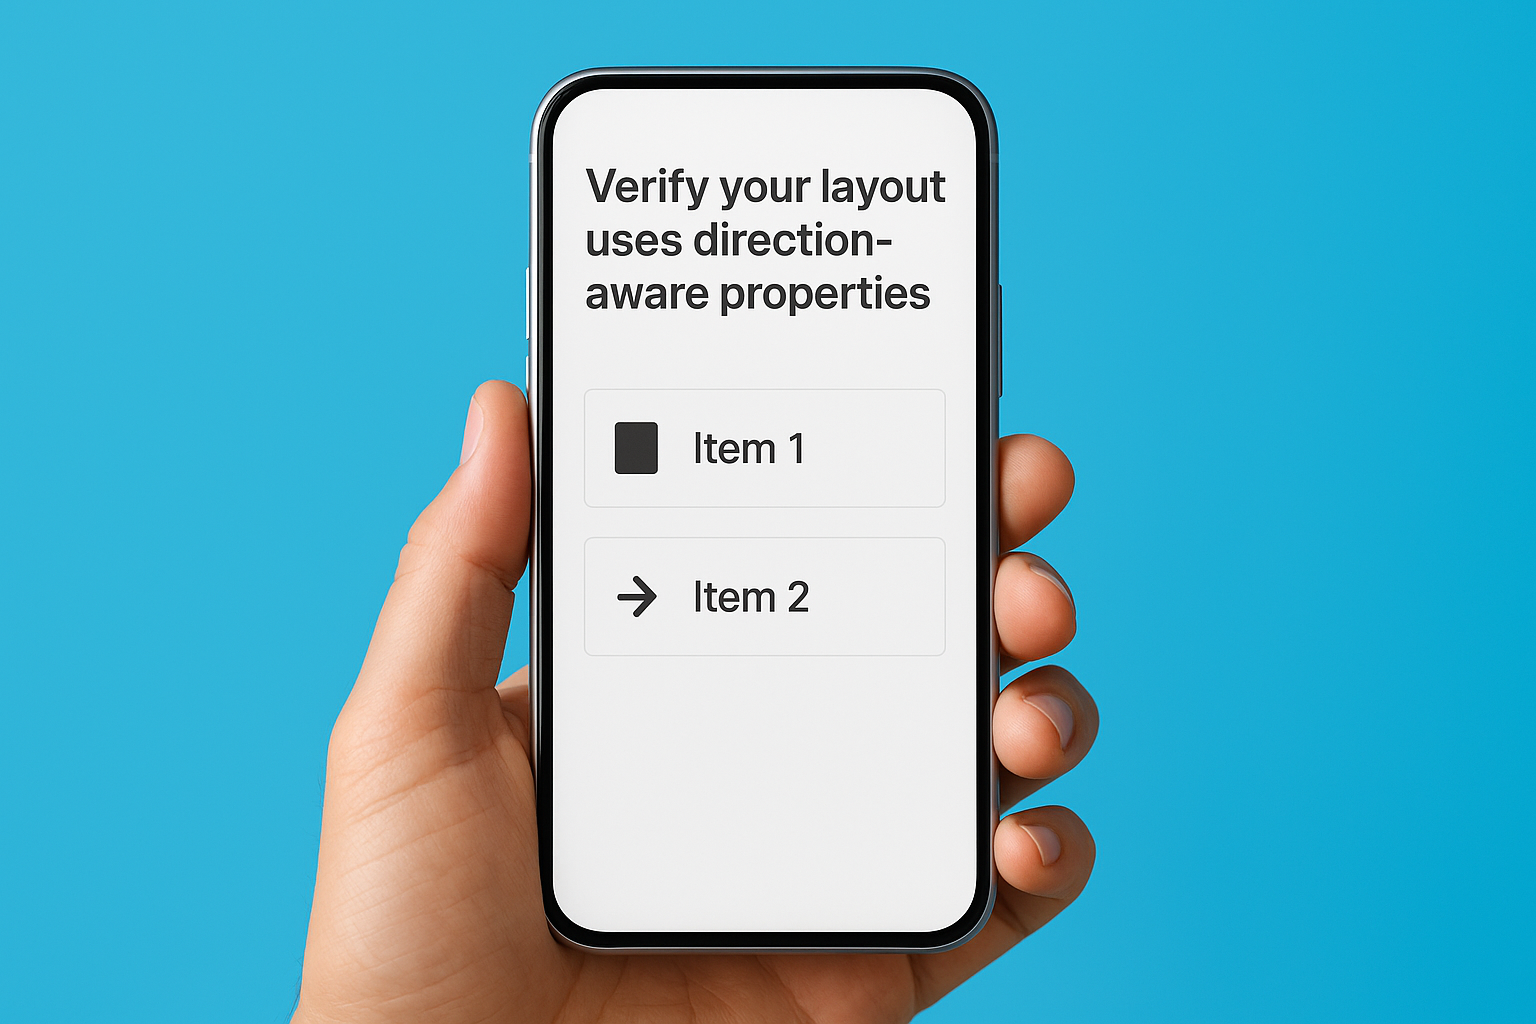
// Avoid this
padding: const EdgeInsets.only(left: 16, right: 8),

// Use this instead
padding: const EdgeInsetsDirectional.only(start: 16, end: 8),
Apply the same swap to Alignment vs AlignmentDirectional, and CrossAxisAlignment.start vs custom alignments that assume left-to-right order. Run your app in an RTL locale during development to catch any direction-sensitive layout issues before they reach users.
Test your app with Arabic or Hebrew set as the device language on both Android and iOS emulators; screenshots reveal directional layout bugs that code review misses.
Read the active text direction when you need manual control
Some layouts require you to make decisions based on the current text direction, such as placing a custom icon on the leading side of a list tile or animating a drawer from the correct edge. Use Directionality.of(context) to read the active TextDirection value directly from the widget tree without any additional setup.
final textDirection = Directionality.of(context);
final isRTL = textDirection == TextDirection.rtl;

Icon(
  isRTL ? Icons.arrow_back : Icons.arrow_forward,
)
This pattern keeps your direction logic context-driven rather than tied to a hardcoded locale check, so it continues working correctly if you add new RTL locales later without touching the widget code again.
Step 9. Add an in-app language switcher and persist it
The flutter localization documentation describes how Flutter resolves the active locale from the device, but many apps need to let users pick a language directly inside the app. You implement this by lifting the locale state above MaterialApp and rebuilding the widget tree when the user makes a selection. The pattern requires three things: a state holder for the current locale, a way to pass that locale into MaterialApp, and a mechanism to save the choice so it survives app restarts.
Store the selected locale with a ChangeNotifier
Create a LocaleNotifier class that extends ChangeNotifier and holds the current Locale value as a mutable field. When the user picks a new language, you update that field and call notifyListeners(), which triggers a rebuild of every widget listening to the notifier. Wrap your MaterialApp in a ListenableBuilder or use ChangeNotifierProvider if your project already uses the Provider package.
class LocaleNotifier extends ChangeNotifier {
  Locale _locale = const Locale('en');

  Locale get locale => _locale;

  void setLocale(Locale locale) {
    _locale = locale;
    notifyListeners();
  }
}
Pass the locale property directly into MaterialApp so Flutter uses your selection instead of the device default:
MaterialApp(
  locale: localeNotifier.locale,
  supportedLocales: AppLocalizations.supportedLocales,
  localizationsDelegates: AppLocalizations.localizationsDelegates,
  home: const HomeScreen(),
);
Call
setLocalefrom any settings screen widget by reading the notifier throughcontextand passing a newLocaleobject built from the user’s selection.
Persist the locale across app restarts
A language switch that resets on every cold start frustrates users. You save the selected locale by writing its language code to SharedPreferences when setLocale is called, and reading it back during app startup before the first frame renders.
Future<void> setLocale(Locale locale) async {
  _locale = locale;
  final prefs = await SharedPreferences.getInstance();
  await prefs.setString('selectedLocale', locale.languageCode);
  notifyListeners();
}

Future<void> loadSavedLocale() async {
  final prefs = await SharedPreferences.getInstance();
  final code = prefs.getString('selectedLocale');
  if (code != null) {
    _locale = Locale(code);
    notifyListeners();
  }
}
Call loadSavedLocale() in your main() function after WidgetsFlutterBinding.ensureInitialized() so the correct locale loads before the widget tree paints, preventing a visible flash of the default language on startup.
Next steps
You now have a complete picture of everything the flutter localization documentation covers, from adding dependencies and configuring l10n.yaml to handling plurals, RTL layouts, and locale persistence. Your app can support any language your users speak, and your architecture handles locale switching and formatting without brittle workarounds. Run through each step in order, test with at least two locales before shipping, and re-run flutter gen-l10n every time you add or rename a key.
One part of this guide that no tooling can handle for you is the quality of your translations themselves. A technically perfect ARB file with inaccurate or culturally tone-deaf translations still produces a poor user experience. Professional translators who understand your product’s context and your users’ expectations make the difference between a localized app and a well-localized one. If you need certified, accurate translations to populate your ARB files, get in touch with our translation team to discuss your project.